Talk:Majesty's Rest
7 Hero Update Makes This a Snore[edit]
Well, well, well; here I am reading all these special builds and strategy, and in the end I kill Rotscale and his group on Hard Mode using the amazing tactics of...run up the stairs and hit everything until it dies. Seriously guys, with the 7 hero update, this is easy, easy, easy. I used myself (warrior) with Hundred Blades, FGJ, Pain Inverter and "Save Yourselves!", 2 Spirit Spammers, 2 N/Rt healers (1 with Spoil Victor, 1 with Spiteful Spirit), Norgu as a Panic Mesmer for interrupts, and 2 E/Mo Ether Renewal protters with buckets of energy. Seriously, I just ran in and killed everything; wiped just the once, and that was only because I was messing around at the bottom of the stairs trying to pull. In the end I just manned-up and charged in. Problem solved. Andran Steel 02:32, 1 May 2011 (UTC)
- Indeed. I was cartographing the area so I wasn't even meaning (or needed) to kill him, but once I saw him I wanted to give it a try (I had heard he was "hard to kill", that's about it). 7-hero team from Temple of the Ages, I was Warrior. No runes or insignia on heroes. Completely ordinary builds: IAS+FGJ and sword adren skills on myself, two monks with hybrid heal/prot builds (couple of heal skills, couple of prots, hex and condition removal), another two melee with ordinary stuff, interrupt mesmer, necro (not MM, his role was mainly poison remover) and an Earth ele with elemental/melee wards. As described above, I got the Balthazar blessing and killed the wraiths separately. Wiped once when the phantoms appeared (I didn't know about them). On the second run pulled and killed phantoms, cleared the right-hand foes and several on the left before wiping (couldn't move the heroes properly from right to left past Rotscale, the melees basically stood there and did nothing). On the third run cleared the left and then just wore Rotscale down slowly. 92.80.78.222 19:31, 29 May 2011 (UTC)
- I can confirm that the setup Andran Steel used for his Warrior, utilising 7 Heroes, works phenominally well,. I wiped once as one then the other N/Rt went down but after that no more DP was earned by myself or my heroes and we successfully took out the Rotscale and his surrounding dragon minions then went on to VQ the rest of Majesty's rest without having to bother to go into the desert part. --The preceding unsigned comment was added by Dabheid Dunlaine (talk) at 08:13, 11 January 2012 (UTC).
can be soloed :)[edit]
--The preceding unsigned comment was added by RolandOfGilead (talk • contribs) at 12:50, 10 May 2011 (UTC).
- Doesn't work like it says .Dont even waste your time. --The preceding unsigned comment was added by 98.176.114.144 (talk • contribs) at 20:04, 17 June 2011 (UTC).
- To clarify above comments: You can indeed clear this area in HM with the Thackeray quest. However, it does not count for the vanquisher title. 69.249.223.63 18:24, 26 March 2012 (UTC)
[edit]
I recently found myself running though this area, I noted the temple etc, and accidentally also noticed...
The small shelter where the Scepter of Ore was found is in this section of the map, opposite the Temple and within sight of the ressurection shrine.
- Scepter of Orr is its name. Viruzzz 08:44, 19 November 2011 (UTC)
Some other tips[edit]
I am doing a Vanquish as a Ranger and with only Heroes and Henches. I tried all the Junk above, nothing worked, or even comes close. The assumption is that ANet made changes, so they no longer work. I was about to give up when late one night made a few discoveries, so here are the tips.
Take Ebon Vanguard Assassin Support and Sniper support. I am a level 10 in this, so if you are not, less damage. Even with these, I pretty much got no where untils I discovered some of the things below. I managed to kill all his support a couple of times, but just got wasted because too much death penalty. You can of course return to the shrine and have it removed, or bring consumables.
Take a monk or whatever with Rebirth. The frozen soil is a pain, but having this guy pinned back and some what safe can help. You can pin him and the team closer, but you be alert to get them out to safety. I am not sure this is necessary, but it seemed to work better than the other rezs, certainly, a touch rez wont work and I doubt that the half range will.
1: First get you health bonus (/kneel at the statue).
2: I pin the rebirth monk out of range, then the remainder of the team about the center. They still get hit there, but you can back them up when needed. The thing is that I want them close enough in case some one actually comes down the stairs and hopefully a heal while I am retreating.
3. Go to the end of the bridge, right side first. Here do NOT attack the Rotting dragon, hit the Skeleton Bowmaster with Sniper support. Watch for the damage. If and only if it hits for the big damage (592 as I recall), then hit again with assassin support. Most of the time, only these 2 are needed. Else, retreat and repeat. No one else is needed for this. One time, the two did not finish him and I returned with a 2nd sniper attack which did it.
NOTE: On the right side, you can at times position the post at the end of the bridge (behind the post) to block attacks from him. Saves some running. Sometimes not, and if a 2nd foe attacks, you have to retreat.
When retreating, you have to run pretty far back, else they keep attacking and can kill your heroes if they are pinned too close. When you get out of range, they usually quit attacking them.
Repeat this for the left side, but no bridge blocking here. Be prepared to Snipe and run. Once I had to do this 23 times before it hit the big number, so be patient. They want to cripple you too, so you need whatever armor or protections that you can muster up. If your monk is close enough, maybe a remove conditions.
4: Next ... another Skeleton Bowmaster. This seems a bit counter intuitive. The rotting dragons are closest and it seems you should be able to do the same with them. You can hit them, but the health and healing is just too high, I could not get it to work. Additionally, pulling doesn’t seem to work either.
By attacking the Skeleton Bowmaster (not the closest foe) and running, the Clerics chase you and come down the steps. I think that no matter how you approach the problems here, this seems to be the key (killing the clerics). This is where I pulled in my guys for an attack. I only let them come in when someone comes down the steps (and NOT Rotscale). Sometimes both would come. Sometimes after killing the cleric, a rotting dragon or something else would be pulled as well. Go after them only if they come down the steps. Even here, be prepared to retreat. The farther that you can pull them, the better off you are.
If a few party members are dead, get out and let you Rebirth monk get them up. This too can be a pain, but almost always with some patience, you can reform the party for another run at them.
Repeat this right then left sides.
NOTE: At times they position themselves to where you have to run up to far .. or whatever. I used the Assassin Support to hit someone which got them all to move and reposition.
I am doing this from memory, so, I think that the two Skeleton bowmasters pulled down the steps as well. So at some point here, you have to do the Sniping on them again. I dont recall where in this process that I killed them. Regardless, its whenever you can do the Sniping thing on them.
5: By the time I had done this, all that remained were Rotscale, two Rotting Dragons, and the Necrid horsemen (2 I think it was). Back to
Sniping. The Horsemen don’t seem to heal, so it was just repeating until they were both gone.
6: With all the support now gone, the two rotting dragons were not too hard to take out. Only Rotscale remains.
7: Almost forgot, the Wraiths. Now, I pinned everyone back just behind the bridge, so that when the Wraith spawn, my guys would be ready for them. Spread them out. I expected to die when I ran up to triger them, but did not. With only Rotscale there, I did not get zapped in the first attack, so I ran back to help the crew.
8: Rotscale. By now, you probably wont have much trouble. Your heroes should all be in pretty good health since they have had very little to do. I ran everyone up the left side. I pinned the rebirth monk back as far away from the center as I could (towards the bridge), then every one is spread out along the left. The monk just keeps rezing the multiple deaths. They run back and start attacking him again. Takes a few minutes, but he goes down.
Team wise, I took the Rebirth healing Monk, another monk with some protection/healing (cant remember, I may have put ROJ on him). The remainder were casters. My melee guys just don’t help much, but then I did not try them with these tactics. The Necro was an MM. 2 Searing eles, and I forgot the last one. But really, they did not actually even have great builds, so you can probably bring whatever you want. I had put put some skills on the heros that were never even used. I also use Paragon Command skill to rez all dead. The necro and maybe one of the Eles had this. So long as one guy with a rez survives, your OK.
Katt (Katt Knipp or whatever) CT (The Celestial Twilight) Jan 20 2012
- Absolutely brilliant. I did this with the cookie cutter T7 Player Support and it worked beautifully. Just swapped out Fall Back on the RoJ monk for rebirth, used your strategy and did it with no wipes and one hero death. I am still a newbie at GW1, my Ebon Vanguard is only Rank 4, so with a little patience anyone should be able to knock this out. Tarix 05:28, 19 August 2012 (UTC)
Vodou?[edit]
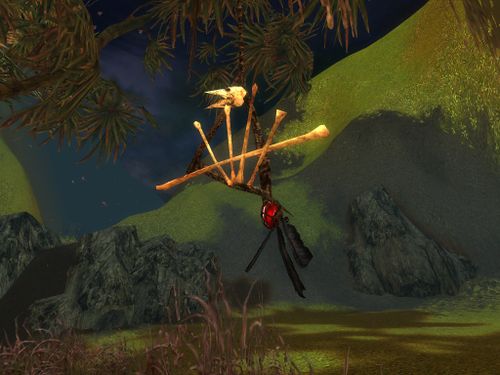
What do you guys make of this? ![]() ¥oshida Keiji(talk) 13:03, 7 July 2013 (UTC)
¥oshida Keiji(talk) 13:03, 7 July 2013 (UTC)
- I love all the tiny details there are to find within the artwork of the game. I never found anything that quite looks like this in "Haitian Vodou" or "African Vodun". This actually looks closer to Native American shrine or sacred markers. I feel that Acolyte Jin's Default Armor appears to be of Native American influence. If this is also of Native American design, the meaning behind this is for protection. Assuming that is a bird skull, birds are noted for the sounds they make or for their singing. The spirit of the bird could be invoked to protect the person’s voice or from a variety of ailments. When Native Americans would find any animal remains they would consider it a good omen. Such a shrine would then be made to honor it's life and sacrifice. --Wendy Black 00:20, 28 September 2014 (UTC)


