Veiled Threat
| Veiled Threat | |
|---|---|
| Section | Depths of Tyria Quests |
| Campaign | Eye of the North |
| Given by | Gron Fierceclaw in Doomlore Shrine (Depths of Tyria) |
| Type | Secondary quest (Difficulty: Master) |
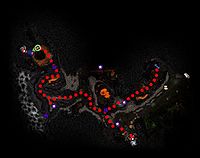
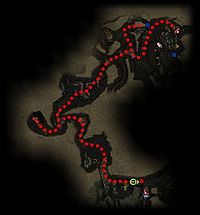
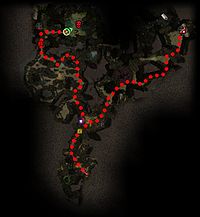
| Map(s) | |
   (Click to enlarge) | |
Quest information[edit]
Objectives[edit]
- Find Rragar Maneater.
- Pursue Rragar into the depths of the dungeon and eliminate him.
- Destroy Hidesplitter
- See Gron Fierceclaw (Merchant) for your reward.
Reward[edit]
- 7,500 Experience
- 1,500 Gold
Walkthrough[edit]
Leave from Doomlore Shrine and go southwest through Dalada Uplands, to Grothmar Wardowns, and then southeast into Sacnoth Valley. Head south to the southwest corner, as this is where the entrance to Rragar's Menagerie is found.
Level 1[edit]
Talk to the Beacon of Droknar to gain Dwarven Raider. Head north past Blobby (a neutral Ooze). Just after, some Fleshreavers will appear. Save any Fleshreaver Morsels that they might drop; you can use them to tame Blobby and have him follow you. Throughout the first level, the Charr and Fleshreavers are hostile; you can leave them to kill each other off and mop up the remains.
To get the optional dungeon map, take the north-east passage. Proceed carefully to avoid aggroing too many of the Charr patrols along the way.
On your way back to the western passage, pick up a Dwarven Powder Keg (bundle) or clear out the group of Charr near the weakened wall and then return for it. Your next goal is to acquire the dungeon key to advance to the next level. Crack the wall to your right and ignore the cracked wall in the chamber you enter. Take the right passageway that will lead to a group of Charr (led by a boss). After finishing them off, continue down the passage to meet Rragar Maneater and still more Charr. You can pull about half of them without aggroing Rragar. As you kill off the group, Rragar will take off leaving behind the key. Return back to the wall you've cracked open. Head north-west. Magma Blisters will appear in the piles of magma, which can cause Burning when stepped on. After killing the blisters, turn left (west) and go down the ramp (the first ramp is a dead end the second is a tunnel; can be easy to miss if your screen is dark.
As you enter the next chamber, Fleshreavers will pop up; an Ooze group will pop-up right at the shrine - be careful not to aggro the charr and ooze at the same time. After finishing these foes, you will notice a Keg Station near a Beacon of Droknar. Grab a keg and head north to find more Charr and Blisters. Blow up the cracked wall you find. Do not enter immediately to allow the Fleshreavers and Charr to fight; move in and finish them off. Avoid any remaining Charr on your way to Level 2.
Level 2[edit]
As you enter and head left, a group of Charr will run away, unleashing two Boulders and closing a large gate. You have three options: run quickly to the right and follow them out the gate (so it does not lock you in); snare them (so that you can kill them before they exit); or allow them to lock the gate. The fight is easier using the first two options, but you end up in the same place regardless.
This hallway has several spots where there are rockslides. You will eventually encounter a sizable group of Charr. You can easily pick up the dungeon map for this level if you head into the left chamber from where you encountered the Charr group. After handling these, you will enter an area with a body of water you will have to walk through, Ooze pop-ups will occur. Turn right after handling the pop-ups and head north through the entrance. Turn left after going through this entrance. Keep heading south-west, killing a group of Fleshreavers a few Charr groups.
It is easy to miss the boss key on this floor. You will reach a Beacon of Droknar. West of this beacon is Rragar Maneater, again, with Charr around him. You can pull the Charr without Rragar to make the battle easier. Get the Key.
Start heading south-east to reach the entrance to the last level. You will fight through Fleshreavers, Charr, and Ooze to get there.
Level 3[edit]
Head to the south passage. After you kill the Fleshreavers blocking the way, head west. Charr and Fleshreavers will start appearing in hybrid groups. Head south-west when possible. You will reach a chamber with a Beacon of Droknar and another Keg Station; as you approach, the wall nearby will be blown up by an incoming Charr group. Head directly south down this now-opened passage and retrieve the boss key, after killing a sizable group of Fleshreavers with a boss type amongst them.
Start heading north-west when possible now. You may fight through several Fleshreaver groups. However, if you are careful and watch the patrols, you can avoid all but one or two. Use the Boss Key to open the gate.
Rragar and Hidesplitter[edit]
Most players concentrate on killing Rragar first; if Hidesplitter dies first, Rragar will resurrect him. Hidesplitter, on the other hand, goes into a rage when Rragar dies, but if you got this far, you should not have any trouble surviving anything he tries to throw at you.
Skill recommendations[edit]
- There are plenty of exploitable corpses for minion masters; however, Fleshreaver Hounds deal holy damage, Ominous Oozes have Verata's Aura, and Shimmering Oozes have Spiritual Pain.
- Shadow Form is a poor skill for tanking; Fleshreaver Hounds can cause substantial melee-range damage through it.
Dialogue[edit]
Initial dialogue[edit]
Gron Fierceclaw (Merchant)
- "Pyre tells me we are to be allies, human. If that is so, I would warn you of a Charr named Rragar Maneater. Deep within his Menagerie, he rears a new breed of creatures he intends to utilize to destroy humans, and then plans to gain position within the ranks of the Charr Legions. Thankfully, his plan has not yet come to fruition. The time to strike is now, before he completes his army of fleshreavers. Venture into Rragar's Menagerie, and put an end to his operation and his life. Be sure to destroy his creations as well... even without Rragar's influence, they're savage and dangerous beasts."
Intermediate dialogue[edit]
Dungeon Level 1[edit]
While approaching the pool in the first room (if Pyre Fierceshot is in the party)
- Pyre Fierceshot: "Looks like Rragar's been dabbling in ooze breeding as well. He obviously failed with this one."
Upon encountering Rragar
- <Party leader>: "We've found you and your vile creations. Surrender, Rragar, and we might let you keep your limbs."
- Rragar Maneater: "Humans? Here? Blast! It's not yet time."
After defeating Rragar
- Rragar Maneater: "Time for a"'tactical retreat.""
Dungeon Level 2[edit]
After reaching the large pool of water
- Pyre Fierceshot (if present): "So, he's using fleshreavers to do his dirty work. Tread lightly...these unnatural horrors won't go down easily."
- <Party leader>: "The water is strange..almost thick. It's as if Rragar were cross-breeding oozes also."
When approaching Beastmaster Korg's room (if Pyre Fierceshot is in the party)
- Pyre Fierceshot: "Careful, human. I smell an ambush."
When approaching Beastmaster Korg
- Beastmaster Korg: "You seem in a hurry to be devoured by our creations. My fleshreavers shall accomodate you."
When approaching Rragar Maneater
- Rragar Maneater: "Ah, the meat is back. Good timing, I was just looking for a test subject."
After defeating Rragar Maneater
- Rragar Maneater: "As they say, "Discretion is the better part of...staying alive.""
- Pyre Fierceshot (if present): "Come back here, coward!"
Dungeon Level 3[edit]
At the first intersection
- <Party leader>: "Looks like Rragar taught the fleshreavers to fight alongside the Charr. We need to stop him quickly, or this is going to become a large problem."
When approaching Rragar
- Rragar Maneater: "Allow me to introduce to you my most prized specimen. You should feel honored to have your bones picked clean by such a magnificent creation! Hidesplitter, show them no mercy!"
Reward dialogue[edit]
Gron Fierceclaw
- "Killing Rragar gave you great pleasure, I am sure. With those unnatural creations rotting on the dungeon floor your people will rest easy...for now."
Notes[edit]
- On the first level, Charr and Fleshreavers are hostile to each other; however, they are allied with each other on the second and third levels.
- The key to an easy victory is by bringing down the health of one boss to a minimum and then attack the other boss. If Rragar Maneater is killed first, then Hidesplitter will enter an aggressive stance and deals more damage. If Hidesplitter gets killed, Rragar Maneater will try to resurrect his companion using Resurrection Chant.
- On the first level, near the door to Level 2, beware of the popup Ooze group. Try to pull the Charr away from that spot to avoid being overwhelmed.
- On the first level, in the far southwest corner there is hidden treasure. There are also 2 other hidden treasures in the same chamber to the north. On the first level, to the southeast of the northern Dwarven Powder Keg Station their is a secret switch which opens a secret tunnel. There is a hidden treasure and a Dwarven Ghost down that secret tunnel. There are 2 hidden treasures by the exit from the first level.
- On the second level there is a Dwarven Ghost next to the Beacon near the Boss Key and there is a hidden treasure next to the Boss Key. There is a hidden chest to the northeast of the boss door.
- On the third level, south of the entrance there is a secret switch for a secret chamber. In the secret chamber there are five hidden treasures and one Dwarven Ghost. In the four alcoves near where the boss key is obtained there is a hidden treasure in each alcove.