Introduction[edit]
This tutorial demonstrates how to create dye charts conforming to the Dye charts project guidelines. The tutorial is shown using the application Adobe Photoshop CS3 Extended (Windows) though features detailed in this guide also apply to the non Extended version and can also be easily done using other applications.
Setting Up[edit]
-bmp command line[edit]
Screenshots should be taken using the -bmp command lines (see the Command line article for details on setting Command Lines up). Without using the command line your screenshots will be taken as a Joint Photographic Experts Group (JPEG) with JPEG's lossy compression system. This compression algorithm analyses in 8x8 pixel blocks and exploits known limitations of the human eye to discard approximately half the colour of a picture. This compression is cumulative so saving a picture over and over again will continue to degrade the quality. That is why we use the -bmp command line. The downside of .bmp images is they are significantly larger than .jpeg images so be sure to keep your files organised.
Alternatively, paste your files manually after pressing the "print screen" key. The clipboard holds uncompressed (and thus, lossless) data until cleared or overwritten. This allows programs such as TexMod to be used.
In-game settings[edit]
In-game you should change your graphic's settings to as high as possible by moving the Visual Quality bar to Highest Quality. Other settings also include:
Graphics Options
- Resolution: Highest possible [full screen]
- Anti-aliasing: 4x
Advanced:
- Enabled post-process effects: Un-check it (should have been checked after changing the Visual Quality)
- This does not apply if taking images in the dye preview window or Llye's makeover window, as those windows do not experience blooming or a "glowy" look from post processing.
Preparations[edit]
 Preparation-The model has all the dye and the weapon prepared. The model has also removed all weapons and armor Each profession wields each weapon in a different manner which in turn affects how well you can view the weapon in the dye preview box. This is crucial in determining which character to take screenshots on. Take a look at the weapon position page to decide which character would be best suited.
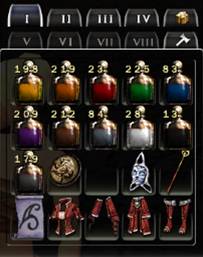
Make sure to have all the dyes ready, and the item/s you will be dying (it helps to put dye in the order used for images after). Remove all equipment from your character (armor, weapons, etc.) and place them in your Xunlai Chest or Inventory. You may choose to take screenshots with your armor on. If you do choose to do this make sure the armor is not distracting in terms of armor art and dye color. Double click a vial of dye, and click on the item you will be previewing.
Expand the dye preview window fully by dragging the corner out. To get even closer, change the user interface size to "Larger". For some items it may be more suitable to not fully drag the window out allowing you can to fit a larger portion of the item in the preview screen. Use your own personal judgment when deciding.
Screenshots[edit]
Taking screenshots[edit]
To take a screenshot simply press the Print Screen key on your keyboard. You can bind the print screen function to another key under Options, Controls, Miscellaneous: Screenshot. A message will appear in your chat log detailing that you had saved a screenshot and the location it is placed under.
Unlike other screenshots where you might want the User Interface to disappear (Ctrl+Shift+H), you will need the U.I. visible or the Dye Preview box will not appear.
Depending on your computer screenshots can be instantly taken when you press the Print Screen button, or it can have a short delay.
Dye Preview[edit]
The Dye Preview box allows you to view the item you are trying to dye. The problem with the Dye Preview box is each time you remove or add a dye from the table on the left it will automatically begin to zoom in on the item until it reaches the closest distance possible.
To create a successful dye chart we will need to take the screenshots from the same distance, or as close to the same distance, as possible. If possible use some sort of marker to align your shot, whether this be a piece of the model's body or even a piece of masking tape stuck to your screen. Using a marker to align your screenshots ensures you get to as close to consistent screenshots as possible.
For the dye chart you will be wanting twelve different screenshots of the item. One default (no dye) and one of each currently available dye color (including Gray). Make sure to watch the model's breathing as exhaling and inhaling will cause the weapon to move. If you are taking a picture that includes the face try to get the model why they are not blinking as well.
- The only exception to twelve is if doing armor or festival hats, because of default/gray color issue.
It is recommended you have your screenshot folder open so you can switch between the game window and the screenshot window to see whether the screenshot was successful. There is nothing worse than taking screenshots, closing the application only to realise one of your screenshots didn't turn out properly. After you have done the first screenshot, change the dye color, reposition the shot and take another screen capture. Repeat until finished.
An alternative method[edit]
An alternative method to using a physical guide is to watch how your character moves (they breath in and out), then choose a first position and screenshot that. This will be your guide. For each dye after, take a burst of images around the same position as the image, then pick out the closest match after. Zooming in and/or layering the images with the first image helps get it pixel perfect (in many cases, it is able to get the exact location if at an identical angle and zoom). Beacause bitmap images also load fast, you can easily delete and spot ones that do not line up correctly.
Creating the dye chart[edit]
Note: This section is shown using the application Adobe Photoshop CS3 Extended (Windows) though features detailed in this guide also apply to the non Extended version and can also be easily done using other applications.
Author's Note: The write up may be confusing. It's very hard trying to describe something that I take for granted. If you need any clarification please post on the talk page. Images of the process cannot be included as it would infringe copyright.
Now that you have all your screenshots, it's time to transform them into a dye chart. This step-by-step guide will help you create a dye chart. There are many shortcuts that can be used to make dye charts but this guide will take you through the basics. If you are familiar with the Adobe Photoshop applications you can use the many functions available to create mass dye charts in a shorter time.
- Open Adobe Photoshop CS3 (or your image manipulation application) and open your Guild Wars screenshot folder (usually located under C:\Program Files\Guildwars\Screen)
- Select the screenshots you will be using (Ctrl+Click or Shift+Click) and drag them from your screenshot folder into Photoshop, or File, Open, <destination>. Change the screen mode (F or the Restore Down icon)) to view the files as separate windows.
- Select one of the screenshots (this tutorial will be using the Default color screenshot) and using the Rectangular Marquee Tool [Style: Normal, Feather: 0 px] select the portion of the screenshot you want. Don't select any area of the dye preview box. Try not to select too much unnecessary space, but also remember you will need to add text to the selection later.
- Create a new file (Ctrl+N or File, New) and make the dimensions relatively large to ensure you fit all the images on. You will crop the image in a later stage so excess space is not a problem. If you require a larger canvas later on you can adjust the canvas' size by going to Image, Canvas size (Alt+Ctrl+C). Click the window where you previously selected [Step 3] the item to restore it.
- Using the Move Tool (V), click on the selected area and drag it to the new canvas you created [Step 4]. The selected area should now appear on the canvas. Rename the layer for future references. Close the screenshot file where you just dragged the image from.
- Click the Default color layer (that you just dragged onto the canvas in Step 5) and position the image in the top left hand corner. The layer will automatically snap into position when in close proximity to the edge.
- Using the Move Tool (V), click on the Default color layer and drag it onto one of the other screenshot files (this tutorial will be dragging onto the yellow dye screenshot). If done properly the Default color layer will still be in the corner on the new file, but also appear on the file you just dragged it into.
- In the Layers palette, click the drop down box and select Difference. Areas of different colors between the layers now appear colorful while areas of similar colors will become dark (almost black). Align the Default color layer on top of the Yellow dye screenshot in an effort to get as much black as possible. Once you are happy with the selection, Shift+Click on the Layer thumbnail (in the Layers palette) of the Default color. This will outline the Default color layer.
- Without deselecting click on the the yellow dye screenshot layer (named Background) in the Layers palette.
- Using the Move Tool (V), click on the selected area and drag it to the new file you created [Step 4]. The selected area should now appear on the canvas. Rename the layer and position it next to the Default color layer. It should snap to the neighboring layers automatically (alternatively use Guides to help with alignment).
- Repeat Step 7 to Step 10 with the other screenshot files. Use the same image for 'Difference (in this case it was the Default color image) to keep consistency. Make sure to arrange them in a reasonable layout on the new canvas. Depending on the dimensions of the selection this will usually be 4x3 or 6x2.
- Crop the image using the Crop Tool (T) to remove all the excess white areas. The crop tool should automatically snap to the images but make sure you don't accidentally crop over the needed amount.
- Once you have all twelve screenshots properly arranged and cropped on the new canvas it's time to add text. Using the Horizontal Text Tool click on a corner of the Default color layer. After changing the settings type "Default". Use the following settings:
Font family: Verdana; Font style: Regular; Font size: <varies, ~20>; Anti-aliasing: Sharp; Alignment: Center text; Text color: #ffffff
- Nudge (using the arrows keys) the text to the location you want to position it in
- Right click on the Default text layer and select Blending Options (or Layer, Layer Styles, Blending Options). Click the box Outer Glow and the box should now be highlighted and checked. After changing the settings click Okay. Use the following settings:
Blend mode: Normal; Opacity: 100%; Noise: 0%; Glow color: #000000; Technique: Softer; Spread: 20%; Size: 5 px; Contour: Linear; Anti-aliased: unchecked; Range: 50%; Jitter: 0%
- With the Default text layer selected, hold Ctrl+Alt, drag the text right (then hold down Shift) and position it onto the yellow dye layer. The text will now be duplicated.
- Repeat Step 16 until the whole top row has a duplicate of the Default text layer (this tutorial will be show duplicating the Default text layer onto the yellow, orange and red dye layers).
- In the Layers palette highlight the text layers from the top row (in this case Default [text layer], Default copy, Default copy 2 and Default copy 3), hold Ctrl+Alt, drag the text down (then hold down Shift) and position it onto the second row's layers. The text will now be duplicated again.
- Repeat Step 17 for all rows until each dye layer now has a text layer on top of it.
- Double click on the Layer thumbnail and type in the dye color for their respective images. The text will automatically center itself (if you used the settings in Step 13)
- You should now have a completed dye chart- displaying twelve colors, with text and cropped appropriately. Save the .psd file for future use (do not flatten the image). Resize the image to an appropriate size using Image, Image Size.. (wiki pages display dye charts at 500 px but viewers may want a larger size by clicking on the image).
- There's two main ways to save the file as a .jpeg for use on the wiki (method 2 is most preferable, better control over quality):
Method #1
- Go File, Save As... (Ctrl+Shift+S). Type a file name, wiki uses a <item's_name>_dye_chart.jpg (i.e. Long_Sword_dye_chart.jpg). Select File Format: JPEG. Below that, under Color, you do not need to embed any ICC profiles so uncheck that (Guild Wars bitmaps do not come tagged with anything). Then click Save. Choose a Quality of around 9-11 (make sure to watch the file size). If preview is enabled you can see how the file will look after saving. Under Format Options, chose Progressive, with 5 scans. This will make it the smallest size. Click Okay and you're done.
Method #2
- Go File, Save for Web & Devices.. (Alt+Shift+Ctrl+S). In this method, we can more better compare quality between saved and original versions. Select the 2-up tab (or 4-up tab if you want more comparisons) at the top of the window. The image on the left shows you the original file and the right shows you the current version which you will be altering. You can also use the Optimized display if you switch between Optimized and Original back and forth. The file size is displayed on the bottom. Select JPEG in the drop down box and adjust the Quality scale to a suitable level (around 65-90, 90-100 can be used however if the image is already very small or doesn't agree with much lower quality settings). Zoom in to see how much the image will be affected. Once you are done, check Progressive, uncheck Embed Color Profile, uncheck Convert to sRGB, and set Metadata to none, then click Save and type a file name, wiki uses a <item's_name>_dye_chart.jpg (i.e. Long_Sword_dye_chart.jpg). Save as type should be set to Images Only (*jpg) and click Save.
Other information:
- Name the layers for ease and place in groups (i.e. all dye pictures in a "Dye" group, all text in a "Text" group)
- For future dye charts there's no need to create new text for each, simply copy the layers (or layer styles) over and adjust as necessary. It's even possible to use the same dimensions for different weapon dye charts and just simply copy the images into the existing file.
Uploading onto Guild Wars Wiki[edit]
They're two main ways to upload the file onto Guild Wars Wiki:
Method #1
- Open your web browser and bring up Guild Wars Wiki
- Click the Upload file link in the sidebar (under toolbox)
- Click Browse, find the file, click Open
- Type a file name, wiki uses <item's_name>_dye_chart.jpg
- Settings are Image use: General use; Licensing settings: Guild Wars screenshot
- In summary type [[Category:Weapon dye charts]]
- Check Watch this page and Ignore any warnings if you wish
- Click Upload file
- Go to the article in which the dye chart was made, click Edit, add {{dye chart}} under the dye section (as per the Weapons' formatting guidelines and click Save Page. If you named the dye chart correctly the image will automatically be added.
- Done
Method #2
- Open your web browser and bring up Guild Wars Wiki
- Go to the article in which the dye chart was made, click Edit, add {{dye chart}} under the dye section (as per the Weapons' formatting guidelines and click Save Page.
- On the article page click the red link in the dye chart box, which will take you to the Upload page
- Click Browse, find the file, click Open
- Check Watch this page and Ignore any warnings if you wish
- Click Upload file
- Done
Other notes[edit]
- Even if the weapon is customized to another character you can still use the dye preview function to take screen shots. Simply go about the same process of applying dye without having the weapon equipped.
|
