Scrambled Reinforcements
| Scrambled Reinforcements | |
|---|---|
| Section | Depths of Tyria Quests |
| Campaign | Eye of the North |
| Given by | Commander Hixx in Magus Stones (Depths of Tyria) |
| Type | Secondary quest |
| Map(s) | |
  (Click to enlarge) | |
Quest information[edit]
Objectives[edit]
- Help Hixx and his troops secure the Arachni's Haunt.
- Destroy 3 spider matriarchs.
- Kill Arachni.
- Use the Asura flame staff to burn through the web gates.
- Use the Asura flame staff to set ablaze the egg sacs.
Reward[edit]
- 7,500 Experience
- 1,500 Gold
Walkthrough[edit]
Beware of the Ooze! They multiply and can wipe an unprepared party with PBAoE damage spam.
Level 1[edit]
On the first level, you need to take out a number of groups of Needling Lavastriders and Lifeweavers. If you kill the Lifeweaver first, the rest of each group is much easier. The Oozes should be pulled carefully or avoided if possible since they tend to swarm the party quickly with high amounts of AoE damage. There are plenty of pop ups throughout the dungeon, so try to aggro mobs one by one.
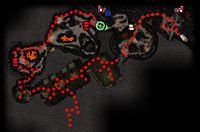
To the south of the start point there is a dungeon map guarded by spiders. Following the map, you will find an Asura Flame Staff bundle among the dead asura, which must be used to light up the nearby spider web blocking the path. (You do not need to keep the first staff, but keeping hold of the second one you obtain later will save time.) Continue until you reach the next Beacon of Droknar - where a ranger boss will appear.
There are a lot of spiders and poison traps in the next room, so pick a wall and keep close to it to avoid spawning too many spiders. Head for the northwest gate, pickup the staff and burn the web. (Keep this staff.) Keep close to the right hand wall and you can avoid many of the Elementals and Forge Masters in this room, but be wary of the Fire Bombs that Lok sends down the passage. Exit the room by the next web, and kill the plant popups in the next room. Pass the narrow passage with more Painweavers and poison jets.
Clear the spiders out from around the Spider Eggs. It is useful to the party if you light the eggs one at a time to prevent the party being overwhelmed by the popups. Also on the fourth group of eggs, the spawn of spiders is delayed. After lighting all the eggs, a Spider Matriarch will appear.
Repeat this process on the eastern bunch of Spider Eggs. Once complete, the Dungeon Key will appear on the ground in front of the last Spider Web gate.
If a party misses the first matriarch by running straight past the eggs, then the key will not drop at the matriarch near the entrance to the next level. The party must run back to the first matriarch and kill it. This will cause the key to spawn in the location of the matriarch near the entrance to level 2, this had been mistaken for a bug but can be avoided by simply killing the first matriarch as you pass the eggs.
Level 2[edit]
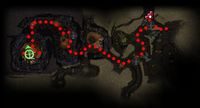
Head east as soon as you enter the level to retrieve the asura flame staff, then back-track to the start and head southwest. Ignore the tunnel with the Spider Web gate in front of it and head up the stairs past the Fire Darts. If the Fire Darts are difficult to deal with, they can be disabled by killing a Flame Guardian off the direct path to the south of the entrance; a safer route to the Guardian can be opened at the Area Map using a Secret Switch that can be revealed using Light of Deldrimor within compass range of the entrance.
Head west across the waterlogged next room and to the Beacon of Droknar. Ignore the skelk-infested passage and head northwest to the large room with the Spider Web gate in front of it. From here there is only one route to the end of the dungeon, with large numbers of spiders and a few popups of plants.
In the final room there are many spiders, from Level 14 Spiders to Lifeweavers of Level 24, and it is recommended to kill all of the spiders before starting to burn the eggs because of the pop ups. There are ten clutches of eggs to burn, in two groups of five on either side of the chamber. Burning all five clutches on one side causes a large group of spiders including a Spider Matriarch to spawn, and after you've burned the last clutch of eggs, Arachni spawns with another large group. You have to kill the matriarch and Arachni to complete the quest and reveal Arachni's Spoils; it doesn't matter which one you kill first.
Killing Arachni[edit]
- Blinding skills, or skills such as Price of Failure and Spiteful Spirit make the final boss battle much easier. The damage from Arachni comes from Barrage and Whirling Defense. If you use Diversion to stop Barrage then Arachni will simply stop attacking.
- Whirling Defense can be turned to your advantage with Pain Inverter.
Skill recommendations[edit]
- Minion Masters are extremely useful, as they are very efficient in killing the many weaker mobs. There are enough corpses to easily support two Minion Masters. Ebon Battle Standard of Honor can boost the damage output considerably.
- AoE damage is extremely useful against the large groups of low level spiders.
- Because of the large number of Ranger and Paragon enemies in this dungeon, consider taking a skill like "Shields Up!" or Winds to reduce the damage you and your party takes. The henchman Talon Silverwing uses "Shields Up!".
- When trying to do this dungeon, remember that your NPC allies are warriors as primary, and they'll rush to attack anything crossing their aggro bubble. This can be extremely dangerous when trying to pull the oozes on level 1, because the NPCs following you will attack your target and aggro all the others. For this reason, it's highly recommended to bring along with you at least one running skill to break NPCs' aggro on foes.
NPCs[edit]
Allies[edit]
 20 (20) Commander Hixx
 20 (20) Hudd
 20 (20) Vask
Bosses[edit]
 28 Brood Warden → Crippling Shot (Level 1)
 28 Spider Matriarch → Stunning Strike (Level 1 & 2)
 28 Lok The Mischievous → Savannah Heat (Level 1)
Boss-like foes[edit]
Arachnid
Dialogue[edit]
Initial dialogue[edit]
- Hixx
- "You are a sight for sore eyes, bookah! Arachni's Haunt is home to powerful veins of energy we need in our defenses against the Destroyers. We've been fighting an unending Battle against the matriarchs and are in need of some reinforcements. These spiders lay large egg sacs and spin webs that no normal fire can burn through. They've enslaved other nasty beasts to help protect their brood. Manp developed a super-heated staff capable of doing the job. I'd find you one, but the last troops that went in took the remaining ones. I'm sure you'll find what you need on their bodies..."
Trivia[edit]
- This quest contains several references to the film Aliens (source). The three Asura accompanying you, Commander Hixx, Hudd and Vask, are named after the Aliens characters Hicks, Hudson and Vasquez, respectively. They and the initial dialogue use quotes from the film, for example "Now all we need is a deck of cards" or "Anytime, anywhere". You torch egg sacks on your way into the lair to kill the spider queen which resembles scenes from the film.