Guide to the Desolation run
Contrary to popular belief, The Desolation can be ran across without the aid of a Junundu or resurrection skills. Many end-game Nightfall rewards can be accessed extremely quickly by running through the Desolation. These rewards include Vabbian Armor and Ancient Armor from The Kodash Bazaar and Bone Palace respectively. Unlike other runs, crossing the Desolation has the added difficulty of dealing with Sulfurous Haze, an effect that will cause death if the player stays exposed for too long.
Running the Desolation[edit]
Sulfur mechanics[edit]
The application of the Sulfurous Haze effect is controlled by an internal instance timer which is invisible to the player. This timer starts as soon as the instance first loads. Every two seconds, this timer "ticks". If the player is on the sulfur when this "tick" occurs, then Sulfurous Haze is applied. Once the Sulfurous Haze effect is applied, the player has exactly two seconds to get off the sulfur before dying. When Sulfurous Haze expires, the next "tick" will happen exactly two seconds later. Based on the frequency of these ticks, the absolute maximum time a player can stay on the sulfur is four seconds.
The exploit[edit]
To most players, the application of the Sulfurous Haze effect seems random and unpredictable. However, that is not the case. When the player synchronizes movements with the internal instance timer described above, the application of Sulfurous Haze no longer becomes random. With perfect timing of the exploit, the player will be able to survive on the sulfur for a maximum of four seconds.
To perform the exploit, do the following steps in order:
- Step onto the sulfur and wait for the Sulfurous Haze effect to be applied.
- Step off of the sulfur and back onto a safe area.
- As soon as Sulfurous Haze expires, run as fast as possible across the sulfur to the next safe spot.
It will take a while to get used to how the exploit functions. Once adjusted, you will be able to instinctively run between safe spots without much effort.
Methods[edit]
There are two ways to run across the Desolation:
- Die, resurrect, run: Prior to the discovery of the exploit, players knew they would die while running across the Desolation. To successfully complete the run, self-resurrection skills would be equipped to resurrect the player when the sulfur killed them. Common skills used to accomplish this are Eternal Aura and Lively Was Naomei. The player would cast the skill, run across a portion of the sulfur, die, resurrect, and then run the remaining distance to the safe spot. This method is extremely slow due to activation time, the delay between death and resurrection, and the fact that speed boosts are removed upon dying.
- The exploit method: The more efficient method exploits the mechanics of Sulfurous Haze, allowing the runner to remain in the sulfur for a maximum of four seconds. With at least 33% movement speed, four seconds between safe spots is more than enough time to successfully navigate the entire Desolation.
Finding safe spots[edit]
There are various spots within the Desolation that will not trigger the Sulfurous Haze effect. These areas are referred to as "safe spots".
- Earth (dirt/sand that the developers intended players to walk on)
- Basalt (the black areas usually on the perimeter of the sulfur)
- Rock (grey areas that can be found in the middle of sulfur patches). Found mainly in The Alkali Pan.
- Random green patches within the sulfur (these usually only appear in areas such as The Alkali Pan)
- Random patches of dark-tan sand
Although some areas may appear safe, they may be unsafe. The same concept applies to areas that appear to be unsafe.
Server latency[edit]
Server latency, the delay of the connection between your client and the servers, plays a role in timing the exploit. If you begin running across the sulfur the moment you see Sulfurous Haze expire, you will not achieve the maximum four seconds of travel time. So if your latency is 250ms and you leave the sulfur as soon as you see Sulfurous Haze expire, you will survive on the sulfur for a maximum of 3.750 seconds (4000ms - 250ms = 3750ms). If you have a good idea of your current ping, you can safely leave the sulfur slightly before you see Sulfurous Haze expire. Not taking server latency into account may lead to unexpected deaths during the run, so try to be aware of your average latency when attempting very long gaps.
Example build[edit]
|
Shadow Arts: 12 | ||||||||
Areas encountered during a Desolation run[edit]
| This article needs to be cleaned up, see Guild Wars Wiki:Formatting for details. |
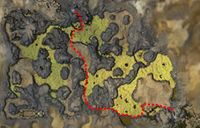
From Gate of Desolation to Remains of Sahlahja[edit]
Without a shadow stepping skill (easier)[edit]
- Make your way west toward the wurm spoor.
- Turn south and follow the basalt perimeter. Continue west until you reach the resurrection shrine.
- At the resurrection shrine, take a right turn and head north. Follow along the safety of the outer rim until you get to another area of safe sand.
- Get past the Margonite group by using spell protection and keep heading north under the archway.
- The undead mob near the last area of safe sand will knock you down. Use knockdown prevention to counter this.
- Continue heading north until to the Remains of Sahlahja.
With a shadow stepping skill (harder)[edit]
- Upon zoning, run west on the sand hill until you reach a cliff. There are Djinns patrolling the cliff. Use Heart of Shadow on them to shadow step down the cliff.
- Use a speed boost of atleast 33% intensity to cross the large gap to the other side of the sulfur. To increase chances of success, use Dash or Pious Haste.
- Follow the basalt south until you reach the next area of safe sand. Keep in mind that this area of basalt has wurms that can knock you down.
- Continue west toward the resurrection shrine.
- At the resurrection shrine, take a right turn and head north. Follow along the safety of the outer rim until you get to another area of safe sand.
- Get past the Margonite group by using spell protection and keep heading north under the archway.
- The undead mob near the last area of safe sand will knock you down. Use knockdown prevention to counter this.
- Continue heading north until to the Remains of Sahlahja.
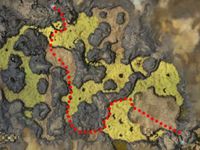
From Remains of Sahlahja to Basalt Grotto[edit]
- Head due north till you pass the first large area of sulfur.
- Turn due east and follow the northern perimeter of the large area of sulfur until you get to the next safe area.
- Continue northeast until you reach Basalt Grotto.
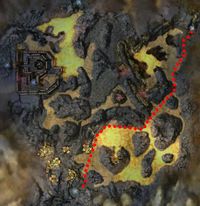
From Remains of Sahlajha to Bone Palace[edit]
Normally, you cannot enter the Bone Palace from Joko's Domain until late in the game. However, if any party member has the quest A Deal's a Deal, the entire party will be transferred to the palace upon completion. Usually, the runner should have the quest, otherwise this run becomes much more time consuming.
- Head north out of the Remains of Sahlahja. Have the person with the quest initiate the dialog.
- Hug the left wall to cross the desolation.
- Continue past the shrine and cross the bridges. Head east to kill General Huduh's group. Have the quester talk to him and continue closer to the palace.
- Pull enemies out of the sulfurous area.
- Flag your H/H so that they follow a safe path.
- The gate will open after killing the enemies nearby.
- Trigger resurrection shrine and die if needed.
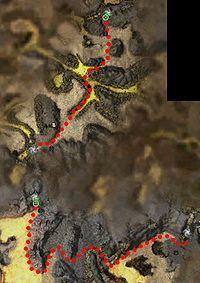
From Basalt Grotto to Lair of the Forgotten[edit]
- Joko's Domain
- Head west from the Grotto heading to the Bone Palace. This part of the run is very simple.
- The second patch of sulfurous area is harder, hug the wall and head north. Ensure you have anti-knock down skills in use when near the undead groups.
- The Shattered Ravines
- Make your way to the sulfurous trench.
- Use the dark spots to cross, using shadow steps for speed and to avoid body blocks. If enemies are still following try using Heart of Shadow to aid in reaching the opposite side.
- Continue north to finish the run.
From Bone Palace to Ruins of Morah[edit]
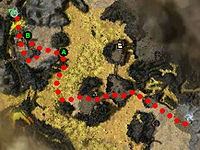
- Exit the Bone Palace and follow the trail to the sulfurous area heading towards the Remains of Sahlahja.
- Cross the desolation staying on the darker areas to stay alive.
- Get close to the closed gate to activate the resurrection shrine at point A.
- Proceed to have your party die as close to that area as possible.
- Your party will resurrect inside the gated location. The local foes may get in your way, dispatch them at your leisure.
- Move towards point B where the Solitary Colossus is at. Use life stealing skills to kill the Colossus.
- Walk across the new bridge to enter the Remains.
From Bone Palace to Lair of the Forgotten[edit]
- It is advised to leave from the Basalt Grotto instead and just hug the north wall as described above.
See also[edit]
- Vabbi Tour — the complete Vabbi Tour guide.


