User:Foo/GoM

GoM AFK XP Farm[edit]
An efficient and simple AFK XP farm for getting the Legendary Survivor title in 4 hours, and 534 skill points per day.
This build only requires:
- The Gate of Madness outpost unlocked,
- Lightbringer rank of 4 or more,
- 1 Mesmer hero and 2 Monks heroes,
- Scrolls of Berserker's Insight, and
- An armor-set with at most 60 armor and some cheap runes and insignias.
Setup can take as little as 8 minutes, and the AFK farm can run indefinitely.
The Basics[edit]
- A Chaos Rift in the Gate of Madness mission can spawn 8 Titans every 30 seconds.
- A player tanks the Titans with a low health armor set.
- Protective Bond reduces all damage to 5% of the player's (low) max health, and the Lightbringer title, (reapplied after Protective Bond), reduces it further to something between 1 and 5.
- Protective Bond's energy cost is shared by 3 Bonders and paid for with Essence Bond, Blessed Signet, and Balthazar's Spirit.
- Burning and Bleeding durations' are reduced with Purifying Veil, and health regeneration is provided by Mending, Watchful Spirit, and Succor.
- A Keystone Signet Mesmer hero, backed up by EoE, kills the Titans.
- The Monk Bonders are outside agro range, maintaining bonds and EoE from afar.
- XP is shared only between the player and the Keystone hero, and with a Scroll of Berserker's Insight, sums up to 348xp per kill, or 334,080xp per (AFK) hour.
Build[edit]
|
|
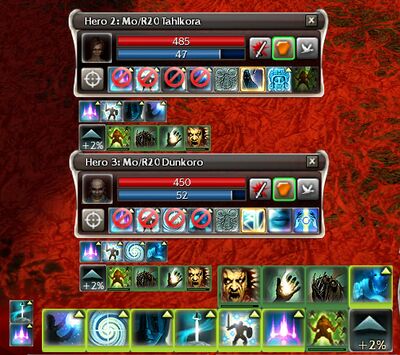
Mesmer/Monk hero with 16 FC and 15 Inspiration: OQNCA8wDP9B8DyzmOUi1veC |
|
|
Monk hero casting Prot Bond first with 14 Protection and 7 DF |
|
|
Monk/Ranger hero casting Prot Bond second with 13 Healing, 8 Protection, 7 DF, and 12 BM |
|
|
Player casting Prot Bond third with 3 Protection, and 180 health |
The Keystone Mesmer is flagged near the Player, kills the titans, and:
- Should be set to "Fight".
- Should wield no weapon at all, (Offhand is OK, one with +1/20% FC is best).
- Should have Artificer's Insignias and at least 350 health (with any combination of runes / insignias / offhand).
- Should be individually flag-able by either being one of the first 3 heroes, or having a key assigned for the "Command Hero #" action.
The two Hero Bonders maintain all bonds on the player and EoE.
The player, of any profession, only maintains two bonds, and:
- Should have 3 Protection.
- Should have at most 60 base armor:
- Warriors, Ranger, Assassins, Paragons, and Dervishes should craft low level armor (the cheaper the better).
- Caster professions can craft low level armor or just use their regular max armor.
- Should get 180 health by using 4 superior runes. (Dervishes should remove their chest piece to avoid its +25 health bonus).
This health value allows the player tank to take some damage (5 for LB4, 4 for LB5, 3 for LB6, 2 for LB7, and 1 for LB8), so that Essence Bond would work.
Depending on LB, lower health can reduce some of that damage, but it must be at least LB * 20 + 20 (damage taken is floor(MaxHealth / 20 - LB)), and also no less than 140.
Be aware of other health modifications which should be avoided or adjusted for:
- Extra health from weapons, off-hands, or insignias.
- Morale from cons or from closing more than the one necessary rift.
- Temporary health modification by Grails of Might, Birthday Cupcakes, Candy Apples and Pahnai Salads.
Walkthrough[edit]
Getting to the AFK location[edit]
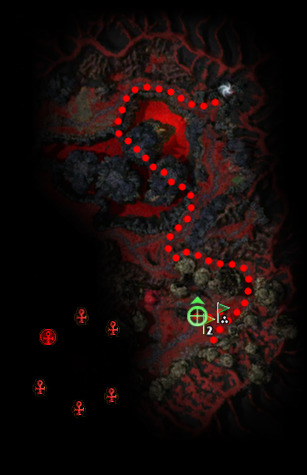
Start the Gate of Madness mission and fight your way to the area where the Chaos Rifts are. Once you reach the Rifts you'll see a Torment creature's Rift to your left, and the Titan's Rift to your right.
Preparing the AFK location[edit]
There are several groups of enemies in the area of the two first Rifts:
- 3 Portal Wraiths guarding the Torment Chaos Rift (the one to your left), which must be pulled and killed, ideally first, and without agroing any Titans.
- 3 Torment creatures and 2 Margonites patrolling the areas, which must be pulled and killed after the Wraiths, again, without agroing any Titans.
- 1 stationary Torment Claw, which can be ignored.
- 2 Titan Abominations, spawned from the Titan's Rift, patrolling the area, which should be avoided for now. If you agro them, pull and kill them and their spawns. Be careful of the next pair which will shortly spawn and patrol the area.
- 3 Portal Wraiths guarding the Titan's Chaos Rift (the one to your right), which must not be killed, as they keep the Titan-spawning Rift active. If you agro them, disengage. If they all die, the Rift closes and the mission must be restarted.
All other mobs are further enough west to not interfere with the setup, and are best avoided.
Once the only enemies in the area are the 3 Wraiths of the northern Rift, the 2 patrolling Titans, and the stationary Torment Claw, setup can begin.
Preparing the Tank[edit]
- Switch to your low health armor-set.
- Apply all bonds to the tank.
- Protective Bond should be applied in descending order of Protection - from the highest to the lowest. This is required so that every bonder would pay only 1e per damage packet.
- Re-activate your Lightbringer title. This must be done only after Protective Bond is applied.
Agro and positioning[edit]
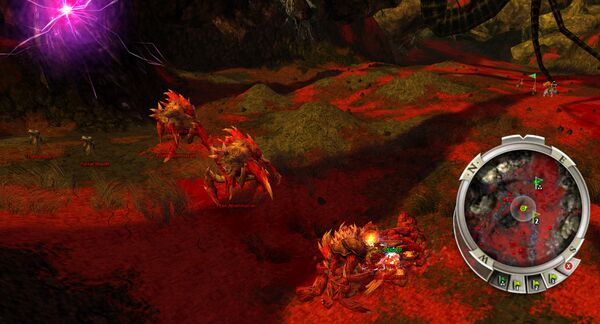
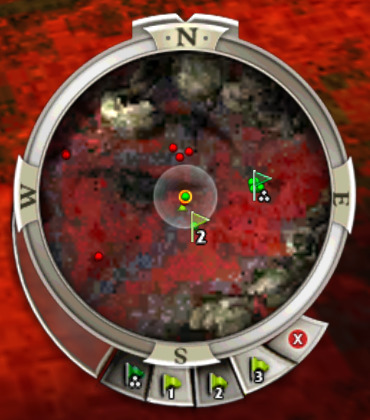
- Flag the party on the tip of the long shadow as seen in the pictures.
- Agro the Titans and position yourself directly south of the Portal Wraiths, as close as possible without agroing them.
- Make sure that you and the enemies around you are within EoE range.
- Flag the Keystone slightly inside your agro bubble, in the direction opposite from the Rift and the coming Titans.
- Activate a Scroll of Berserker's Insight.
- Minimize the game and go AFK! Alternatively, watch for a couple minutes to make sure that your health bar and all the Bonders' energy bars look healthy.
Troubleshooting[edit]
Can't maintain agro on yourself, and enemies attack the keystone? Make sure that:
- Your armor is at most 60.
- Your healths is lower than 200.
- The keystone's health is at least 350, and that it has Artificer's Insignias.
Take too much damage and die? Make sure to:
- Reapply Lightbringer after casting (the last) Protective Bond.
- Wear your low health armor set.
Bonders drained of energy? Make sure that:
- You apply Protective Bond in the right order: with Protection >= 13, then >= 8, then >= 3.
- The bonders do not waste energy in any way like healing minions or a bip hero.
- The Keystone Mesmer is set correctly and that enemies are within range of EoE. Enemies living longer raises Protective Bond's cost.
It's possible that the random arrangement of mobs around the tank would get too scattered for the damage from Keystone Signet to reach them all,
causing a delay in killing that might cause too much pressure.
This should be rare enough to not trouble anyone going for just survivor, but for farming skill points it's best to get a high LB which mitigates most of that risk.
Higher LB will also reduce the risk of the scroll expiring, which could happen due to a combination of slow killing and bad luck.
Still failing and don't know why?[edit]
Message me on discord (gwfoo) screen shots of your builds and positioning, and details on your armor and health, how long you lasted, how it failed (if you know), your profession, your Lightbringer rank, how much damage you received from the Titans, and anything else you might find relevant.
Additional Questions and Thoughts[edit]
- Can this be done in HM for even more XP? Likely not, as enemies go after the Keystone, which even if bonded, runs away, messing agro, and being distracted from dealing damage.
- Can the Keystone be improved? A lot of thought was put into every single skill in that bar, so I think not. If you have an ideas, let me know!
- Can it be done without the specific health settings? Yes. If not using Essence Bond, health could be lowered so that damage would be 0. See the Theory page.
- Can it be done with less than 3 heroes? Yes! It's pretty simple for Necros, Monks and Mesmers, and possible but more complex for other professions. See the Theory page.
If you have any other questions or ideas, please share them with me on discord (gwfoo).
Good luck!


