Looking For Trouble
From Guild Wars Wiki
Jump to navigationJump to search
| Looking For Trouble | |
|---|---|
| Section | Primary Quests |
| Campaign | Factions
(Canthan only) |
| Given by | Brother Pe Wan in Seitung Harbor (Shing Jea Island) |
| Preceded by | The Road Less Traveled |
| Followed by | To the Rescue |
| Type | Primary quest |
| Map(s) | |
 (Click to enlarge) | |
Join four instructors from the Monastery in securing Jaya Bluffs against the plague.
Quest information[edit]
Requirements[edit]
Objectives[edit]
- Find Zho, Talon Silverwing, Panaku, and Lo Sha in Jaya Bluffs.
- Destroy the plague creatures that have overrun the monastery.
- See Zho for your reward.
Reward[edit]
- 2,000 Experience
- 100 Gold
Walkthrough[edit]
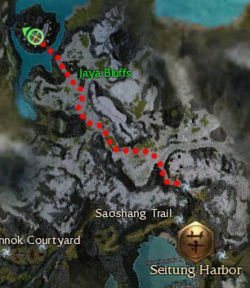
Head out into Jaya Bluffs and go northwest, fighting hostile Tengu along the way. When you reach Zho and company, there will be three groups of Afflicted in a small monastery, the Sizhou Hall on a tall island. Eliminate them and claim your reward.
NPCs[edit]
Allies[edit]
 12 (?) Talon Silverwing
Foes[edit]
 10 (24) Sickened Peasant
 8 (23) Sickened Servant
Afflicted (3 random)
 14 (24) Afflicted Warrior
 14 (24) Afflicted Ranger
 14 (24) Afflicted Monk
 14 (24) Afflicted Necromancer
 10 (24) Afflicted Mesmer
 10 (24) Afflicted Elementalist
 14 (24) Afflicted Assassin
 12 (24) Afflicted Ritualist
Dialogue[edit]
Initial dialogue[edit]
- Brother Pe Wan
- “Master Togo has sent Zho, Talon Silverwing, Panaku, [sic] and that bumbling Lo Sha to the monastery in Jaya Bluffs. He believes that the Monks there might have some knowledge that will help us to combat this plague more effectively. Honestly, he sent Lo Sha, and yet someone of my obvious skills is relegated to role of messenger boy. In any case, he wants you to meet them and give them any assistance they may require.”
Intermediate dialogue[edit]
On meeting the four:
- Lo Sha: “Ah, there you are. We were told to expect you, and I was quite relieved, truth be told. We have all heard tales of your exploits thus far, and we are mightily....”
- Panaku: “Still your wagging tongue, Lo Sha, or I shall make it still!”
- Zho: “Enough, both of you. <Party leader>, the situation is serious. Afflicted creatures have overrun the monastery. I fear we have arrived too late to save the Monks within, but we must try. We will follow Talon's lead and charge when and where he tells us. Panaku, this means you. Talon, we await your orders.”
- Panaku: “I will kill when it is time to kill.”
- Talon Silverwing: “It is my hope that we will take them by surprise. Follow me, and when I give the order, strike quickly.”
Talon moves to the edge of the bridge, and the four join the party as allies.
After clearing Sizhou Hall:
- Panaku: “That was the last of them. It looks as though they finished off the Monks before we arrived.”
- Zho: “Thank you, Talon. <Party leader>, come over here and speak with me.”
Reward dialogue[edit]
- Zho
- “Although you are still learning, it is clear that Master Togo places a great deal of faith in you, and I am beginning to understand why.”
Notes[edit]
- If you avoid the Sizhou Hall after Zho, Talon Silverwing, Panaku, and Lo Sha have joined your party as allies, you can bring them along with you to kill Jaya Bluffs foes that are not in Sizhou Hall.
- After clearing Sizhou Hall, Zho says "<party leader>, come over here and speak with me" for the reward dialogue, even when this quest is active on another party member and not the leader. The reward dialogue will only appear for the member(s) who has/have this quest active.