User:Wendy Black/Lab03
| Home |
Heroes |
Defenders |
Talk About It |
Miscellaneous |
|---|
Using Variables[edit]
A while back I showed how math functions could be stored in variables. Now here is another good use for variables.
This is some BLUE text.
This is some small brown text.
This is some More blue text.
Now let's look at how variables were used:
- {{#vardefine:blutxt|display: block; font-size:1.75em; color:lightblue;}}
- {{#vardefine:smalltxt|display: block; font-size:0.5em; color:brown;}}
- <span style="{{#var:blutxt}}">This is some BLUE text.</span>
- <span style="{{#var:smalltxt}}">This is some small brown text.</span>
- <span style="{{#var:blutxt}}">This is some More blue text.</span>
The first two lines define a string of text into the variables blutxt and smalltxt. Now these two variables can be used over and over again.
Here is yet another example.
This line of code is real long and I have to type it ten times!
This line of code is real long and I have to type it ten times!
This line of code is real long and I have to type it ten times!
This line of code is real long and I have to type it ten times!
This line of code is real long and I have to type it ten times!
This line of code is real long and I have to type it ten times!
This line of code is real long and I have to type it ten times!
This line of code is real long and I have to type it ten times!
This line of code is real long and I have to type it ten times!
This line of code is real long and I have to type it ten times!
- {{#vardefine:r|This line of code is real long and I have to type it ten times!<br>}}
- {{#var:r}}{{#var:r}}{{#var:r}}{{#var:r}}{{#var:r}}{{#var:r}}{{#var:r}}{{#var:r}}{{#var:r}}{{#var:r}}
Using Conditions[edit]
So I showed you how a variable is a container for holding a lot of information. But now lets look at the conditional statement.
- {{#vardefine:x|534}}
- {{#vardefine:title|No Title}}
- {{#ifexpr: {{#var:x}} > 49|{{#vardefine:title|Sunspear Sergeant}}|}}
- {{#ifexpr: {{#var:x}} > 99|{{#vardefine:title|Sunspear Master Sergeant}}|}}
- {{#ifexpr: {{#var:x}} > 174|{{#vardefine:title|Second Spear}}|}}
- {{#ifexpr: {{#var:x}} > 299|{{#vardefine:title|First Spear}}|}}
- {{#ifexpr: {{#var:x}} > 499|{{#vardefine:title|Sunspear Captain}}|}}
- {{#ifexpr: {{#var:x}} > 999|{{#vardefine:title|Sunspear Commander}}|}}
- {{#ifexpr: {{#var:x}} > 2499|{{#vardefine:title|Sunspear General}}|}}
- {{#ifexpr: {{#var:x}} > 7499|{{#vardefine:title|Sunspear Castellan}}|}}
- {{#ifexpr: {{#var:x}} > 14999|{{#vardefine:title|Spearmarshal}}|}}
- {{#ifexpr: {{#var:x}} > 49999|{{#vardefine:title|Legendary Spearmarshal}}|}}
- Your rank is {{#var:title}} because you have {{#var:x}} promotion points.
In this example above the varible x never changes but is checked using the #ifexpr: condition. Meanwhile the title variable is set to "No Title" and is changed 5 times as each condition is read. The outcome of this running on any page would look like this;
Your rank is Sunspear Captain because you have 534 promotion points.
This is very much the same as my custom userbox called Timerank go look at the code and copy it to one of your pages to play with the variables.
Simon's Table to Template[edit]
Ok Simon, this is what YOU would need to change, for this table (shortened to 3 rows) to become a template.
Change all the lines:[[File:Colored Map Icon Red.png|15px|link=]]
To read: [[File: {{ #switch: {{{q1|}}} | 1 = Tango-check-icon | #default = Colored Map Icon Red }}.png|15px|link=]]
Then you will need to rename each switch q1, q2, q3, and so on...
Save this as a normal wiki page in your user name space such as; User:Simon of Aragon/Template/Table01 then add it to the viewing page using the double braces.
{{User:Simon of Aragon/Template/Table01
| q1=1
| q8=1
| q55=1
}}
The benefit is you will be able to track more than one character without digging through a lot of code. The downside as I told your before you will need to know which quest is which by the variable you assign it. Also look around the kind of template you are looking for might already exist. For example; Adding another category to the Quest list table template can produce different results;
| Quest | Type | Profession | Given by | Given at | Preceded by | Followed by |
|---|---|---|---|---|---|---|
| Army Life | Secondary | |
Armsman Pitney | Piken Square | ||
| Gargoyle Trouble | Secondary | |
Warmaster Grast | Old Ascalon | ||
| Into the Breach | Secondary | |
Warmaster Grast | Old Ascalon | Military Matters | |
| Military Matters | Secondary | |
Warmaster Grast | Old Ascalon | Into the Breach |
Performance Monitor[edit]
GWW has a blurb about this subject. I would expand on it, but some people edit your stuff and content gets lost. This appears as a small green, yellow, or red dot on your screen and many people don't know the basics about this little tool. Recently my graphics card burned and fried. I was getting FPS: 6 (six frames per second) which looks like people are teleporting as they run by you. As you can see, with my new card I am getting 60 FPS which makes for smoother animation.
The next thing you will notice is the Pings, The last ping took 172 thousandths of a second to reach the game server. This means in 1 second at 200ms about 5 packs of information travel from server to my PC. These packs contain chat, my position in the game, and all the other players information as well. The above mentioned blurb doesn't tell you that a big ping can result in big lags during the game.
The Server IP is a NCSoft server located in Austin, Texas. If it wasn't for the fact they are ALL in Austin, Texas you might could use this to get a server closer to where you live and receive a better connection. In my opinion this last bit of information is not practical.
Also you can see a working graph of this information if you press Shift+F10 and TAB to switch graphs. Shift+F10 will close the graph. Overall this monitor is a good tool to check if you are experiencing lags or graphics issues.
Simple GIMP Enhanced Images[edit]


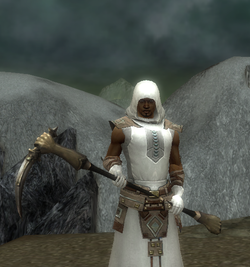
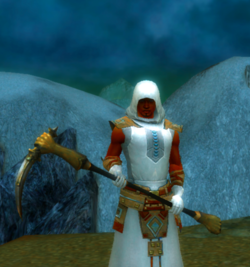
Using the free Open Source program called GIMP you can do this to liven up some otherwise drab looking images.
No skills required.
- Here are the instructions on how to do this process;
- Open your screen shot in GIMP.
- Colors --> Auto --> Color Enhance (looking good already?)
- Colors --> Color Balance...
- Move the Cyan / Red slider on the midtones to -30
- Colors --> Components --> Channel Mixer...
- Output Channel Red: Red = 160, Green = -60, Blue = 0
- Output Channel Green: Red = 0, Green = 100, Blue = 0 (no changes)
- Output Channel Blue: Red = -60, Green = 60, Blue = 100
Finally I did some minor repair on his scythe at the belt. The weapon was consumed by the model. Shadow across his eyes under the hood. Tossed in a Gaussian Blur of 1 pixel.
