Charismatic Harm's Dungeon Crawling Journal[edit]
Welcome to my little journal. I hope you can find some of the information in here to be useful. I tried to take some notes as I was running through these dungeons to make it easier for people when going through these dungeons themselves. This is a work in progress and will be updated as I crawl through the dungeons.
Dungeon Quick Reference[edit]
I've set this section up to quickly display information about the dungeons that most people will be concerned with. Clicking the dungeon name will take you to the section of the Journal associated with that dungeon. These sections contain more detailed information about the dungeons including the nearest outpost, quest giver, quest giver location, hints, tips, team builds and maps to make your journey through the dungeons a little easier.
| Dungeon Name
|
Reputation Reward
|
Gold Reward
|
Experience Reward
|
Number of Level(s)
|
Boss / Bosses
|
| Raven's Point
|
1,500 Norn Reputation
|
1,250 Gold
|
5,000 XP
|
3 Levels
|
|
| Rragar's Menagerie
|
3,000 Ebon Vanguard Reputation
|
1,500 Gold
|
7,500 XP
|
3 Levels
|
- Rragar Maneater
- Hidesplitter
|
NOTE: All dungeons have a Beacon of Droknar in them to receive Dwarven Reputation Points by killing enemies in the dungeons. The Reputation Rewards listed above are given upon completion of the associated dungeon.
Dungeons[edit]
General Information[edit]
Teammates (Builds)[edit]
|
Dungeon Maps[edit]
|
Other Maps / Pictures[edit]
|
General Information[edit]
Teammates (Builds)[edit]
- Charismatic Harm (PvE Ele)
- Acolyte Sousuke (SF Ele 1)
- Vekk (SF Ele 2)
- Gwen (Interupt Mesmer)
- Lo Sha [Illusion Henchman]
- Eve [Blood Henchman]
- Mhenlo [Healer Henchman]
- Lina [Protection Henchman]
- An Unlit Torch can be found in an unlocked chest near a closed gate after killing a group of enemies that guards the gate
- Light the Torch using a nearby lit Flame Brazier
- Torch stays lit for 30 seconds
- Use the Torch to light Flame Braziers to open gates
- You do not need to continue carrying the Torch, a new one will become available near the next gate
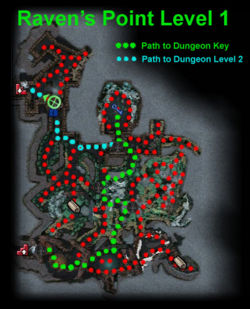
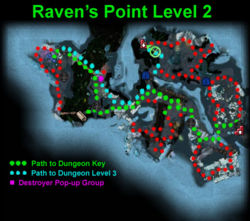
- Watch out for the Destroyer Pop-up Group on Level 2 after crossing the bridge with the Dungeon Key
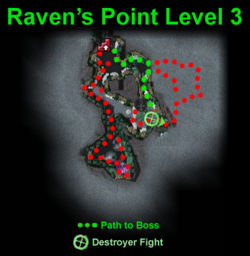
- On Level 3, take Engineer Xapp around to all of the Ice Dart Traps in the area of the Destroyer Fight. He will reactivate the traps and they will help to kill the Destroyers.
- FYI: There is an area of the dungeon that seems to be unexplorable, but if you head to the east after you kill the boss, you can walk into a huge area of the map. I don't think it will actually do anything for you, but it was neat to find.
|
Dungeon Maps[edit]
|
Other Maps / Pictures[edit]
|
General Information[edit]
Teammates (Builds)[edit]
- Charismatic Harm (PvE Ele)
- Acolyte Sousuke (SF Ele 1)
- Vekk (SF Ele 2)
- Gwen (Interupt Mesmer)
- Lo Sha [Illusion Henchman]
- Eve [Blood Henchman]
- Mhenlo [Healer Henchman]
- Lina [Protection Henchman]
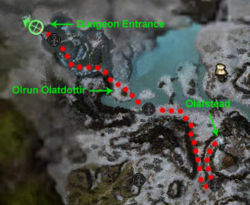
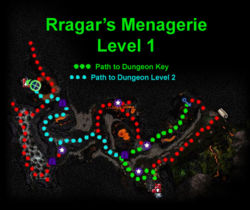
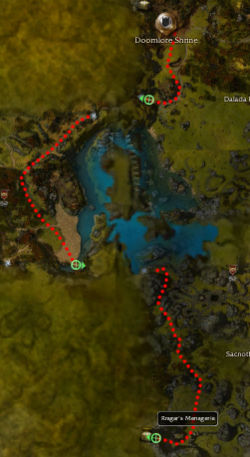
- Getting There:
- Don't follow the arrow on the compass for the quest
- The path shown in the map above is much easier
- Approximately 5-8 groups to fight the entire way to the dungeon
- Level 1:
- There are a ton of pop-up groups on this level
- Use Dwarven Powder Kegs to blow open Cracked Walls
- Supposedly, the "Blobby" [Clone] things will help you fight if you give them a Fleshreaver Morsel
- I have not tried using these allies
- Unsure if they will follow you to subsequent levels
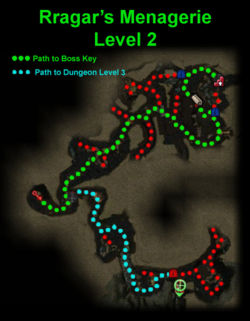
- Level 2:
- Proceed cautiously into the first room
- Both groups will run shortly after being aggroed
- DO NOT follow them immediately
- Beware of Rock Slides and Giant Rolling Boulders
- There are quite a few bosses throughout the area
- They are usually standing alone...this is a sign
- They have somewhat large pop-up groups with them
- Try to pull the boss without agging the pop-up
- After killing the boss, move forward to agg whatever didn't pop the first time
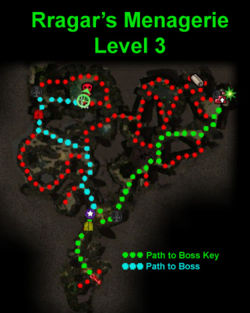
- Level 3:
- If there is a Dwarven Powder Keg Station near a group of enemies use it
- Flag plant henchmen right on top of the Station
- Repeatedly click the Station to pick up and drop a Powder Keg
- These kegs do 50 dmg and knock down an enemy
- Several kegs will take down an entire group of melee enemies quickly
- It's also fun to watch 50 of them blow up one after the other
- Once you get to the bosses, be very careful
- Note the pictures of where to fight (located in the Maps section)
- Stand behind the rock so as to avoid the attacks from Hidesplitter
- Kill Rragar Maneater first. He will rez Hidesplitter
- Kill Hidesplitter
|
Dungeon Maps[edit]
|
Other Maps / Pictures[edit]
|
Unknown[edit]
General Information[edit]
- Nearest Outpost:
- Quest Giver:
- Quest Name:
- Rewards:
- Selected Title Track:
- Dungeon Boss:
Teammates (Builds)[edit]
|
Dungeon Maps[edit]
|
Other Maps / Pictures[edit]
|
