Rragar's Menagerie
| Rragar's Menagerie | |
|---|---|
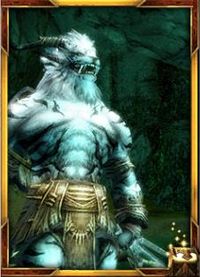
| |
| Campaign | Eye of the North |
| Region | Depths of Tyria |
| Type | Dungeon |
| Levels | 3 |
| Reward chest | Hidesplitter's Chest |
| Required quest | Veiled Threat |
| Party size | 8 |
| Exit(s) | Sacnoth Valley |
| Images | |
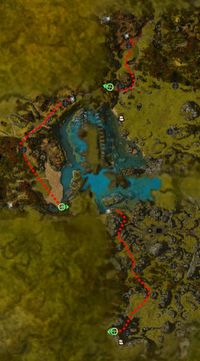 Getting there from Doomlore Shrine | |
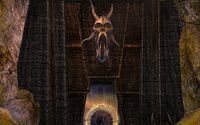 Rragar's Menagerie entrance | |
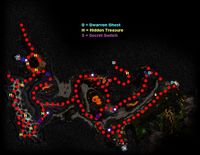 Level 1 | |
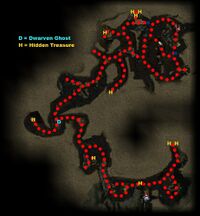 Level 2 | |
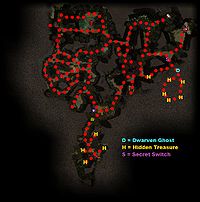 Level 3 | |
“Greater dangers awaited deep within the earth, where a Charr named Rragar Maneater bred a race of murderous creatures. These creatures, known as fleshreavers, were horrible, voracious monsters with an unusual evolutionary method. Young fleshreavers, it seems, are born as barely more than tiny skeletons. To survive and evolve, the emaciated young rely on their parents to harvest muscle, organ, and fat from their prey, and then layer it over their skeletons of the newborns. Rragar had taken advantage of this disgusting, yet easily-manipulated evolution, to perform ghastly experiments on the fleshreavers, turning them into powerful weapons to be used against humanity. By searching carefully, we found unexpected allies among Rragar's failed creations. Rragar was still difficult to defeat, for he was armed with powerful magic and could teleport freely around his twisted workshop.
NPCs[edit]
- These quests will affect the spawns in this area:
Allies[edit]
 20 Cait (Collector of 5 Fleshreaver Morsels) (level 1)
 1 Beacon of Droknar (all levels)
 20 "Blobby" (level 1)
Hidden objects[edit]
Hidden objects are revealed using Light of Deldrimor.
Level 1[edit]
See map for exact locations.
 (24) Dwarven Ghost near the Area Map.
 (24) Dwarven Ghost near the Dungeon Key.
 (24) Dwarven Ghost at the end of the secret passage.
 Secret Switch in the north-East area of the dungeon, opening a secret passage (beware of burning dmg).
 Hidden Treasure half way the secret passage.
 Hidden Treasure at the Resurrection Shrine South of the junking leading to lvl 2.
 5 Hidden Treasures in the grotto most west of the map (2 at the bottom, 1 in the middle and 2 at the top).
 3 Hidden Treasures in the last room before entering lvl 2 of the dungeon.
Level 2[edit]
See map for exact locations.
 (24) Dwarven Ghost ally at the last junction before the Boss Key.
 3 Hidden Treasures just beyond the western Dungeon Lock, in in the most north part of the map.
 Hidden Treasure west from the above treasure location, in a small pool.
 Hidden Treasure at the end of a dead end passage leading south.
 Hidden Treasure in the room with the Boss Key (almost on top of the key).
 Hidden Treasure south from the junction to the last Boss Lock.
 Hidden Treasure next to the Boss Lock that's before the entrance leading to level 3.
 2 Hidden Treasures at the end of the passage after passing the last Boss Lock.
Level 3[edit]
See map for exact locations.
 Secret Switch opening a passage to a secret room to the south.
 (24) Dwarven Ghost just after entering the secret room.
 5 Hidden Treasures in the secret room opened by the Secret Switch.
 Hidden Treasure at the end of the passage leading southeast from the Secret Switch.
 4 Hidden Treasures near the Boss Key, 1 in each of the 4 dead end passages.
Charmable animals[edit]
 5 Albino Rat (levels 2 and 3)
Foes[edit]

 20 (26) Charr Axemaster (all levels)
 20 (26) Charr Blademaster (all levels)
 20 (26) Charr Shadowblade (all levels)
 20 (26) Charr Seeker (all levels)
 20 (26) Charr Prophet (levels 1 and 2)
 20 (26) Charr Mender (all levels)
 20 (26) Charr Defiler (all levels)
 20 (26) Charr Hexreaper (levels 1 and 3)
 20 (26) Charr Dominator (all levels)
 20 (26) Charr Flameshielder (all levels)
 20 (26) Aggressive Ooze (all levels)
 24 (26) Magma Blister (level 1)
 20 (26) Ominous Ooze (all levels)
 20 (26) Shimmering Ooze (all levels)
 20 (26) Earthbound Ooze (all levels)
 20 (26) Fleshreaver Hound (all levels)
 20 (26) Fleshreaver Harrower (levels 2 and 3)
 20 (26) Fleshreaver Nephilim (all levels)
Bosses[edit]
Charr
 24 (30) Beastmaster Korg → Scavenger's Focus (level 2) (Korg's Recurve Bow)
 24 (30) Charr Warden → Burning Arrow (4 on level 1)
Fleshreavers
 24 (30) Flesheater → Toxic Chill (2 on level 3) (The Flesheater)
 24 (30) Elder Nephilim → Cruel Spear (4 on level 2, 2 on level 3)
Boss-like foes[edit]
Charr

 29 (32) Rragar Maneater (all levels)
Fleshreaver
 29 (32) Hidesplitter (level 3)
Objects[edit]
- Hidesplitter's Chest (spawns when you defeat Rragar Maneater and Hidesplitter)
- Dwarven Powder Keg Station
- Scrawled Hide
Notes[edit]
- You need to have the quest Veiled Threat (from Gron Fierceclaw in Doomlore Shrine) to advance through level 1 of this dungeon.
- You will earn 3,000 Ebon Vanguard reputation points upon your first completion of this dungeon on normal mode, and 1,500 for subsequent completions. 4,500 Vanguard reputation points are awarded for completing this dungeon for the first time in hard mode, and 2,250 for subsequent completions in hard mode.
- Feeding a "Blobby" will cause it to join your party as an ally.
- Rragar and Hidesplitter do not regenerate their health.
- When fighting Rragar and Hidesplitter, it is useful to kill Rragar first, because he carries Resurrection Chant.
- Completion of this dungeon will fill in page #2 of the Master Dungeon Guide storybook.
Trivia[edit]
- The first level in this dungeon includes the entire last level of Heart of the Shiverpeaks as part of its map.
- Rragar's room contains a moss-covered sculpture of what appears to be a Dwarven face.
| One-level | Ooze Pit • Fronis Irontoe's Lair • Secret Lair of the Snowmen |
|---|---|
| Two-level | Arachni's Haunt • Bogroot Growths • Sepulchre of Dragrimmar |
| Three-level | Bloodstone Caves • Catacombs of Kathandrax • Cathedral of Flames • Darkrime Delves • Heart of the Shiverpeaks • Oola's Lab • Raven's Point • Rragar's Menagerie • Shards of Orr • Vloxen Excavations |
| Five-level | Frostmaw's Burrows • Slavers' Exile |