The Imploding Past
| The Imploding Past | |
|---|---|
| Section | Charr Homelands Quests |
| Campaign | Eye of the North |
| Given by | Captain Langmar in Grothmar Wardowns |
| Preceded by | Failure to Communicate |
| Followed by | The Assassin's Revenge |
| Type | Secondary quest |
| Map(s) | |
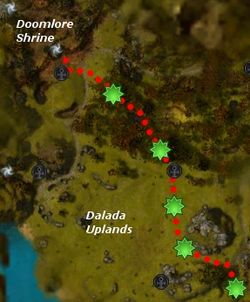
 Quest path from Doomlore Shrine | |
Kill some Charr groups with Anton.
Quest information[edit]
Objectives[edit]
- Meet Anton in Dalada Uplands.
- Defeat the Charr warbands and discover the location of Rend Ragemauler.
- See Captain Langmar for your reward.
Reward[edit]
- 10,000 Experience
- 150 Vanguard reputation points
Walkthrough[edit]
- Exit from Doomlore Shrine and head south to find Anton (The first marker on the quest map).
- The quest updates points that will lead you into the big open field near Molotov Rocktail -- stay on the edge of the clearing if you want to avoid an encounter. Keep in mind that you can activate the resurrection shrines along the way.
- In each Charr group there is a Prophet and a Charr Flameshielder. Thus, the easiest way to do this quest, with heroes and henchmen only, is to start from Doomlore Shrine and get control of the Siege Devourer stationed outside the outpost.
- After finishing off the fourth group of Charr, map travel to Longeye's Ledge and head outside to speak with Captain Langmar for your reward!
NPCs[edit]
Allies[edit]
 20 (20) Anton
Foes[edit]
Charr (initially allies, turns hostile when approached)

 20 (26) Charr Axemaster
 20 (26) Charr Blademaster
 20 (26) Charr Seeker
 20 (26) Charr Mender
 20 (26) Charr Hexreaper
 20 (26) Charr Dominator
 20 (26) Charr Flameshielder
Dialogue[edit]
Initial dialogue[edit]
- Captain Langmar
Anton went to the Charr for information? He always was a strange individual. Claims he was imprisoned in Surmia, and only escaped when the city fell. Still, he has served the Ebon Vanguard well. Whenever the issue of Rend Ragemauler comes up, he withdraws. He loses focus on everything except revenge. I do not know the details but can guess that this Ragemauler took something precious from him. His obsession will kill him if he cannot temper it with common sense.
Go. Find Anton. Help him work through his rage with the Charr. See that he returns to us in one piece. We cannot afford to lose such a skilled fighter.
 Accept: "Rage, rage against the dying of the Charr..."
 Decline: "But you can afford to lose me, I see. Hmph!"
 Ask: "Anton would have headed to Dalada Uplands. We have reports that Charr warbands are regrouping there."
Intermediate dialogue[edit]
- Meeting Anton.
- Anton: "Ahh, the call of battle was too much to ignore, was it? You were drawn here like a griffon to its mating grounds."
- Anton: "I welcome the extra talons. Come. One of these Charr knows where I can find Rend Ragemauler, and I intend to extract that information.'"'
- 1st Charr group.
- Charr Axemaster: "You seek the Ragemauler? Tell me, does your kind always seek death?"
- 2nd Charr group.
- Charr Prophet: "You will find nothing here but pain and suffering!"
- 3rd Charr group.
- Charr Prophet: "Pathetic humans. Do you really think you can stand against us?"
- 4th Charr group.
- Charr Mender: "The Ragemauler approaches. As we speak he comes to Sacnoth Valley. Are you so eager to die?"
- Completing the quest
- Anton: "At last I have my answer. Sacnoth Valley! For his help, I gave this Charr a quick death. For your help, I grant you reprieve from what must come next."
- Anton: "Tell Captain Langmar where I have gone. This is simply something I must do alone. My life has led, inexorably, to this moment. A life lived too long in pain over those whose lives and loves and dreams were cut short. Farewell."
Reward dialogue[edit]
- Captain Langmar
I was afraid of this. Anton has become enslaved by his emotions, driven by obsession into rash action. I must deal with this situation before his actions bring ruin down upon us all! Thank you for your assistance in this matter. I fear I will have to call upon you again soon.
Notes[edit]
- Killing the four Charr mobs will complete this quest. You do not need to meet Anton.
Trivia[edit]
- The accept text is a reference to a famous poem by Dylan Thomas entitled "Do not go gentle into that good night".