Druid's Isle
| Druid's Isle | |
|---|---|
| Region | Maguuma Jungle |
| Environment Effects | Fount Of Maguuma |
| Map | |

| |
Druid's Isle is a Guild Hall inspired by the Maguuma Jungle region.
Layout[edit]
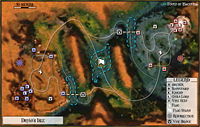
Druid's Isle is a popular map for split builds. Each base has two entrances, a main front entrance leading directly to the flag-stand and a back entrance into the base which is connected to the flag stand area by a vine bridge which is initially not accessible and must be opened during play. A narrow channel runs along the edge of each base beneath the outer wall.
Map mechanics and rewards[edit]
- Each base has a vine bridge leading to its back entrance which is initially closed and needs to be opened using a vine seed.
- A vine seed can be found in each base -- dropping the seed on the glowing green circle outside of a base creates a vine bridge into the back entrance. Dropping it anywhere else causes vines to sprout up out of the ground and knock down adjacent enemies for four seconds, after which the vines retreat into the seed and the vine seed is ready to be picked up again.
- Around the flag stand is a Maguuma Fountain, which provides a +1 pip of Health regeneration for anyone standing in the water. This effect is removed seconds after the player leaves the water.
- In addition to these rules, this map follows the standard rules of a GvG match.
Strategy and tactics[edit]
Druid's Isle is a map that supports a flexible, more balanced play style. It gives good splitting opportunities due to the vine bridges. Due to the central location of the flag-stand, however, a team with strong 8v8 play can control the stand for the entire match. It is common practice for teams to leave their flagger inside their base at the start of a match to prevent an early split, gaining an immediate advantage at the start of the map. Likewise, teams that are split capable are likely to take the vine seed out of their own base immediately at the start of the match and either open the vine bridge straight away, or store the seed nearby to allow the bridge to be opened quickly. A common tactic that has been seen on this map is a vine bridge Lord gank where in the closing minutes of the match one team will suddenly rush across the opponent's vine bridge, leaving the two people required to body block the vine bridge behind while all of their offense rushes the enemy Lord to attempt a kill before the body block can be broken or defensive characters can make it to him; their progress will be hindered however by having to run to him by the long way. This tactic can easily be countered by: good positioning near the end of the game to slip through the vine bridge before a body block is formed, killing the body block, running quickly around the long way (IMS skills like Sprint help here), or by healers killing themselves before a time-out to allow a respawn directly beside the Lord pit. The flag running distance is reasonably long on this map, but if the vine bridge is open a flag can be run out more rapidly through the back door. For this reason a team that is starting to lose may open their own vine bridge to allow flagging to continue even when they are pushed back into their own base. Teams that are designed to fight purely 8v8 sometimes run out through their valley beside the front door instead of the usual route to force an 8v8 fight outside their back door and prevent split play while also denying the enemy access to the flag stand.
Defensive team[edit]
There is only one Archer covering the rear base directly, and there are two covering the front base. The Vine seed spawns on the opposite side from the front gate. Opponents running through the valley beneath the main wall are obstructed from the top of the walls and can effectively avoid fire from the outer archers. The bodyguard is far behind the Guild Lord deep within the Lord pit so he can be easily defended against early gank attempts.
Offensive team[edit]
The attackers' base has a disadvantage compared to the defenders' base. The bodyguard can be easily attacked by a ranger with a flatbow or longbow from the cliff overlooking the lord area. The defending team will use this as an easy way to attack the bodyguard if offensive team's defense is out of position. An obstruction prevents the attackers from using the same tactic against the defenders. The general base layout is the same as the attacking side.
Disputed areas[edit]
Outside each base there is a choke point on the corner after each front door. NPC fire does not reach this choke point so it is a common mistake for teams under heavy pressure to fall back into this choke point and find themselves under even more pressure before they can make it to their own base and fall under the arc of their own archer's range. For this reason retreats need to be called early and be decisive to prevent wipes. The flag stand area is reasonably open so body blocking is difficult.