Isle of Solitude
| Isle of Solitude | |
|---|---|

| |
| Region | Kourna/Vabbi |
| Environment Effects | None |
| Map | |

| |
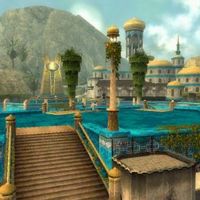
Isle of Solitude is a guild hall introduced with the release of Guild Wars Nightfall. Northern base represents the Vabbian architecture style, while southern base is styled after a Kournan garrison.
Layout[edit]
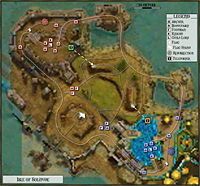
The Isle of Solitude consists of a giant battlefield with two bases on each side. At the edge of the battlefield, and between the bases, is the Flag stand, which sits on a cliff accessible via a short pathway up the reverse side. Each base has a one-way teleporter near the Guild Lord, which sends anyone entering it to the main battlefield area. The quickest way to the flag stand, however, is by walking out the front door. In addition to these two exits, each base has a back door, which leads to the edge of the main battlefield farthest from the flag stand.
Map Mechanics and Rewards[edit]
- The two teleporters in this map are one-way, they can be used to teleport out of the base by players from either team, but cannot be used to enter the base.
- This map follows all the other standard rules of a GvG.
Strategy and tactics[edit]
This map favours split tactics because of its large size and relatively poorly defended back door. Both knights can sometimes be pulled and killed before a team can respond due to the long distances involved. Morale boosts can easily be obtained against poorly prepared flaggers, flaggers must work hard to stay on top of flags. The standard 8v8 start to this map is for both teams to proceed out through the teleporters, but often the flaggers will go from the front door alone to plant the flag which can lead to early flag runner ganking attempts.
Defensive team[edit]
The back door is accessible over a bridge and is very poorly defended. The knights can be accessed very quickly and pulled and killed on the first split attempt, possibly before any response can be made. The lord pit is very wide open and gives an easy escape route to gankers in the form of the teleporter so responses to splits need to be fast and aggressive. Resurrecting healers can quickly be within casting range of the guild lord so dying before time can be utilised effectively to stop a lord gank. The walls are high and steep but clear of obstructions so ranged attackers and casters can support a team on the battlefield below if they push up close to the walls.
Offensive team[edit]
The Offensive team's base is practically identical to the defensive teams.
Disputed areas[edit]
The flag stand is isolated from the main battlefield by high cliffs. Flaggers waiting to plant a flag can assist the team if the battle is pushed close to the base of the cliff below the flag stand, but can also be easily pushed as support will take a long time to get there. For the most part the battlefield is largely clear of obstructions, but the teleporters exit into a choke point so an entire team coming through can find themselves in a tight spot with little room for movement. Both teams have footmen very close to the battle field so these can easily be pulled and killed, or fallen back into to add pressure.
Notes[edit]
- Because the battlefield is so huge, players at the flag stand cannot see players near each base's back doors.
- There is a staircase that leads to a dead end in the attacker's hall, inexperienced teams sometimes try to move down this at the start of the match.
- This map is also used for the second isle in the Dajkah Inlet challenge mission.
