Burning Isle
| Burning Isle | |
|---|---|
| Region | Ring of Fire Islands |
| Environment Effects | Lava |
| Map | |

| |
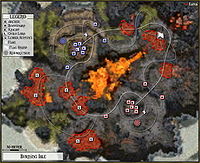
Burning Isle (Guild Hall) is reminiscent of the Ring of Fire Islands in Tyria.
Layout[edit]
The Burning Isle Guild Hall has two bases located opposite each other, separated by Lava pools. The Guild Lord is located on a raised dais with two Archers, two Knights and one Bodyguard. From the main area, there are three paths towards the rest of the map, a path due east from the main area will lead towards the opponents base through lava pools populated by Lesser Flame Sentinels, the main path, which goes slightly northwest and heads towards the flagstand and an alternative to the main path towards the flagstand, which first heads west and passes over the main path twice via a bridge. Going along the main path is the fastest way to the flagstand, but the party will have to pass through a Lava pool before the main battle area is reached. The alternate route will not expose the team to Lava.
Map mechanics and rewards[edit]
- Several lava pools feature prominently on the map. While standing in this environment players are affected by the Crippled and Burning Conditions every three seconds.
- Lesser Flame Sentinels, hostile to both teams, guard the shorter, lava-filled route between the two bases. They die to Health degeneration around the 8:00 mark by themselves, but can be killed by players earlier, netting 40 Balthazar Faction.
- In addition to these rules, this map follows the standard rules of a GvG.
Strategy and tactics[edit]
Due to the layout of this Burning Isle and its poor base defense, spike oriented teams as well as teams that favor 8v8 (or 7v7) battles are often used in this Guild Hall. Furthermore, this map has several nasty choke points and is difficult to run flags on. One of the most reliable tactics against such teams, splitting, is hampered by the Lesser Flame Sentinels that are blocking the primary path towards the opponents base. Before an effective split can take place, these have to be removed from play. This usually takes a couple of minutes, and this time frame can be used by the spike or pressure team to score a few kills on the team that tries to stall the spike/pressure team. Usually both teams meet at the flag stand, although occasionally a lone ranger will be sent to kill the Lesser Flame Sentinels to allow for splitting later in the game. Split teams can have difficulty clearing these Sentinels as they do very high damage, but a ranger with a flatbow can kill them without ever coming into range. Protective Spirit is strongly recommended against the Sentinels.
Defensive Team[edit]
The outer archers provide virtually no defense. They will be killed almost instantly by anything and provide virtually no snaring potential or extra damage. It is also extremely difficult to protect them from gankers without exposing yourself. Unfortunately, the Guild Lord area is also quite vulnerable. Both outer archers are easily reached by a ranger with longbow or flatbow from a raised platform located to the west of the Guild Lord dais. The knights can regularly be pulled to the raised path or beyond. Finally, an attacking team can push up against your walls and be safe from archer fire and still cast inside your lord area. The res shrine is just a bit too far to be covered from inside the lord area and people who res are exposed and in a choke point as they try to rejoin the group.
The terrain can however be used to your advantage a little bit. Monks can stay on the ground outside the lord area and kite around the lord area. This makes them difficult to hit for rangers and warriors and they can still heal the inner area. This is particularly effective with Return. You can also sometimes bodyblock the other team inside your inner area, forcing them to take NPC fire without being able to pull out when they want to. Finally, if you do manage to push them out of your base, you can easily wipe the other team as they either have to push up and over the bridge (giving you plenty of chances to snare and kill them from the bottom) or they have to push through the lava, again taking damage and snares.
Realistically, Burning Isle is a defender's nightmare. This map is notorious for promoting gimmicks and spikes, and for good reason.
Offensive Team[edit]
The Offensive team has a substantially similar base as the Defensive team, although the offensive team's ramp into the guild lord area is solid (and thus cannot be hidden under).
Disputed Ground[edit]
There are numerous dangerous choke points around the flag stand. The flagger is very exposed to a push or spike as he moves in the flag and there is almost no possibility of retreat. Don't lose the 8v8 fight or else it is very hard to win. Because Guild Wars lacks a true Z-axis, it is also possible to attack or bodyblock the upper bridges from the lower level. The flagstand itself is only reachable through a Lava pool located in the north-northwestern corner of the map. Players placing the flag at the stand are quite vulnerable to attacks from a ridge that lies beside this Lava pool.