The Flight North
| The Flight North | |
|---|---|

| |
| Section | Ascalon Quests |
| Campaign | Bonus Mission Pack |
| Given by | Durmand in Lion's Arch, Kaineng Center, Kamadan, Jewel of Istan |
| Type | Mini-mission |
| Map(s) | |
 (Click to enlarge) | |
This is the story of Gwen escaping from the Charr. This quest area can be entered from a copy of Gwen's Story obtained from Durmand [Historian] in Lion's Arch, Kamadan, or Kaineng Center.
Mission information[edit]
Requirements[edit]
- No weapon or offhand equipped.
- Alone in party.
Objectives[edit]
- Escape from the Charr prison camp.
- Find a way to defeat the siege devourer.
- Navigate the underground ruins and find an exit.
- Reach the foothills of the distant mountain. Be wary of Charr patrols.
Reward[edit]
Discovery Mode[edit]
Discovering can be made once per mission, but you have to complete the original mission once before this mode is available.
1. Discovery Bonus — You found the key hiding places Gwen could have used to elude the Charr.
- Achieved by finding all seven hiding places that Gwen could have used to elude the Charr.
- Reward:
- 2
 500
500
- You've made a new discovery! See Durmand [Historian] for a reward.
- 2
2. Assistance Bonus — You determined how Gwen would have freed the Ascalonian Spirits from their long nightmare.
- Achieved by aiding the spirits in completing each obstacle they face without reattempting it.
- Reward:
- 2
 500
500
- You've made a new discovery! See Durmand [Historian] for a reward.
- 2
3. Time Attack — You showed how quickly Gwen might have made her escape.
- Achieved by completing the mission in less than 10 minutes.
- Reward:
- 2
 500
500
- You've made a new discovery! See Durmand [Historian] for a reward.
- 2
Walkthrough[edit]
During this mission, you have the Gwen disguise, 300 Health, 20 Energy, 4 Energy regeneration, 12 Illusion Magic
| Flee | Throw Rock | Hide | Feign Death | Distortion (Gwen) | Illusion of Haste | Shared Burden (Gwen) | Sum of All Fears (Gwen) |
Devourer[edit]
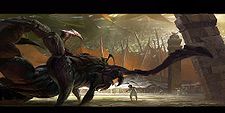
When you are let out of the cage, use the pillars to block the Devourer Catapult's Siege Strike. Pick up the rocks and use Throw Rock to destroy the Fractured Pillar. Throw Rock can also be used to interrupt the Devourer Catapult if you can't get to cover in time. If you're fast enough, you can break the pillar without needing to interrupt or hide before dying.
After the cinematic, run north and use the Gate Lock to close the first gate.
Another way is to stand in one spot until the Devourer uses Siege Strike and then run to one side. The siege will miss entirely and you will be next to the rock to pick up and throw at the Fractured Pillar. Then follow the rest of the guide.
Ruins[edit]
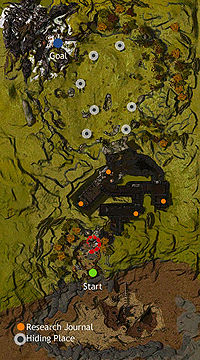
Use the first journal to learn Illusion of Haste, grab the Unlit Torch, light it on the Flame Brazier and use the Lit Torch to light the unlit Flame Brazier to the west, using Illusion of Haste to remove Crippled. Once the second Brazier is lit, the gate east of the first brazier (not the one with the rock in front of it) will open.
Head east and use the journal south of the gate to learn Shared Burden, use it to slow down the Nightmare Charr that will begin to chase after the Ascalonian ghosts. If the ghosts manage to escape the Charr, the third gate will open, if not, you can restart the sequence by returning to the second gate. Use the third journal to learn Distortion if you didn't grab it earlier.
Pick up the Rock and use Distortion to survive the Fire Dart traps, then use Throw Rock to destroy the Cracked Support and use the last journal to learn Sum of All Fears. Pick up the Rock so you have one more use of Throw Rock.
Escape[edit]
Exit the ruins to the north, then sneak around to the northwest corner of the map. Charr Scouts use Pin Down and Tripwire. Once you reach the Ebon Vanguard camp in the northwest corner of the map, a cinematic will play and the mission will be over.
To get credit for discovering where Gwen hid, go to the ruins and stay there for a few seconds. The game will say you found X of 7 hiding places.
Note: The Charr lose interest on pursuing once they are out of reach. Hide in ruined houses and use Illusion of Haste plus Flee/Distortion to break aggro.
NPCs[edit]
Allies[edit]
 15 Lilla
 24 Asgand
 24 Scarlot
 24 Cendin
 8 Nightmare Charr
 1 Ascalonian Farmer
 1 Ascalonian Peasant
 20 Captain Langmar
 1 Duke Gaban
 20 Captain Weststar
 20 Chance Redding
 20 Jenn Valefield
 ? Brave Brent Poltroon
 20 Anton
 1 Ascalonian Citizen (Dead)
 5 Vanguard Soldier (Dead)
Charmable animals[edit]
 5 Black Wolf
 5 Raven
Foes[edit]
- (varies) 20 Charr Prison Guard
 15 Charr Tracker
 15 Charr Scout
Destructable structures
Bosses[edit]
Charr
Objects[edit]
- Gate Lock
- Flame Brazier (2)
- Research Journal (4)
- An Unlit Torch bundle near the first Flame Brazier
- Rock bundles near the first devourer and outside the closed gate in the caves.
- Fire Dart turrets in the last chamber of the caves.
- Spike Traps in the northern half.
Dialogue[edit]
Initial dialogue[edit]
- Durmand [Historian]
- Relive the story of Gwen's escape from the Charr, and see how she came to meet Captain Langmar and the Ebon Vanguard.
Intermediate dialogue[edit]
- Duke Gaban: "Finally awake, girl? Trust me, the nightmare of this world is far worse than any you could dream up in your fitful sleep. Today, the Charr plan to feed us to a siege devourer simply for their amusement."
- Duke Gaban: "But those vile beasts don't realize the extent of my vast knowledge of these lands; at one point, they were part of my estates. I know of a series of tunnels that leads into some old ruins nearby. Beyond that lies freedom. I need only find a way past that infernal creature to once again breathe air as a free man!"
- Dahgar, the Eye of Flame: "You there! Pretty boy. Come! Show us if you fight even half as well as you dress."
- Duke Gaban: "Look at that leaning pillar. I think I can knock it over with a rock. My freedom is at hand. If you can escape in the confusion, do so. Farewell!"
- Dahgar, the Eye of Flame: "What? Over already? Worthless! Such a pity for a man to die as uselessly as he lived. At least he could have entertained us."
- Dahgar, the Eye of Flame: "Perhaps you will provide better sport, little mouse. You always did like to scurry so. Tell me, though, where shall you go now that there's nowhere left to run? No need to answer with words. Your tears will suffice."
- Gwen: "That pillar is cracked. I wonder..."
- Dahgar, the Eye of Flame: "Impossible! Kill her before she escapes!"
- Gwen: "Must...close...the gate!"
- Dahgar, the Eye of Flame: "She fled into the ruins...foolish mouse. None who enter that place ever return. Post guards at the exits in case she attempts to be the first."
- Asgand: "We must not fall! Only we know what the Charr have planned. If we don't stop them..."
- Cendin: "I will fight until the last! The Charr cannot sear our lands if my flame burns them first!"
- Scarlot: "Velise may no longer be with us, but no matter how many Charr we face, remember we are not outnumbered. All of Ascalon stands with us this day. We shall not fail. We fight for the lives of our countrymen. We fight for their future!"
- Cendin: "Charr strike at us from the shadows amidst the chaos!"
- Scarlot: "Curse it all! I need light to aim my arrows."
- Asgand: "We must fall back to a more defensible position!"
- Gwen: "What have the Charr done to these poor souls? I must help them move on..."
- Scarlot: "Balthazar blesses us with his fire! May his hand guide my arrows!"
- Asgand: "Push the Charr back!"
- Scarlot: "We cannot hold them back without Velise! We must retreat!"
- Cendin: "We're not going to make it! We've got to find some way to slow them down!"
- Asgand: "We made it! Now we can regroup and figure out our next step. We must live through this!"
- Cendin: "We're trapped!"
- Gwen: "That support doesn't look stable."
- Scarlot: "The gods favor us this day! The beasts have fallen!"
- Asgand: "I feel as if I have awoken from a dream... How long were we trapped here reliving our past failure?"
- Cendin: "Time matters not. This girl has freed us! That alone tells me that our people yet live."
- Asgand: "The Charr took our lives, but we did not lose the battle...not so long as the people of Ascalon still fight. Go, little one. Leave the past behind. Greater battles lie ahead..."
- Gwen: "Oh my gods! Look at all those Charr! Lyssa, help me avoid them."
Notes[edit]
- This mission is started by opening Gwen's Story and clicking the "Enter Mission" button in the book.
- Although listed under Ascalon in the quest log, geographically, this quest takes place in the past at the Gaban estate, the mountains at the border, and the far southwestern corner of the Charr Homelands. That part of Ascalon once belonged to Duke Gaban.
- Equipping any weapon or offhand item while the mission is loading will cause you to immediately lose upon loading the mission.
- After successfully completing this mission or its discovery modes, talk to Durmand to receive an authorized Gwen's Story, which can be given to Tuomas in exchange for Charr weapons.


