Temple of the Damned
Defeat Murakai, Lady of the Night in the Cathedral of Flames dungeon and obtain an Exquisite Surmia Carving for Gron Fierceclaw.
| Temple of the Damned | |
|---|---|
| Section | Depths of Tyria Quests |
| Campaign | Eye of the North |
| Given by | Gron Fierceclaw in Doomlore Shrine (Depths of Tyria) |
| Type | Secondary quest |
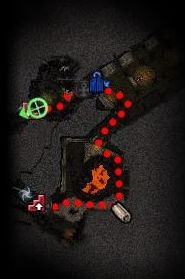
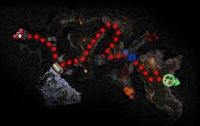
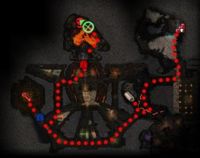
| Map(s) | |
   (Click to enlarge) | |
Quest information[edit]
Objectives[edit]
- Locate and defeat the leader of the undead in the temple.
- Find a sacked relic and return it to Gron Fierceclaw.
- See Gron Fierceclaw [Merchant] for your reward.
Reward[edit]
- 7,500 Experience
- 1,500 Gold
Walkthrough[edit]
The Temple of the Damned features the Cathedral of Flames with a heavy population of undead, Enchanted weapons, and Charr.
Level 1[edit]
The first level is straight forward. Kill Faze Magekiller to obtain the dungeon key, open the door and proceed to the next area. The Keeper and his group of restless spirits are in that area. Killing The Keeper opens the door to the next level.
Level 2[edit]
On the second level there is a dungeon map to the south of the staircase. Tyndir Flamecaller guards the locked door on the east side of the level. Beyond that door, Vraxx the Condemned patrols with a group of Plague Zombies which can be easily pulled and dispatched. Next, carefully pull and clear the Enchanted and undead patrols around the edge of the chamber. Finally, defeat the Master to open the door to the next level.
Level 3[edit]
Either quickly kill the Keymaster of Murakai, or follow it to the location of the dungeon floor map and kill it. The Keymaster will drop the dungeon key when slain. Proceed around the central chamber to the western side of the level. After unlocking the locked door, wait for the Murakai's Steward to finish speaking and slowly pull as many popups as possible from the room. Stay outside the range of the poison darts before killing the Steward and his group at the hill top. With his dungeon key backtrack to the first ramp and proceed north through a nearby tunnel which will take you to the northern side of the main chamber. Clear any undead along the way and run up the northern stairway to the boss door as fast as possible to minimize damage from the fire darts. It is not recommended to run through the center of the chamber as there are a lot more fire darts to contend with.
In the boss room there are Plague Zombies and Bone Fiends that can be easily dispatched before battling with Murakai. When Murakai uses Murakai's Consumption her power meter fills up, which allows her to use Murakai's Storm of Souls. Interrupting Murakai's skills will prevent her from dealing much damage and she will die with only moderate pressure.
Tips[edit]
- Minion masters are less useful in this dungeon as there are small numbers of exploitable corpses, and the undead can make short work of them using Ray of Judgment and Banishing Strike.
- The Charr and the undead are hostile to each other and you can just let them fight each other.
- The Charr have high fire damage and the undead use powerful lightning spells, so pre-protting is crucial to mitigate massive amounts of damage.
- Beware of the undead popups in this dungeon.
- Holy damage, such as from Light of Deldrimor, is very effective against the skeletons and zombies.
- Poison Dart, Poison Jet or Poison Spout can hurt the enemy as well as you, so use flags and proceed carefully around them, and possibly pull enemies into these traps.
Dialogue[edit]
Initial dialogue[edit]
Gron Fierceclaw
- "Pyre ordered Fierceblade and I to search the temple for anything of value. We discovered a blocked passage...blocked for a reason, as it turned out. Burntsoul and his band had a pretty pile of Ascalonian treasure down there, sacked from the ruins. You'd think being suddenly rich would solve all my problems, mouse, but the issue is...the spirits attached to the treasure haunt these vaults. Seems one called Murakai is creating a storm of souls to unleash on you mice and the Charr alike.
- We thought you'd have an easier time getting rid of them, seeing as they're your species...or were...or, look, I just don't like dead things. We tried to "liberate" the spirits with steel, but they keep coming back to the relics. Pyre needs those relics to fund the battles against the Shamans' forces, and nobody wants haunted gold, trust me. Set your mind at ease and free the spirits, won't you?"
Intermediate dialogue[edit]
Level 1, near the map:
- Charr Hexreaper: "This temple belongs to the Charr Shaman. Leave now, or suffer a painful death!"
Level 1, upon encountering Faze Magekiller:
- Faze Magekiller: "The undead are tearing this place apart. Leave now if you know what's good for you, meat."
- <Party leader>: "Stand down, furball. We're going through that door."
- Faze Magekiller: "Hold your tongue. If you want this gate opened, it will be over our corpses."
Level 1, approaching the northeast end of Faze Magekiller's room:
- Charr Hexreaper: "Stay back, meat. We'll kill you along with the undead if we have to."
Level 2, approaching the map:
- Charr Dominator: "How stupid are you, human? Do you wish to rot here? Leave this place!"
Level 2, approaching Tyndir Flamecaller:
- <Party leader>: "Hand us the keys. We're here to clear this place out."
- Tyndir Flamecaller: "Clear out? Look! A meat with a sense of humor! You'll get no keys from us. This door is the only thing keeping the undead hordes from feasting on our marrow."
- <Party leader>: "It's time we trained you kittens."
Level 3, approaching Murakai's Steward:
- Murakai's Steward: "You will not disturb the Lady Murakai."
Level 3, approaching Murakai, Lady of the Night:
- Murakai, Lady of the Night: "So, you've arrived at last. No matter, my Cataclysm will let you feel death's sweet embrace soon enough. In the meantime, be a good little toy and keep my children entertained. Ohhhh boys, it's playtime!"
Reward dialogue[edit]
Gron Fierceclaw
- "I think it's only a matter of time before Murakai returns, but for the moment the spirits seem peaceable. With these relics, perhaps we can bribe our way out of camp the next time you aren't around to rescue us."
Notes[edit]
- After accepting the reward, you have to return to Doomlore Shrine first if you want to go for another run, or simply change to a different district.