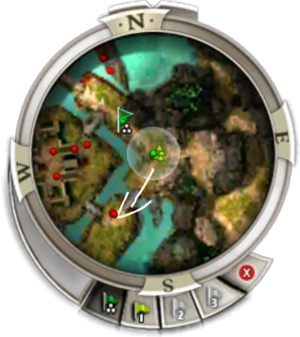
Hero flag
Heroes and henchmen can be manually positioned in explorable areas by utilizing the hero flag buttons attached to the compass. This function only extends to heroes and henchmen under your control. The Nightfall tutorial quest Command Training, and the Eye of the North tutorial quest Hero Tutorial explain how to use flags within the game.
Using flags[edit]
Below the compass, there are icons of four flags and the cancel sign. The flags labelled 1, 2, and 3 are only available if there are that many heroes (or more) present under your control. From left to right and only for heroes and henchmen under your control the following functions exist:
- Move all heroes and henchmen as a single group.
- Move the first hero individually.
- Move the second hero individually.
- Move the third hero individually.
- Cancel all active flags and direct previously flagged heroes and/or henchmen back to the player.
To set a destination, left-click once on the desired flag and click a location on the compass, the Mission map, or any visible terrain to place said flag. The correct heroes and/or henchmen will start moving to that destination and stay there as long as the flag is active. To remove a single flag simply double-click the respective icon. When you remove a flag, any heroes and/or henchmen previously located there will make their way back to the player. When a hero or group moves to the destination they automatically determine the shortest path. This can lead to problems if (body) blocked by enemies, an object, or the terrain, causing the flagged party members to stop moving until they are no longer being blocked. If this happens, simply cancel the appropriate flags. Flagging in parts can allow for more precise positioning without having to worry about potential obstructions. If you set a flag too far into previously not yet traversed parts of a map, the party members will start moving directly towards it, oblivious to the terrain and will often be found hugging a wall or other scenery in their attempt to make their way to the instructed location.
Hot keys[edit]
- You can assign hot keys for flagging Heroes 1 through 7 to move to a location.
- You can assign hot keys for commanding Heroes 1 through 7 to use a specific skill.
Advanced flagging[edit]
Flagging can also be used to control a party with heroes and/or henchmen for more detailed strategic purposes. Per example, using flags to spread out the party as a counter to area of effect skills, or using flags to create a wall of party members, keeping enemies from advancing past them.
It is also possible to unflag a hero (or multiple heroes) to follow your character while the other heroes and/or henchmen stay put at their assigned location. To do this, simply flag the desired hero(es) to a location with their unique flag and assign the rest of the party to any location you prefer, using the group flag. Then unflag the hero(es) you need, causing them to return to and follow your character.
To flag heroes and/or henchmen into not-yet-traversed territory (in that instance), flagging towards it in small steps will avoid pathing issues.
Players with heroes as party members[edit]
The flags only direct the group of party members under your control. Each party member always has control over their own heroes and/or henchmen. If one or more party members leave, their heroes and/or henchmen will be left behind and will be under the control of the next player in the Party window. The leader at the top of the party list controls all henchmen as they are, mechanically, the only player who can add henchmen to the party in the first place.
Therefore, you control:
- your own heroes;
- the heroes of anyone directly above you who have left the game;
- any henchmen if you are the person at the top of the party list.
If another party member has left and you control their heroes, they respond only to the control-all flag, as if they were henchmen.
