User interface
Players interact with Guild Wars through the user interface. The interface includes windowed panels and dialogs and a heads-up display.
Heads-up display (HUD)[edit]
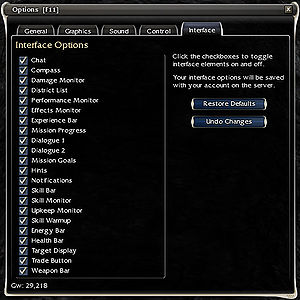
These items are always on screen by default. All elements can be hidden by unchecking them in the Options dialog.
Chat window[edit]
- See also: Special command
The chat window is where you type in correspondence to other players. All server, guild, and NPC messages also appear in the window.
You can send your messages to 6 different chat channels:
- All: All players in the same district or instance can read your message. Character names appear as yellow text, messages as white.
- Guild: Only your guild members can read your message. Character names appear as green text, messages as white.
- Team: All allies can read your message, including other allied parties in certain missions (e.g. Vizunah Square, Alliance Battles). Character names appear as blue text. Members from other allied parties appear as darker blue.
- Trade: Same as "All". This channel is specifically for trade, selling and buying stuff. Spamming is disallowed. Both text and name appear as pink text.
- Alliance: All members from your guild's alliance can read your message. Character names appear as orange text, with the guild tag appended, messages as white.
- Whisper: Only one specific person will be able to read your message. Insert that character's name into the left box. When you receive a message this way, an audible notification ping will inform you. Received messages appear as white text, with the sender's name as blue, sent messages are completely green. The name of the sender appears in brackets.
Other characteristics[edit]
- While in observer mode, the All and Trade channels are disabled. The Team channel will be called Observer, allowing anyone watching the same match to exchange messages.
- You will see a message informing you to press enter in order to chat, until the first time you type a non-command entry.
- Chat allows up to 120 characters.
- If you type an unsupported character, you will see the message, '"You have typed characters that Guild Wars does not currently support. We're sorry for the inconvenience."
- Some characters are disallowed in the local channel of certain districts.
- If you type these characters in a non-supported district, you will be reminded that, '"You have typed characters that are not allowed in public messages to your current district. However, you can use such characters in: private messages, guild communication, international outposts, and international games (which includes all PvP modes)."
- A new option has been added to suppress Whisper messages from players that don’t meet the following criteria:
- Party member, friend, active trade partner, or recent party/team member.
- You may now /report directly in the whisper chat window without needing to type the character name.
- Reporting players is still restricted to the same district that you’re in.
- Custom chat filters are now possible.
- Item transfer messages appear in teal.
Compass[edit]
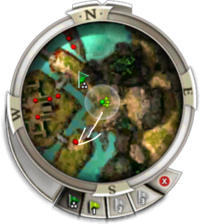
The compass, also known as radar, is part of the user interface that displays a general map of the location of allies and foes in relation to the player within eyesight. The compass shows cardinal directions, but always centers itself relative to the player.
The compass displays foes as red circles, allies as green circles, allied minions/pets/spirits as green triangles, and neutral minions as gray circles.
The compass also displays a translucent white circle known as the Danger Zone, in which all computer-controlled enemies become "aware" of the player's existence (commonly referred to as being "aggroed").
The compass itself may be pinged or drawn on by any party member, in order to communicate information such as routes of escape, treasure locations, or items of interest. This can be initiated by any party member by clicking or dragging on the compass map area with the mouse. Some quests and missions will also ping the compass with specific goal locations (usually in yellow). The compass, like the Mission Map, may also be used to order hero movement with hero flags.
While in a town or outpost, other players will appear as light/dark blue dots on the compass. Players indicated by dark blue are currently in a party whilst light blue indicates that the player is available to join a party.
If a quest is selected in the quest log, the location of the quest objective will show as a green starburst on your compass. If the objective is not within the compass range, a green arrow will appear in the general direction of that objective.
Energy bar[edit]
The energy bar is a blue bar that shows the status of a character's current energy relative to their maximum energy.
It displays three kinds of information:
- Energy: Current energy points are shown numerically.
- Energy regeneration: Current energy regeneration/degeneration is shown in pips/arrows on the bar. One pip of regeneration is equivalent to 0.33 energy per second.
- Overcast: If the character is suffering from overcast, the maximum energy is lowered by being greyed out until it regenerates.
It is important to note that although a character can have negative energy, the energy bar will not display energy values under 0. The bar will display 0 until the character regenerates up to or more than 1 energy.
Experience bar[edit]
The experience bar is a green bar that shows the percentage of experience needed until the next level. It also has the level of the character listed if the bar is long enough.
If a player has reached the maximum level, 20, the bar instead indicates the character's progress towards their next skill point.
Health bar[edit]
The health bar is a red bar that indicates the status of the character's current health relative to their maximum health. The health bar may also display several other kinds of information.
- Health: The bar displays a numeric value corresponding to your character's remaining health total.
- Regeneration: Pips/arrows indicate how quickly the player is gaining or losing health to regeneration/degeneration.
- Each pip of regeneration/degeneration on the health bar is equivalent to 2 hit points per second.
- Health regeneration and degeneration is capped at effectively 10 pips in either direction (this means that if a player had 20 positive pips, only 10 would actually work, the other 10 are simply there and counter degeneration).
- Degeneration source: The bar changes color to reflect the source. By priority.
- Purple for degeneration hex spells, e.g. Suffering. Note that being in an enemy's Well of Suffering also causes a purple health bar, but this skill isn't a hex spell.
- Green for poison and disease
- Pink for bleeding
- No indication for other sources, e.g. Burning.
- Deep Wound:
- The first fifth portion of the health bar is turned grey, and healing this portion is not possible due to Deep Wound.
The health bars in the party window and target display will display an empty health bar for dead allies. Unlike a player's own character health bar and hero's health bar, the health bar in the party window, Minion List, and target display doesn't display a numeric value nor pips, but it does display the following effects:
- Conditions. If a target has a condition, their health bar will have a a brown downward triangle, along with a change in color of the bar itself (see above).
- Enchantment spells. If a target is enchanted, their health bar will have a yellow upward triangle.
- Hex spells. If a target is hexed, their health bar will have a purple downward triangle, again the health bar will change color with degeneration hexes (see above).
- Weapon spells. If a target is affected by a weapon spell, their health bar will have a small sword in front of a star, will appear on your health bar if you are affected by one.
Menu button[edit]
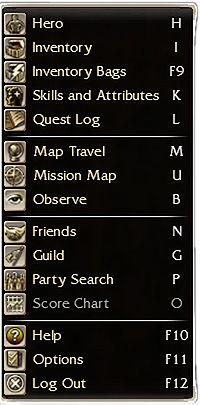
The menu button pops-up a list of various dialogs that you can select to perform certain functions or customize the game interface. The selections presented show an icon for the item (which can be dragged onto the screen for instant access later), the name of the menu selection, and the hot key for that selection. To remove the easy access buttons drag them back over the Menu button in the bottom left of the screen and release.
The window is organized into 4 sections.
- Map Travel
- Mission Map
- Observe (grayed out by default) / becomes Stop Observing (while in Observe Mode)
- Friends
- Guild
- Party Search
- Score Chart (grayed out by default)
Party window[edit]
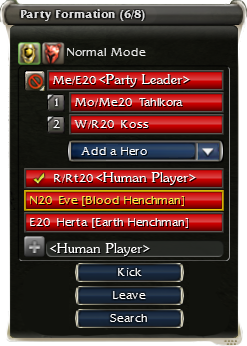
The party window gives a visual representation of the party's condition. It displays health bars for party members, animal companions and some quest and mission allies. The red bars represent the allies' or party members' health. A disconnected player will have its health bar greyed out. The names of allies will change from white to gray when they are outside the party area of your player character (except dead allies, since their names are already displayed in gray).
Names of heroes are indented under the player who owns them. This window shrinks and grows dynamically when players or heroes are added, kicked or leave. When a hero is available to be added and the party is not full, a drop-down list will appear under the last hero's name. You can add no more than 7 heroes per character in a party. A potential member can also request an invitation by entering the name of a member of the party in the text box beside the addition sign button and pressing enter on their keyboard (or the button). Leaving a party will abandon all other players, heroes, and henchmen. The Search button opens up the Party Search panel window.
To the left of each player's name, you will find a dropdown that displays "Ready" or "Not Ready." This is a quick way for groups of players to ensure that everyone is ready to leave before zoning or entering missions. It will only show if somebody is ready, it will not display the red crossed out circle next to their name. In order to avoid griefing issues, the game will not prevent the party from proceeding even though players have set themselves as "Not Ready."
Party leader[edit]
Party leaders can use this window to kick and invite members. In Prophecies and Factions only party leaders can start missions while in a party. When a party wipes or resigns, party leaders can return the party to the outpost from whence they came. If you leave a party where you are a leader, the party is not disbanded, the next player in the list assumes control.
Henchmen[edit]
Henchmen will stick by the party leader in one of two fixed formations, depending on the type of weapon the party leader is equipped with. The exact positions is determined by a combination of factors, as well as the order in which henchmen are added to the party.
Heroes[edit]
Heroes will stick by their respective owners in a similar fashion as henchmen do, their exact positions are determined solely by the order in which they are added to the party.
Minions window[edit]
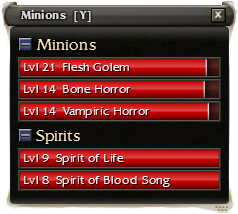
The minions window (referred to as Minion List in the control options) is a window that lists minions and spirits controlled by the player, in chronological order. It was added in the March 3, 2011 update and can be accessed by pressing Y by default (not accessible from the Menu). The names of minions and spirits will change from white to gray when they are outside the party area of your player character.
Performance monitor[edit]
The performance monitor is a small dot in the lower right of the screen and shows the FPS (frames per second), ping times, and the Server IP address when you you hover your mouse over it. A low ping generally means better performance and less lag, since it is the time it takes to relay information from the server to your computer. The server IP address is also listed.
The dot changes color from green to red depending on ping. If the ping is high (>750 ms), it turns red. If it is mediocre (250-750 ms), it is orange. If the ping is below 250 ms, it is green.
A Lightning bolt icon in the dot means the client is downloading game files in the background.
NCsoft states that the performance monitor is not an accurate measurement of the latency of your connection to the Guild Wars servers.
Skill bar[edit]
- See also: Skill icon
The skill bar is a part of the user interface that displays skill icons of the skills currently equipped. The skill slots are numbered from 1 to 8, and can be activated by either clicking directly on the desired skill, or (at default settings) pressing the corresponding number on the keyboard. If no skill is equipped in a slot, it will be shown as a blank. Skills that are being used or queued will pulse.
The skills on the skill bar can only be modified in a town or outpost, though their order can be changed at any time by opening the Skills and Attributes Panel.
Weapon sets[edit]
Weapon sets allow a player to swap a combination of weapons and focus items or shields on the fly using the F1, F2, F3, and F4 hotkeys by default. Dragging a weapon or offhand to one of the weapon set slots or double-clicking the item in the Inventory window while that slot is active will bind the weapon or offhand to that slot.
Effects monitor[edit]
The effects monitor displays skill icons for all effects that the player character is currently affected by, e.g. enchantments, hexes, conditions or environmental effects. Below each icon is a small bar which indicates how long the effect will last. Shortly before an effect wears off, the icon will start blinking. Clicking a maintained enchantment will cause your target display to switch to the source.
Damage monitor[edit]
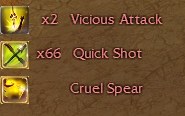
The damage monitor displays the source of damage a player received in the last moments in the form of skill icons and skill names. A number shows the number of times a player has received damage from that source. The icons are normally displayed for a specific time if the player does not receive damage from the same source again. If the player dies, the damage monitor will be frozen until the player is resurrected. Note that the source of damage received from non-skills are not shown, however the source of damage received from vampiric weapon modifications are shown in the damage monitor with a vampiric damage icon, even though it isn't classified as a type of damage.
Target display[edit]
The target display shows the name of whatever interactive object, creature, bundle or item the player currently has selected as a target. If targeting a creature, it will also show sometimes profession(s) and always level of the target before the name, as well as turning the display box into the target's health bar. Unlike other health bars, the target display health bar also displays your Assassin attack chain (the lead, off-hand, or dual attack icon will be displayed on the health bar and is only visible to the player that initiated the attack chain on the target).
Skill monitor[edit]
The skill monitor shows the usage of skills by the current target. It displays the skill's icon as well as a bar that fills upon activation of a skill. During activation, this bar is shown in green color. It will turn yellow upon completion or purple if the skill is interrupted.
Upkeep monitor[edit]
The default position of the upkeep monitor is just above the skill bar. It display icons for enchantments that you are maintaining, and who it is affecting when hovering over each one. Single-clicking an icon will cause your target display to switch to who it is affecting. Double-clicking an icon will dismiss the enchantment.
District panel[edit]
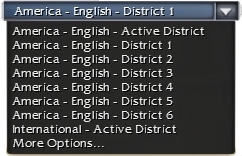
This panel appears only in outposts. It is usually located in the upper left hand corner and shows what district you are currently in. Districts are the equivalents to what many other MMORPGs call 'channel'. You can freely change between districts by clicking on the panel and selecting the district you would like to go to. Note that you will leave your party if you have one currently, just as if you are map traveling to another outpost.
If you want to meet someone, and you are both in the same outpost but you can't see each other, it's likely that you are in a different districts. Messages in the all and the trading chat channels can be read only by players in the same district.
When you click the panel, it will give you quick access to all districts of the same language and the international district. To change into districts with different languages, select "More Options...". A window with three drop-down-lists will appear in the middle of your screen. The first panel showing the server, the second one for the language and the third one to select which district of that language you want to travel to.
The active district is the current district that has the most player activity. This is generally district 1 but is not always so.
Dialogue 1 and Dialogue 2 panels[edit]
These two panels are used to emphasize dialogues. Either because they are important, or easy to miss, or because they may be interesting. Not all important dialogues appear in these panels, though.
Mission Goals panel[edit]
This panel appears in missions, mini-missions, and arenas; it shows the current objectives of the area, and appears every time those objectives change.
Players that have reconnected while inside a mission or mini-mission will see all the objectives again in this panel.
When entering certain outposts, this panel will also be used to give the player hints about what to do next. For example, when they reach a port town, this panel will show messages informing about the available campaign travel quests.
Mission Progress panel[edit]
This panel contains one or more progress bars.
- In PvP, they are usually used to show the capture progress of a control point; or the progress to gain morale or points towards victory.
- In PvE they have a much wider range of applications. From progress to closing a Chaos Rift, to time to the activation of an environmental trap or proximity to a target that doesn't have a map marker.
Mission Status and Score Display panel[edit]
This panel is mainly used in PvP areas to display the score of each team.
In dungeons, this panel shows the numbers of keys the party has found.
Notifications panel[edit]
In this panel, notifications about current events are shown. For example:
- Whenever you acquire a new quest.
- Whenever an Eye of the North boss is aggroed.
- Whenever progress to something has been completed.
Hints panel[edit]
This panel is first shown to any new character to show them hints about basic Movement. After that, it will keep appearing showing different contextual hints based on what the character is doing. It will show the same hint only once; excepting the message about "ordering your character to attack repeatedly" that appears in training areas.
Undocumented hotkeys[edit]
Some hotkeys are not documented in the manuals, and cannot be changed in the options panel.
- Toggle graphs: Shift + F10. Once the graph is shown, you can use Tab to switch between Network Traffic and Frame Time graphics shown on screen.
- Hide UI: Press Ctrl + Shift + H. Press the same keys to turn the UI back on.
- Take screenshot without UI: Press Shift + PrintScrn to quickly take a screen shot without the interface. Shift + PrintScrn also hides some things that Ctrl + Shift + H doesn't (ex: drop labels)
Notes[edit]
- You can rearrange the placement of items in your user interface via Options (F11). The pop up window has tabs across the top, and the tab called interface will allow you to add/remove certain elements of your interface. F11 will also give you the ability to move the different elements on your screen, as well as re-size them; any specific element can be restored to its default location by double-clicking on it.
- The Pet Control window is closed after you zone, while the Minion window usually remains on the screen.
