User:Faalagorn/backup2
Guide to cartography nooks[edit]
Nooks or "Magic Spots" along the outer edges of all Explorable Areas, Missions, and Outposts are crucial for the title of Grand Master Cartographer. And knowing where each one is, saves a great deal of time that would otherwise be spent slowly "Scraping" the Geometry on maps that may not even reveal the section you need. ...Or in some cases, would not be revealed anyway due to heavy server latency. And in the majority of cases, the portions of the map technically revealed by these nooks are not even detectable on the standard game map, often forcing players to use Texture Modification tools just to locate and fully reveal them.
This guide will list and display the locations of most of these nooks for players who wish to quickly achieve 100% cartography without relying on those 3rd party applications.
- Additional Tips:
- Some portions between Areas will reveal only when fully explored on both sides.
- Exploring each area in a clockwise rotation makes a small difference, do so whenever possible
Eastern Tyria[edit]

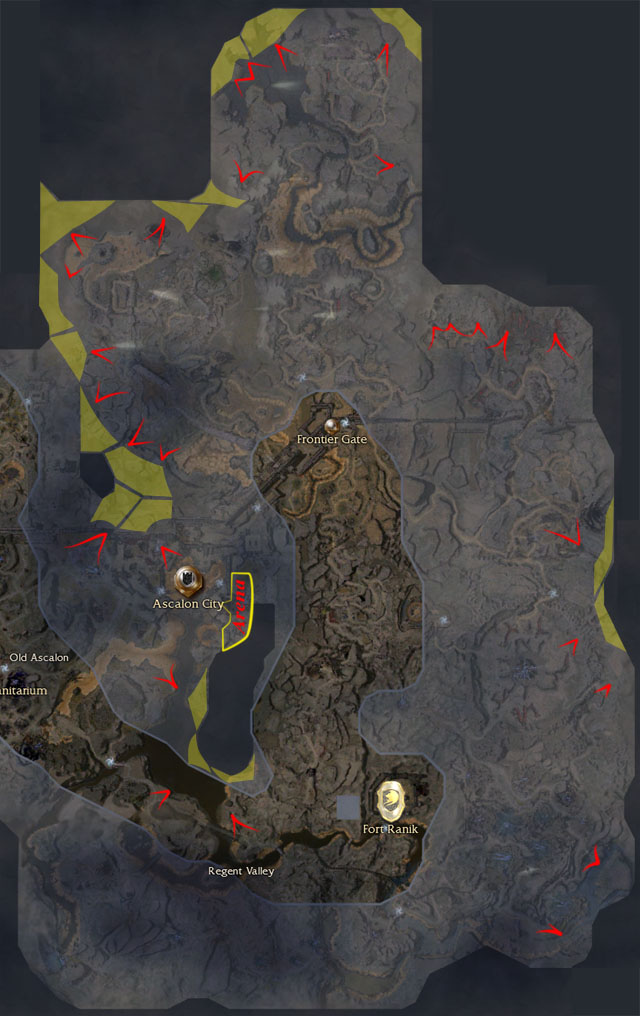
- Ascalon City: Inside a floating wall fragment & crystal wreckage, near Xunlai chests.
- Old Ascalon: North of the wrecked performer's stage
- T.G.N.W.: Its north area can't be explored until after the cinematic triggers. Due to only having 3 minutes, the whole mission will need to be restarted several times to fully expose every nook.
- After crossing the first warning bridge, there is a rock cliff line that looks solid but in fact is not.
- South of the fake cliff, is a maze of nooks that may also need to be explored.
- Take another right before the final bridge but be wary of the 2 groups of Charr (Bring along help if you can). Just past them, will be 2 ponts: 1 against a gate & 1 on pitch-black ground
- Pockmark Flats: Southeast from its north exit and 20 paces up from a stone bridge is a darker patch of slope that requires very precise scraping to find its east-facing nook.
- Ruins of Surmia
- Closed gate near Breena Stavinson ...and Flame Temple Bonus area triggered by her.
- 2 points on the west half of the Lake, and a 3rd point around the north side.
- Back corner of Cell that the flame scepter Mages are released from.

- The Breach
- Southwest tarpit, due south from a Tar Behemoth
- A culvert north of a collector on the hillside above the south tarpits
- Diessa Lowlands
- Climb partially up the wall near the 2 wooden tar pit bridges.
- 2 points: southern edge populated by Elementals. ...1 by way of a small stone bridge.
- Dead-end near the Academy, south of a large bridge and a few Storm Riders
- Dead-end with 1 Charr group along the western edge, after gargoyles, but before storm riders.
- Scraping against some crates in the back of Grendich Courthouse
- Dragon's Gullet: Lots and lots of slogging through smaller tar pits on the periphery
- Nolani Academy(mission)
- 3 points along the west cliff adjacent to, and north of the fallen spirits
- Tight space between the great wall and a glowing column near the tome pedestal.
- Corner of two tiled walls directly behind Bonfaaz Burntfur
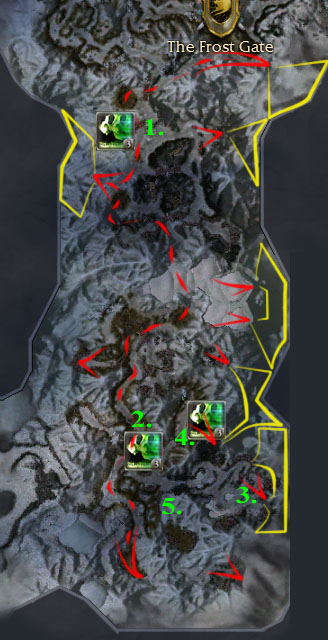
Frost Gate |
- Every inch of this Mission can be fully explored in 1 run by following this order: |

- 1.Bring Consume Corpse, and a strong Degen solo-build or a summoned pet if you have any.
- 2.Make sure you fully explored every path prior to the bridge Prince Rurik is waiting under
- 3.Flag your party back and pull the Ice Golem on the other side onto the bridge (Point #1 on the Map)
- 4.Use consume corpse on the first Ascalon Soldier it kills, then kill the golem and go explore the road.
- Up the road, right as it turns left(North), is a corner that requires careful scraping.
- 5. Important: Do not kill any of the Engineers yet. Instead make your way to the very end of the mission.
- Scrape the west side of this road (blast-pits included) to make sure you don't miss any nooks along it.
- 6.At the very bottom of the mission is a lone Stone Summit unit standing on the road, ignore him while exploring the area just beyond him, then head back UP the road to the bridge connecting a short road to the 3 Gate winches.
- 7.Degen one or all of the units guarding this bridge and use consume corpse again.
- 8.Head east on this bridge and kill + consume the Summit behind the next gate. (point #2)
- 9.Go as far south as you can and unflag your Heroes if you have any. It may take up to 5 minutes for them to "ghost" their way to your location. Once they arrive, go east(#3), clean house, and explore
- 10.Head back to the 3 Winches and the closed gate to the north-east and wait. A pair of Ettins should start heading your way.(#4) Kill & Consume them to get to the Gear Lever & open that gate.
- 11.Use the Lever on the south winch first to open the south gate, clean house & explore.
- 12.Repeat on the north-east winch to open the other gate. But do not activate the Center winch yet. Instead head back up the road and Kill+Consume every group you come to that's behind a gate until you've fully revealed every last spot on the east half of the mission as well. You can even grab and complete the bonus while doing so.
- When you're all done, activate the center Winch and be sure to let the Cinematic run to reveal the Ice Cave to the west.