User:Goin' On Mission/Characters
| Goin' On Mission/Characters | |
|---|---|

| |
| Region | Ascalon (Pre-Searing) |
| Environment Effects | None |
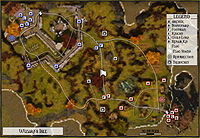
| Map | |

| |
It has happened to many new guilds—they put some wins under their belt but then, suddenly, bump into strange maps and start taking losses. Not from a lack of skill, necessarily, but perhaps from a lack of knowledge about the unfamiliar terrain or assorted quirks of these maps. Talking to the Canthan Ambassador NPC in the Great Temple of Balthazar does help to get a basic orientation for each map, but many map features only become active during an actual Guild Battle.
To see active aspects of your own guild hall, you can simply set up a scrimmage with at least one other person. This will allow you to see all NPC locations, flag spawn points, gate levers, and any item spawn points. To get comfortable with other guild halls will just take time playing on those maps. However, below we will give you some points to consider and tricks you can use as you move into unfamiliar terrain.
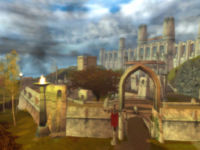
Wizard's Isle is very similar to Hunter's Isle and Warrior's Isle. This Guild Hall is inspired by Pre-Searing Ascalon.
Guild Thief[edit]
Wizard's Isle features a Guild Thief that is used to open the gate of the opponents base. To use a Guild Thief, one of the human players on your team will have to talk to the Guild Thief, and it will follow this person around the map until this player talks with it again.
The Guild Thief has one primary use, which is to open the gates of the opponents base within the 20 minutes of normal GvG play. (At VoD all gates open, so the Guild Thief is no longer necessary.)
A secondary use for the Guild Thief on this particular map is to stall the opponents NPCs from their march to the flagstand when VoD starts at 20 minutes in the game. The player, who the Thief is following, will talk with it when it is standing close to the main gate into the opponents base. The opponents NPCs will start to attack the Guild Thief and while doing this, make a good target for the Trebuchet.
Trebuchets[edit]
Wizard's Isle, like Hunter's Isle and Warrior's Isle features two Trebuchets, that can be used to lay siege to an area inside the base the Trebuchet overlooks.
Defensive Team[edit]
Wizard's Isle is commonly chosen because it looks cool. Many people like the "presearing" style grass and sky. Its very popular among casual or PvE guilds, and is often considered a "generic" map for GvG. Unfortunately, this map has some serious defensive gaps for the home team.
Of the three sister maps (Wizard's Isle, Hunter's Isle, and Warrior's Isle), Wizard's Isle is the least defensible for the home team. Because the Trebuchet makes most of the inner area indefensible and because the inner walls protect the attacking team from your archers, the attacking team can easily break a turtling team. It is very common for an attacker to kill the inner archers and such with hexes from a position of safety. Unfortunately, the outer six archers are also more vulnerable than the archers on the other two sister maps. Because an attacker can easily get to them (close stairs) and because they don't cover each other, they provide almost no support. On the positive side, none of them will get hit by a siege.
However, the res shrine on this map is much closer to the alternative exit than the other two maps. This means you can often sneak one or two people out of the base without being noticed to gank or repair the siege. Furthermore, the inner gap in your walls can be used to quickly switch sides while the attacking team is forced to go all the way around. You can also cover your res shrine from inside the safety of your inner area generally speaking.
Attacking Team[edit]
Ironically, the attacking team has substantially better defense than the defensive team. When you are the attacking defending your ship, your outer six archers are reasonably well placed. The "gate" archers will cover each other, as will the inner archers. This is very nice as the DPS helps and the twin pin down spike is nice to help you snare and kill a ganker. Only one archer is subject to catapult fire, which is better than your sister maps.
The inner area can be very secure to turtle in. The footmen don't often aggro past the bridge and your archers have a clean line of sight. Finally, that there is even some cover inside the protected area. Furthermore, because your flag spawns within your protected area, it can be easier to pick it up and push out unlike many maps where you have to push into the other team to pick up the flag.
However, covering people who res requires the turtled team to push onto the bridge, which can expose you. Furthermore, there is enough space to the eastern corner of your base that the other team can stand there, let your NPCs walk by without aggroing at VoD, then resume the attack on your lord. This is common when they have an NPC advantage and there is very little you can do about it. But before VoD, your turtle is strong.
Disputed Ground[edit]
The little wooden area is a runner's nightmare. It is easy to body block and force boosts.
Both bases have relatively small gates, so it is easy to reverse body block on ganks or to pin people inside their base for sieges.
Like your sister maps, there is a large open area on both the SE and NW corners of the map. This gives a ganker the ability to push far back as he sneaks out, hopefully beyond the range where they can see you on the map or by pressing alt. This makes it easy to ninja repair a siege or gank, although because of the limited movement in any direction you are susceptible to a collapse.
The defensive team's kit area is also fairly close to the flag. This makes it a common place to drop spirits that are hard to kill (because they have to push all the way through your outer three archers and up the hill). A ranger can also sit on that ledge and use his bow reasonably well, although you risk the other team falling back and forcing you to waste time by running around.
Overall[edit]
This hall is not popular in high end GvG, and for good reason. The defending team has poor position and the random nature of catapults plus the risk of NPCs getting sieged or blown up by AoE is a great liability. On the other hand, if you are designed to play defensively and stall until VoD, the wooden gate area and catapult may be an asset to you. For general play, however, this hall is weak on defense, doesn't provide great splitting opportunities, and doesn't have anything that is tactically advantageous.
Notes[edit]
- You do NOT have to be a magic-user (Elementalist, Ritualist, Mesmer, Necromancer, Monk) to get this hall.