The Anvil of Dragrimmar
| The Anvil of Dragrimmar | |
|---|---|
| Section | Depths of Tyria Quests |
| Campaign | Eye of the North |
| Given by | Outrunner Remlok in Drakkar Lake (Depths of Tyria) |
| Type | Secondary quest |
| Map(s) | |
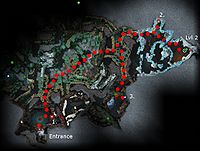
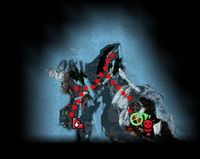
 Level 1  Level 2 (Click to enlarge) | |
Escort Outrunner Remlok to the sacred anvil in the depths of the Sepulchre of Dragrimmar.
Quest information[edit]
Objectives[edit]
- Escort Outrunner Remlok to the Anvil of Dragrimmar within the depths of the sepulchre.
- Defeat the Remnant of Antiquities guarding the Anvil of Dragrimmar.
- See Outrunner Remlok for your reward.
Reward[edit]
- 5,000 Experience
- 1,250 Gold
Walkthrough[edit]
The first floor consists of several gates which indirectly lead to the second floor, which contains the boss. To open each gate, you need to step on a proof within the dungeon, of the same name. For example, stepping on Proof of Strength will open the Gates of Strength, and so on. The dungeon includes rooms with several posts which fire Ice Darts and Ice Jets. The streams are easy to avoid; however, the darts can be very annoying and potentially deadly. A party entering a room full of dart posts and foes should be wary. It is usually safer to pull enemies out of the rooms to avoid being hit by the darts.
In general, players should avoid fighting large mobs of monsters and getting trapped in places where they are constantly taking damage. This strategy will make for a relatively straightforward run. When players arrive at the boss area, they will see Remnant of Antiquities and two other ice elementalist creatures. It is recommended to dispatch the non-boss creatures first, as they cast dangerous AoE spells.
Defeating the Remnant of Antiquities can be a very difficult and grueling experience, especially if the party has no reliable interrupts or dazing. The boss casts the monster-only AoE spell Diamondshard Mist, a type of ward which causes bleeding and heavy damage to those within its boundaries at its expiration.
If you are unable to prevent the spell, it is essential to keep moving in order to stay out of the Diamondshard Mist. The party should spread out so that multiple party members avoid taking heavy damage simultaneously. If the entire party dies, there is a nearby resurrection shrine, so you can return to the assault before the boss can recover completely. A persistent party can defeat the Remnant regardless of Death Penalty.
Tips[edit]
- Bring hex removal as the dryders and elementals in this dungeon use a lot of hexes.
- Careful pulling and avoiding bunching up will make this dungeon a relatively easy run. Also, because the traps can deal a lot of damage, it's advised to lure the enemies to a location where the traps can't hit you.
- Bringing the following skills will make this dungeon much easier: Ward Against Elements, Mantra of Frost, Light of Deliverance, Extinguish (for the final boss), and interrupts such as Savage Shot, Distracting Shot, or anything causing Daze.
- There are not many fleshy creatures, so skills that inflict Bleeding, Disease or Poison, or require corpses are less effective here. Plus, the Whirling Wisps carry Banishing Strike, destroying minions quickly.
- Cold damage is less effective here, since several foes have additional armor rating against cold damage.
- The henchman Zho uses Broad Head Arrow, making her the henchman of choice for this dungeon if you don't have a hero with a daze skill yourself.
- When facing the boss, spreading your party so his Deep Freeze won't hit all of them at the same time is very helpful.
- Or you can bring Pain Inverter and a party with spirits and minions so the boss kills itself.
NPCs[edit]
Dialogue[edit]
Initial dialogue[edit]
Outrunner Remlok
- "You've got the look of one who understands Dwarves. Yes, I think you'd be more suitable. Listen to my tale:
- After many years of searching, I have tracked down an artifact of great import to the Dwarven people...the Anvil of Dragrimmar. Some say the Great Dwarf himself stood at this anvil forging great and powerful weapons, much as he forged our people. Alas, time clouds the stories and the anvil's resting place was lost. But we know it lies in wait for the time when our people will need it once again.
- We believe that time is nigh, and my research has led me here. I tried to explore the depths of the sepulchre, but the traps befuddled me. At heart I'm a fighter, not a thinker. I need someone with the wit to navigate the traps and the strength to brave the terrors below to escort me to the anvil. If you've a will to help, the Dwarven people would be eternally indebted to you."
Reward dialogue[edit]
Outrunner Remlok
- "It's true then. The anvil exists! I dared not hope, but.... This is great work you've done, friend. As I meditate here I may learn to be a better smith, to be able to help my people in their coming travails. Take this as a sign of the gratitude owed ye by the entire Dwarven nation, friend."