Lost Souls
| Lost Souls | |
|---|---|
| Section | Depths of Tyria Quests |
| Campaign | Eye of the North |
| Given by | Crewmember Shandra in Arbor Bay (Depths of Tyria) |
| Type | Secondary quest (Difficulty: Master) |
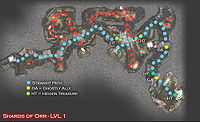
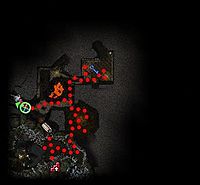
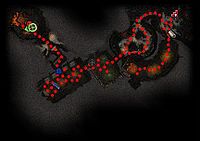
| Map(s) | |
   (Click to enlarge) | |
Find Fendi Nin deep within the Shards of Orr.
Quest information[edit]
Objectives[edit]
- Discover the whereabouts of Lady Glaive's crew and free their spirits.
- Avenge the crew of the Queen of Fools by destroying Fendi Nin.
- See Crewmember Shandra for your reward.
Reward[edit]
- 7,500 Experience
- 1,500 Gold
Walkthrough[edit]
Level 1[edit]
The first level is self explanatory: find the area map, kill the Cursed Brigand that has the dungeon key and proceed to the second level. Take care to not warp to Gadd's Encampment. If you started from Gadd's Encampment, you will have to fight your way towards the Arbor Bay entrance to get Crewmember Shandra or else the door for the dungeon lock will remain closed.
Level 2[edit]
Kill the Cursed Brigand to the immediate left of the portal. When it dies, a chest spawns with an unlit torch, which you will need for most of this level. Take down the mob that blocks the way to a lit brazier and then light all the flame braziers in the circular graveyard room. Be ready for a large mob of undead and enchanted that spawn in a random spot within the room after the final one ignites; they must be killed before the exit door will open for you. Next, make your way to the tiled room to light the 2 of 4 unlit flame braziers, spawning yet another mob including a Cursed Brigand. Kill the Brigand to get the dungeon key to exit the level (he can be pulled away from his group). Leave the torch behind and head for the exit to the next level.
Level 3[edit]
The third level is similar but with more undead mobs, and careful pulling is recommended here. Once again, you need to light up a series of flame braziers to gain access to the final area. These are farther apart than on the other levels, but can easily be lit without a speed boost if you are careful about clearing any groups of foes in the way.
After entering the level, take out the group of undead and enchanted to your right, blocking the first unlit brazier. Open the nearby chest to get a new torch, light it on the nearby brazier, light the now unblocked brazier, then drop the torch for the moment. There are 2 groups of foes and a patrol along the route to the second unlit canister; pull carefully and take them out one at a time. Recover the torch to light the next set of braziers until you come to the entrance of the large chamber with the final set of containers to be lit.
There are several groups in this chamber, but you only have to take out 3 or 4: a group that spawns near the entryway; a group that spawns near the boss lock; the group that spawns with a Cursed Brigand (who carries the final key); and perhaps one more group. After taking out the group near the entrance, light the two stands to the left and right of the entrance. Then, carefully walk around and between any other mobs to light two braziers up the center of the room and two more in the back. If you have heroes and henchmen, flag them to the back so they do not accidentally aggro any foes and take down the Brigand's group, which has now spawned. From this position, you can also confront the group blocking the boss lock, safely leaving room to maneuver and retreat.
Take the zig-zag corridor protected by Poison Spouts and give your party a chance to heal before killing two Bone Dragons and some undead archers. These are the last of the ordinary groups in the dungeon. The final area contains Fendi Nin and his archer body guards.
Fendi Nin has two forms: as an undead and as a soul. When you kill him in his undead form, a group of Damned Crewmen will replace the Skeleton Archers accompanying him and he will turn into the Soul of Fendi Nin. Keep spread out: the Crewmen will spike clumped party members with Clamor of Souls and Fendi attacks with armor-ignoring area of effect damage; they can quickly wipe an unprepared party, especially in hard mode. Fendi remains in his soul form for approximately half a minute, after which time he will revert back to his undead form and the crewmen will revert back into archers. Repeat the process until the soul form has been destroyed to finish the dungeon.
Note: the Damned Crewmen spawn wherever the Skeleton Archers were, so you can kill the Archers then lure Fendi Nin away from where the Archers were killed and the Crewmen will not aggro when the Soul of Fendi Nin spawns. However, Skeleton Archers spawn on top of Fendi Nin when he reverts to his undead form.
Dialogue[edit]
Initial dialogue[edit]
- Crewmember Shandra
- "Following Lady Glaive's defeat during the Second Great Corsair War, we sailed north aboard Glaive's ship, the Queen of Fools, into Orrian waters along the Tarnished Coast. There was a mutiny, and our souls became forfeit in a vicious cycle of betrayal. We need your help to end the cycle. We need revenge! But first we must be freed...."
Intermediate dialogue[edit]
On level 1:
- Crewmember Shandra
- "After the Second Great Corsair War, our captain, Lady Glaive parlayed a deal with King Zoran of Orr, who was father to King Reza. We were granted amnesty in an underground area known as the Shards of Orr. Seeing this as an opportunity to gain control of our ship, the Queen of Fools, first mate Fendi Nin made another, darker deal with the king's advisor.
- Those dealings have condemmed us all; Fendi's curse seals us within this horrid place. Our souls can only be freed by destroying him."
On level 2:
- Crewmember Shandra
- "Glaive escaped with her ship, the Queen of Fools, abandoning all that couldn't make it. She sealed us in the underground tunnels. As Fendi's power waned, the deal's dark nature became apparent.
- It is a vicious cycle that will never end. We fight enternally."
Reward dialogue[edit]
- Crewmember Shandra
- "This day the sun sets on the soul of a free woman. The tide of our destiny may ebb and flow once again, but for today, you have our gratitude, <Character name>."
Notes[edit]
- Ward of Stability and Ward Against Melee are very useful, since much of the difficulty of the dungeon comes from the knock downs caused by Skeleton Wizards and Zombie Brutes.
- Blind is also prevalent; skills such as Sight Beyond Sight and Antidote Signet can help.
- Holy damage is highly effective against the Skeletons and Zombies.
- Rising Bile, if placed on the soul form before it reverts, will still proc proving an effective way to do damage to the soul form while dealing with the archers and regular form.
- Since Zombies are the only fleshy creatures in the dungeon, skills that inflict Bleeding, Disease or Poison, or require corpses are less effective here.
- Remember to keep your party spread out before engaging Skeleton Wizards to mitigate their AOE damage.
- Consider clearing rooms and areas of all foes before lighting flame braziers.
- Lighting all braziers in the southwest room on 3rd level (where you get the last key) opens a secret passage near the very beginning of the 3rd level (Northeast corner of the map). Consider running back to that secret area to collect hidden treasures.