Bombardment
From Guild Wars Wiki
Jump to navigationJump to search

|
This page contains information about a Guild Wars component or feature that has been removed or replaced. |
| Bombardment | |
|---|---|
| Region | Vabbi |
| Victory condition | First to reach 20 points |
| Party size | 1 + 3 heroes |
| Allowed levels | 20 |
| Priest/Obelisk | No |
| Effect | None |
“A proving ground located near the battle islands, this wide coliseum is used to demonstrate the latest in Elonian technology, including the Vabbian Bombard.
— gw.dat
Bombardment sports a powerful Siege Cannon Shrine far in the east, which deals 100 armor-ignoring damage to all foes of its owner in an area around the Center Shrine, which is in the center of the map.
Map and shrines[edit]
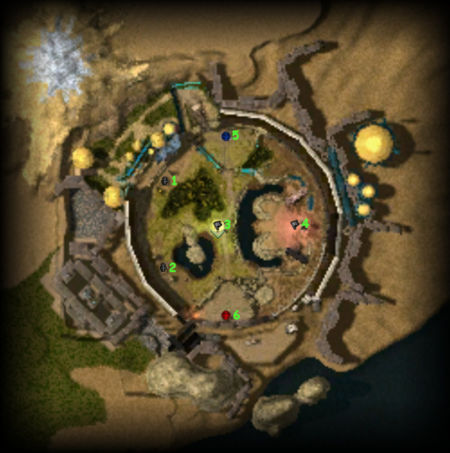
- 1. Northern Health Shrine: One morale regeneration.
- Northern Health Shrine Bonus: Your party members' maximum Health is increased by 120.
- 2. Southern Health Shrine: One morale regeneration.
- Southern Health Shrine Bonus: Your party members' maximum Health is increased by 120.
- 3. Center Shrine: Two morale regeneration.
- "To The Pain!": When within capture range of the Morale Shrine, players do 10% less healing and 10% more damage.
- 4. Siege Cannon Shrine: One morale regeneration.
- The siege cannon fires a Siege Attack every 10 seconds dealing 100 damage in the area of the Center Shrine (3). Damage is only inflicted to the opposing team of the Siege Cannon's current owner.
- 5. Blue Base: Members of your party are resurrected every 30 seconds.
- Base Protection: When in range of their own Resurrection Shrine, party members deal 50% more damage and take 50% less damage.
- 6. Red Base: Members of your party are resurrected every 30 seconds.
- Base Protection: When in range of their own Resurrection Shrine, party members deal 50% more damage and take 50% less damage.

Notes[edit]
Trivia[edit]
- The gw.dat refers to this place as "Isle of the Bombard."
| Hero Battle arenas | |
|---|---|
| Outposts: | Hero Battles (outpost) |
| Hero Battles arenas: | Bombardment | Desert Sands | The Beachhead | The Crossing |