The Crossing
From Guild Wars Wiki
Jump to navigationJump to search

|
This page contains information about a Guild Wars component or feature that has been removed or replaced. |
| The Crossing | |
|---|---|
| Region | Kourna |
| Victory condition | first to reach 20 points |
| Party size | 1 + 3 heroes |
| Allowed levels | 20 |
| Priest/Obelisk | No |
| Effect | None |
This map is oblong, with all four shrines lined up but separated by high ground. Bridges from each player's base connect to the Cultist's Shrine (2), which is located on high ground near the center of the map.
Map and shrines[edit]
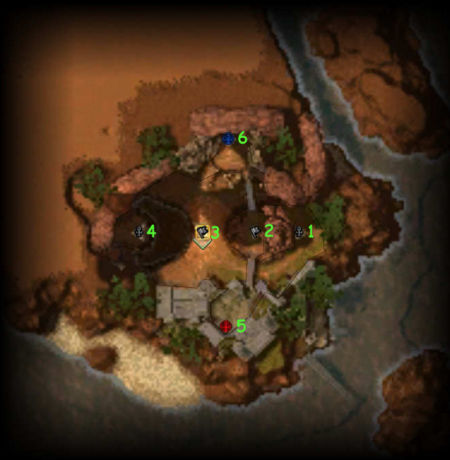
- 1. Battle Cry Shrine: One morale regeneration.
- Battle Cry: Your party members move 25% faster, attack 15% faster, and skills recharge 15% faster.
- 2. Cultist's Shrine: One morale regeneration.
- A Cultist Mercenary aids the owner of this shrine. He is a level 24 Necromancer who casts Parasitic Bond and Life Siphon. The mercenary counts towards a member of your team for capturing shrines.
- 3. Center Shrine: Two morale regeneration.
- "To The Pain!": When within capture range of the Morale Shrine, players do 10% less healing and 10% more damage.
- 4. Mending Shrine: One morale regeneration.
- Mending Shrine Bonus: Your party members have +3 Health regeneration.
- 5. Red Base: Members of your party are resurrected every 30 seconds.
- Base Protection: When in range of their own Resurrection Shrine, party members deal 50% more damage and take 50% less damage.
- 6. Blue Base: Members of your party are resurrected every 30 seconds.
- Base Protection: When in range of their own Resurrection Shrine, party members deal 50% more damage and take 50% less damage.

NPCs[edit]
| Hero Battle arenas | |
|---|---|
| Outposts: | Hero Battles (outpost) |
| Hero Battles arenas: | Bombardment | Desert Sands | The Beachhead | The Crossing |