Desert Sands
From Guild Wars Wiki
Jump to navigationJump to search

|
This page contains information about a Guild Wars component or feature that has been removed or replaced. |
| Desert Sands | |
|---|---|
| Region | The Desolation |
| Victory condition | first to reach 20 points |
| Party size | 1 + 3 heroes |
| Allowed levels | 20 |
| Priest/Obelisk | No |
| Effect | None |
This fairly compact map has the Center Shrine in the south and the other shrines in sort of a line in the north. Bridges connect the Warsong's Shrine to the other ones. An Energy Shrine is located in the east, and there is a Battle Cry Shrine to the west.
Map and shrines[edit]
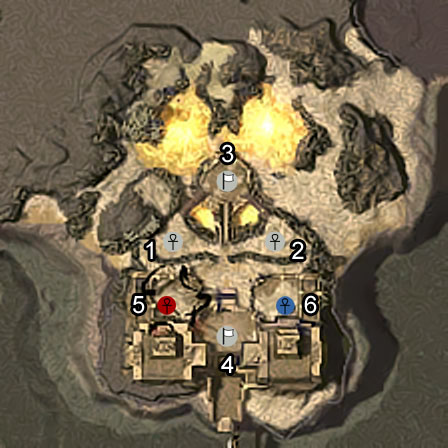
- 1. Battle Cry Shrine: One morale regeneration.
- Battle Cry: Your party members move 25% faster, attack 15% faster, and skills recharge 15% faster.
- 2. Energy Shrine: One morale regeneration.
- Energy Shrine Bonus: Your party members' skills cost 20% less Energy.
- 3. Warsong's Shrine: One morale regeneration.
- The owner of this shrine gets a powerful Warsong Mercenary as an ally to his team. The mercenary is a level 24 Paragon, and uses Leader's Comfort and Blazing Spear. The mercenary counts towards a member of your team for capturing shrines.
- 4. Center Shrine: Two morale regeneration.
- "To The Pain!": When within capture range of the Morale Shrine, players do 10% less healing and 10% more damage.
- 5. Red Base: Members of your party are resurrected every 30 seconds.
- Base Protection: When in range of their own Resurrection Shrine, party members deal 50% more damage and take 50% less damage.
- 6. Blue Base: Members of your party are resurrected every 30 seconds.
- Base Protection: When in range of their own Resurrection Shrine, party members deal 50% more damage and take 50% less damage.

NPCs[edit]
Common tactics / tips[edit]
- Controlling the Warsong Shrine is often important in defeating your opponent in a fight involving you, your opponent, and all of each player's heroes.
- The Battle Cry Shrine and Energy Shrine help when it comes to small fights.
- Note that the Center Shrine is the farthest distance away from the Warsong's Shrine. This can be a huge disadvantage or advantage, depending on how you use it.
| Hero Battle arenas | |
|---|---|
| Outposts: | Hero Battles (outpost) |
| Hero Battles arenas: | Bombardment | Desert Sands | The Beachhead | The Crossing |