Against the Charr
| Against the Charr | |
|---|---|

| |
| Section | Primary Ebon Vanguard Quests |
| Campaign | Eye of the North |
| Given by | Vanguard Helmet in Grothmar Wardowns (Charr Homelands) |
| Part of | The Missing Vanguard |
| Preceded by | Search for the Ebon Vanguard |
| Followed by | The Dawn of Rebellion |
| Type | Primary quest |
| Map(s) | |
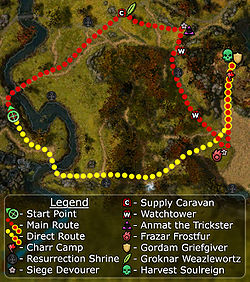
 (Click to enlarge) | |
Attack a Charr camp to find the captured Ebon Vanguard.
Quest information[edit]
- Note: After accepting the reward for Search for the Ebon Vanguard, this quest is automatically added to the Quest Log prior to interacting with the Vanguard Helmet.
Requirements[edit]
- All party members must have received the reward for Search for the Ebon Vanguard.
- It is possible to enter the mission with just one person meeting the requirement, but anyone else will not receive any credit for mission completion.
Objectives[edit]
- Search the Charr camp to the east for signs of the Vanguard captives.
- *OPTIONAL* Find ways to weaken the Charr garrison.
- *OPTIONAL* Intercept the Charr supply caravan. Use Charr Explosive charges to disable it.
- *OPTIONAL* Destroy the watchtowers with explosive charges. [0...2] of 2 destroyed.
- *OPTIONAL* Employ the siege devourers to fire explosive charges at the garrison. [0...2] of 2 fired.
- Defeat Harvest Soulreign.
Reward[edit]
- Ebon Vanguard reputation points
- First time: 1,000 (1,500 in hard mode)
- On repeat: 100 (150 in hard mode)
- 2,500 Experience
Walkthrough[edit]
Shortly after the cinematic, your party will be attacked by a small group of Charr. Dispatch them, then move on. Your party has the choice of assaulting the Charr garrison, or participating in optional objectives to weaken the garrison. The optional objectives are not difficult as long as you don't get overwhelmed by the roaming patrols, otherwise, the quest is truly easy, fast and simple. Interrupting Firereigners should be a priority.
Charr Firereigners drop explosive charges after they are defeated. These charges are used to destroy the supply caravan (optional objective 1), destroy the watchtowers (optional objective 2), and launched by the siege devourers at the garrison (optional objective 3). Either have a spellcaster in your party carry the charges, or wait until you are ready to use them. Once the charge is placed on the ground, it detonates.
The supply caravan is guarded by a few groups of Charr. Dispatch them, and then use an explosive charge to destroy the caravan. The siege devourers are guarded by one or two groups of Charr. Dispatch them, then feed an explosive charge to the devourer. Shortly after the devourer launches a charge, he will be bombarded and killed. The watchtowers are guarded by one or two groups of Charr. Again, dispatch them and destroy the tower.
The garrison consists of several groups of Charr in a small area. Use normal pulling strategies to separate the groups and dispatch them accordingly. Then, move in and destroy Harvest Soulreign. This will lead to a cinematic and begin The Dawn of Rebellion.
Repeating[edit]
Having completed the quest once, you may want to rush through the mission when repeating it for your Hero's Handbook. If so, run to the Vanguard Helmet in Grothmar Wardowns to get the mission and:
- As soon as the mission starts, set off to the southeast - the group approaching from the northeast will not follow you.
- Cross the bridge, waiting for the two groups of Charr to separate before attacking them.
- Head east along the bottom of the area, avoiding the few groups of Charr nearby. When you reach a cliff, you will need to kill two more groups on the road.
- Head straight to the stronghold. If you wait just south of the mission objective star, a devourer catapult will come towards you separately from its group, making it easier to kill.
- Kill the Charr in the fort. Be careful, as there will be more enemies than you might have previously encountered here (this is because you have not completed the optional objectives).
- If you follow the repeat map, from the moment you exit Longeye's Ledge until you finish the quest, it shouldn't take you more than 15 minutes.
5 minute HM speed run[edit]
Take a running build yourself. Build the rest of the party to be able to take out the two end bosses.
Run to, and activate, the helmet. After the cinematic, flag your heroes and henchmen back up the hill you ran down towards the helmet (about half-way up), then run yourself in the opposite direction just to the edge of the burnt area. Your team will probably get hit a little by the incoming Charr, but they will survive. Once the Charr have gathered at the helmet, flag your party (using the Mission Map) across the bridge and along the road a bit.
Keep flagging them a bit further along the road (at about 10 second intervals) till they get to the northern tower (at which stage you will get some dialogue). Continue to flag them south past the second tower, and then east into the Charr camp and onto the green star. A second dialogue will appear about now. Finally flag them into the mouth of the area with the two bosses.
If you don't mind dying, you can get yourself killed by the Charr at the start, which makes it easier to flag. But with practice it isn't necessary.
NPCs[edit]
Allies[edit]
 20 (20) Charr Siege Devourer
Foes[edit]

 20 (26) Charr Axemaster
 20 (26) Charr Seeker
 20 (26) Charr Prophet
 20 (26) Charr Hexreaper
 20 (26) Charr Dominator
 20 (26) Charr Firereigner
 20 (26) Charr Flameshielder
 20 (?) Devourer Catapult
 24 (26) Mandragor Dust Devil
 24 (26) Mandragor Smoke Devil
 24 (26) Vile Mandragor
 24 (26) Mandragor Shadowfang
 20 (26) Mantid Queen
 20 (26) Mantid Nymph
 20 (26) Mantid Digger
 24 (26) Swampwater Skale
 24 (26) Deadly Skale
 24 (26) Skale Lasher
Bosses[edit]
 24 (30) Gordam Griefgiver → Eviscerate
 24 (30) Groknar Weazlewortz → Barrage
 24 (30) Harvest Soulreign → Spiteful Spirit
 24 (30) Anmat the Trickster → Power Block (The Trickster)
 24 (30) Frazar Frostfur → Ward Against Harm
Interactive objects[edit]
Dialogue[edit]
Initial dialogue[edit]
- Battle signs indicate that there are still Ebon Vanguard members to be rescued. Assault the Charr camp and look for them.
Intermediate dialogue[edit]
Grothmar Wardowns[edit]
- Vanguard Helmet
- Do you want to examine the helmet?
 Yes. (The Battlefield plays)
 No.
No.
At the carts[edit]
- Groknar Weazlewortz: Prepare for battle, prey. You will find no mercy here.
- Gwen: You're the ones who will be begging for mercy. (only if Gwen is in the party)
- <Party Leader>: We're not here to seek mercy, unfortunately...for you. (only if Gwen is not in the party)
- Groknar Weazlewortz: Grr. Impudent whelp. I shall skewer your body and devour your carcass whole.
Approaching the northern Devourer[edit]
- Anmat the Trickster: Look lively, troops. Our lunch has arrived.
- Vekk: Ha ha ha ha. Good one. The big oaf thinks you're his lunch. Wait, was he referring to me? (only if Vekk is in the party; takes precedence over Ogden)
- Ogden Stonehealer: Bah. You'll break your teeth on my hide, kitty. (only if Ogden is in the party)
Approaching the southern Devourer[edit]
- Gwen: Hand over the devourer, you mangy beasts. (only if Gwen is in the party)
- <Party Leader>: We need this devourer. Walk away and we'll spare your lives. (only if Gwen is not in the party)
- Frazar Frostfur: We don't take orders from prey. And we never walk away from a fight.
Completing all optional tasks[edit]
- <Party Leader>: That's as much as we can do from out here. Let's make our way to the camp.
Entering the Charr camp[edit]
- <Party Leader>: Where are the Vanguard captives? What have you done to them?
- Harvest Soulreign: You slaughter your way through my camp and demand information from me? You'll find no answers here, only death!
- Gwen: Death is what we seek. It suits your kind well. (only if Gwen is in the party)
- Ogden Stonehealer: Perhaps we should jog his memory...with our weapons. Answer the question, furball. Now! (only if Ogden is in the party and Gwen is not)
- Vekk: If you're ignorant of this information, simply admit as such. It's a simple question, really. Do you know where they are, or not? (only if neither Gwen nor Ogden are in the party, and Vekk is)
- <Party Leader>: I ask again. Did the captives pass through here? Tell us what you know and we shall spare you. (only if neither Gwen, Ogden nor Vekk are in the party)
- Harvest Soulreign: You dare speak to me as an equal? The Shamans command here, and we command you to die!
Notes[edit]
- During this mission Charr Firereigners drop Charr Explosives when killed.
- It is difficult to capture skills from Harvest Soulreign, since the end cinematic triggers immediately after his death.
- Completing this quest triggers The Charr Prisoner cinematic and returns players to Grothmar Wardowns.
- If Plan A quest is active, players will appear in the middle of the Charr camp, surrounded by about 8 groups of Charr.
- However if Failure to Communicate quest is active, the Charr camp will be devoid except for a single group. Which makes it easier to complete this quest.
- This quest (and all primary repeatable Eye of the North quests) may also be obtained from the Scrying Pool in the Hall of Monuments after completing it once.
- Completion of this mission will fill in page #3 in the Hero's Handbook storybook.
| Eye of the North primary repeatable quests and missions |
|---|
| Asura arc: Finding the Bloodstone and The Elusive Golemancer » Genius Operated Living Enchanted Manifestation |
| Ebon Vanguard arc: Against the Charr » Warband of Brothers » Assault on the Stronghold |
| Norn arc: Curse of the Nornbear » A Gate Too Far and Blood Washes Blood |
| Deldrimor arc: Destruction's Depths » A Time for Heroes |
| Challenge: Glint's Challenge |