Kodonur Crossroads
| Kodonur Crossroads | |
|---|---|

| |
| Campaign | Nightfall |
| Region | Kourna |
| Type | Cooperative |
| Party size | 8 |
| Required hero | Zhed Shadowhoof |
| Duration | Medium |
| Preceded by | Centaur Blackmail |
| Followed by | Mysterious Message Centaur Concerns Eavesdropping Weird Waters |
You've allowed yourself to be captured by the Kournans to help Zhed Shadowhoof free his captive Centaur brethren and guarantee their assistance against Varesh in the future.
In this mission you kill taskmasters to obtain their keys, which you use to free the centaurs. When all the centaurs are free, you assault the fort to free Mirza Veldrunner.
Mission information[edit]
Requirements[edit]
- All party members must have accepted the reward for Centaur Blackmail.
- Zhed Shadowhoof must be present in the party.
Objectives[edit]
Rescue Mirza Veldrunner from the Kournans.
- Defeat Kournan Taskmasters to get cell keys.
- Your party has [0...6] cell key[s]. Use a cell key to open a cell.
- Free additional Veldrunner Centaurs to build a resistance force. You have [6...0] more cell[s] to unlock.
- Defeat Overseer Boktek and Overseer Haubeh.
- *BONUS* Defeat the cruel Taskmasters.
- You have [3...0] of 3 cruel Taskmasters remaining.
Reward[edit]
| Normal mode | Cruel Taskmasters killed | Rewards | |||
|---|---|---|---|---|---|
| Standard | 0 - 1 | 1,000 XP | 100 |
1 |
15 |
| Expert's | 2 | 1,500 XP | 150 |
1 |
15 |
| Master's | 3 | 2,000 XP | 200 |
1 |
15 |
| Hard mode | Cruel Taskmasters killed | Rewards | |||
| Standard | 0 - 1 | 1,000 XP | 200 |
1 |
60 |
| Expert's | 2 | 2,000 XP | 300 |
1 |
60 |
| Master's | 3 | 3,000 XP | 500 |
1 |
60 |
Walkthrough[edit]
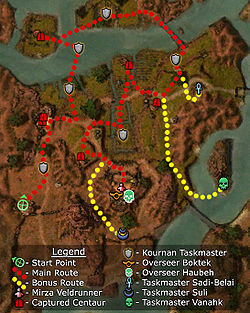
Your goal is to rescue the leader of the last free Centaur pride in Elona with the aid of other captive members. There are six Centaurs to liberate before assaulting the fort where Mirza Veldrunner is imprisoned. Each of their cells can be unlocked by obtaining a key from six taskmasters. These keys can be used by any party member to open any cell, but one at a time. Keep in mind that opening the cell in the middle, as well as the one closest to the fort, will trigger one patrol each to rush to the location.
Open your Mission Map (U) to pick a course and take care of patrols without engaging multiple groups at the same time. The far eastern cell holds a level 24 Veldrunner Centaur (boss) while the rest are level 20 regulars. It will not join the party window but will follow and help you fight. Haroj Firemane on the other hand, doesn't engage ever.
Once all Veldrunner Centaurs are freed, use these new trapper allies to rescue their leader.
Since the endeavour is time-consuming, it is wise to ensure the last step success by:
- Clearing both guarding groups at each side stairs before pressing to the main gate.
- With a lot of casters in the player group, it is possible to eliminate many of the enemies inside beforehand (only the final 2 Overseers and the few mobs right next to them are unreachable). Keep in mind that this is only possible before freeing all 6 captive centaurs, and that the gate and walls will block projectile-based attacks.
- The main gate itself will blast open and a few extra enemies will instantly spawn inside the fort, but only when a player approaches. It is possible to flag heroes/henchmen at the stairs (Centaur allies may follow a player) and once it opens, rush back to the stairs and then use one hero to lure enemies out of the fort. This method secures outnumbering the enemies and not the other way around.
Finally, eliminate the remaining forces plus the two Overseers (Boktek and Haubeh) to complete the mission.
Alternate Strategy[edit]
After being freed, avoid the first group and go directly east to take out Taskmaster Suli. Make your way counter-clockwise across the estate killing the remaining Bonus Taskmasters. Since the fortress forces only spawn after all 6 centaurs have been freed, one can walk near the fortress without much concern.
Bonus[edit]
The bonus is to find and kill 3 cruel Taskmasters and their groups before the fort assault.
- Taskmaster Sadi-Belai, is to the east just past the eastern most cell. This boss spams Zealous Benediction which makes her difficult to overcome, engage her only after getting rid of the approaching patrol.
- Taskmaster Vanahk is on the small island at the east.
- Taskmaster Suli is south of the fort.
Skills recommendations[edit]
- Enchantment-based builds are vulnerable to enchantment removal by Kournan Oppressors and Seers.
- Hex removal skills could be unnecessary; the only hex spells your party will encounter are Enchanter's Conundrum (the hex that is applied has no impact if your party does not use enchantments) and Life Siphon (ends when its caster dies).
- The final groups of foes within the fortress are primarily tightly packed casters. Panic and other AoE denial will have great impact on them.
NPCs[edit]
Allies[edit]
 20 (20) Haroj Firemane
 20 (20) Veldrunner Centaur
 24 (24) Veldrunner Centaur (boss) → Smoke Trap
 20 (20) Mirza Veldrunner
Foes[edit]
 16, 20 (20) Kournan Guard (axe)
 22 (26) Kournan Elite Guard
 24 (30) Kournan Taskmaster
 16, 20 (26) Kournan Bowman
 20 (26) Kournan Priest
 20 (26) Kournan Oppressor
 20 (26) Kournan Seer
 20 (26) Kournan Scribe
 22 (26) Kournan Elite Scribe
 16, 20 (26) Kournan Phalanx
 22 (26) Kournan Elite Spear
 20 (26) Kournan Zealot
 22 (26) Kournan Elite Zealot
 28 (30) The Hunger (Cannot be engaged; appears briefly just before ending-cinematic.)
Bosses[edit]
 24 (30) Taskmaster Sadi-Belai → Zealous Benediction
 24 (30) Overseer Haubeh → Blood is Power
 24 (30) Taskmaster Vanahk → Blood is Power
 24 (30) Overseer Boktek → Cautery Signet
 24 (30) Taskmaster Suli → Pious Renewal
Interactive objects[edit]
Dialogue[edit]
Opening cinematic[edit]
- <Character name>: "So what's this plan of yours?"
- Zhed Shadowhoof: "It is simple, two-legs. We surrender to the Kournans."
- <Character name>: "Surrender? Have you lost your mind?"
- Zhed Shadowhoof: "Hardly. Once we surrender, they will lock us up in a pen in the work camp. We then free ourselves and rescue the other Centaurs."
- <Character name>: "And how would we free ourselves if we're locked up?"
- Zhed Shadowhoof: "My friend Haroj Firemane is trusted by the guards. They believe his will to be broken."
- Zhed Shadowhoof: "He has acquired a single key, which he will use to release us."
- <Character name>: "How do we know you and your friend won't just turn us in?"
- Zhed Shadowhoof: "You don't. You'll have to trust me."
- <Character name>: "We have to trust a Centaur who doesn't trust us."
- Zhed Shadowhoof: "Yes. Ironic, isn't it?"
Initial dialogue[edit]
- Kournan Guard: Another double shift! I don't get it. We've got enough guards here to storm Istan.
- Kournan Taskmaster: We can't take any chances, so shut your mouth... or me and my cell keys will shut it for you.
- Kournan Guard: Shove your keys in your pocket. I'm taking a break.
- <Character name>: Well Zhed? Is this the part where we "trust" you?
- Haroj Firemane: Ahai! Let me get you out of here and we can free the rest as planned.
- Zhed Shadowhoof: Come now, you did not really think I would turn you over to the Kournans, did you? I would die before I gave those dogs what they want.
Intermediate dialogue[edit]
After killing the first Kournan Taskmaster.
- Zhed Shadowhoof: These holding cells can be unlocked with the keys the Kournan Taskmasters carry. Do what you must to get those keys, two-legs. The bloodier, the better... but do not make much noise.
If approaching the garrison before all Centaurs are freed.
- Zhed Shadowhoof: We are not yet ready to storm the garrison. Centaur holding cells remain locked, and the numbers are still on the side of the Kournans. Free all of my brethren. Only then will we stand a chance against the garrison guards.
When freeing a Centaur.
- Veldrunner Centaur: Ahai, Zhed Shadowhoof. We shall join your rebellion!
- Veldrunner Centaur: Free at last! These Kournan dogs will pay!
- Veldrunner Centaur: Freedom or death! The Veldrunner pride will be shackled no longer!
- Veldrunner Centaur: Thank you for coming to our aid! We will teach these Kournans what it means to mess with the Veldrunner pride!
After freeing all Centaurs.
- Zhed Shadowhoof: Only Mirza Veldrunner remains a prisoner. Prepare yourselves. Storming the central garrison will be no easy task. Approach with caution.
Ending cinematic[edit]
- Later...
- (Outside the Dejarin Estate)
- Zhed Shadowhoof: "Mirza Veldrunner will take my people home from here. I shall come with you."
- <Character name>: "Why should we trust you? You didn't share your plan with us until it was almost too late."
- Zhed Shadowhoof: "I feared you would flee if I told you too soon, two-legs. You are made of sterner stuff than I had thought."
- <Character name>: "My friends and I risked capture for you, and you still use that "two-legs" talk."
- Zhed Shadowhoof: "Of course. I am sorry if I have offended you. I shall trust you fully if you allow me to help."
- <Character name>: "All right. You can come along. We can use your help. But watch your language."
- Zhed Shadowhoof: "You lead. I shall follow."
- Zhed Shadowhoof: "Two-legs."
- Meanwhile...
- (The Dejarin Estate)
- Varesh: Who is responsible for this?"
- Kournan Captain: "Warmarshal!"
- Varesh: "Captain, why did you not kill the traitors when you had the chance?"
- Kournan Captain: "We... we thought you would want them alive, Warmarshal."
- Varesh: "You were mistaken, Captain."
- Varesh: "Hunger?"
- Morgahn: "Varesh! The captain was just doing his duty!"
- Varesh: "As I do mine, General Morgahn."
- Morgahn: "Yes, but such discipline will soon leave us without soldiers at all!"
- Varesh: "You are right, Morgahn. I apologize for my impulsive response. Now is a time for clear thinking. General Bayel!"
- General Bayel: "Warmarshal!"
- Varesh: "Take the Hunger, and whatever forces you need! I want these Sunspears dead!"
- General Bayel: "Your words are my deeds, Warmarshal."
- Varesh: "You are a good soldier, Bayel. I would expect no less."
Notes[edit]
- If you let the level 24 Veldrunner Centaur (boss) die, you can capture the elite skill Smoke Trap from him.
- After completing this mission, your party will be taken to Sunspear Sanctuary.
- Sometimes when the mission is finished, The Hunger will appear briefly, presumably for the cinematic's sake.
- Completion of this mission will fill in page #3 in the Night Falls storybook.
