Heart of the Shiverpeaks (quest)
| Heart of the Shiverpeaks | |
|---|---|
| Section | Primary Dwarf Quests |
| Campaign | Eye of the North |
| Given by | Jalis Ironhammer in Battledepths (Far Shiverpeaks) |
| Part of | Against the Destroyers |
| Preceded by | Northern Allies, The Knowledgeable Asura, and The Missing Vanguard |
| Followed by | Destruction's Depths |
| Type | Primary quest |
| Map(s) | |
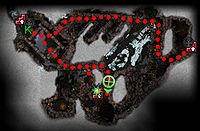
 Reaching Heart of the Shiverpeaks, via Battledepths | |
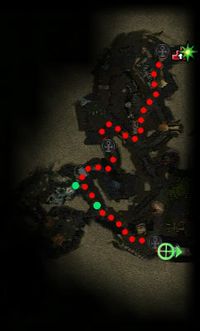
 Level 1 map | |
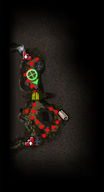
 Level 2 map | |
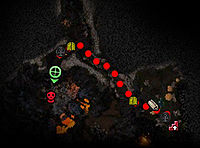
 Level 3 map | |
Travel into the Heart of the Shiverpeaks to retrieve the Hammer of the Great Dwarf.
Quest information[edit]
Objectives[edit]
- Meet Budger Blackpowder inside the Heart of the Shiverpeaks.
- Retrieve the Hammer of the Great Dwarf from deep within the mountain caverns.
- Use Dwarven powder kegs to remove obstacles.
- Slay Cyndr the Mountain Heart.
- See Jalis Ironhammer for your reward.
Reward[edit]
- 2,000 Experience
- 250 Dwarf reputation points
Walkthrough[edit]
The main difficulty of this quest is encountered on the third level of the dungeon, where players must defeat Cyndr the Mountain Heart - which can be extremely difficult for single players and it is recommended to team-up with others, as the party will need to drop three kegs on the Wurm to enable it to be damaged.
Getting there[edit]
Start from Eye of the North (outpost), head west and use the portal to Battledepths. Head along the north tunnel to the Dwarves' encampment and talk to King Jalis Ironhammer (point K on the wiki-map) to pick-up the quest. Cross the hall, and head east to avoid the Chromatic Drakes - kill the two groups of Djinn and then follow the wall to the Asura Gate to the dungeon entrance.
It is also possible to enter this area from the first level of the Bogroot Growths dungeon as long as the quest has been obtained, but the route is difficult and long.
Level 1[edit]
Head either south or northwest upon entry and then head in a southerly direction past the resurrection shrine.
- The south route only has Undead to fight (but is probably easier for groups unable to take down multiple healers).
- The northwest route has spiders (the Lifeweavers can be difficult to kill), regular undead and a massive room of traps and Chained Clerics (which can be avoided by running through with an organised party).
Find Budger Blackpowder at any of his possible spawn points (marked with green dots on the wiki-map) - he gives you some free Aged Dwarven Ale. He will follow you through the entire dungeon, providing you with Dwarven Powder Kegs which can be used to breach Cracked Walls - as well as knocking down and causing 50 damage to foes when dropped. Pull foes to avoid over-aggro.
Once at the Cracked Wall, talk to Budger to receive a Dwarven Powder Keg. Drop the item in front of the obstacle to destroy it and proceed forward.
Level 2[edit]
This level can be completed by only fighting two/three groups. By quickly heading north at the start you can avoid aggroing a slowly patrolling group of Skelk. Destroy the wall with a Powder Keg. Once at the portal eliminate the Skelk group to open it.
Level 3[edit]
This is the final level. There is an Area Map immediately after the entrance, which will reveal the locations of two Cracked Walls and the chamber where Cyndr the Mountain Heart resides.
There are Aggressive Oozes, Flowstone Elementals, Magma Blisters and Burning Spirits along the way. Be careful with these last ones when turning left to blast the second wall as there will not be much space to avoid their area of effect attacks.
Cyndr the Mountain Heart[edit]
After breaching the second wall, an apparently empty room awaits. Enter the room slowly and beware of Cyndr the Mountain Heart that appears. It cannot be damaged at all while protected by the "Mountain Heart Carapace". To destroy its Carapace, the player(s) must drop three Dwarven Powder Kegs close to it. A blue progression bar will indicate when the wurm is vulnerable, after which it turns red and regenerates its Carapace (additional keg blasts can deal 50 of damage points). Depending on the party's overall firepower, it is possible to defeat Cyndr in one single attempt.
Cyndr can deal a high amount of damage to bunched up teams (such as heroes) while also destroying kegs with Pyroclastic Shot, and its Flame Burst can kill a low armor character (such as a caster) in one hit. The lava on the ground also inflicts burning. As such, it is extremely difficult to take the wurm down the normal way if you're the only player character of your team.
One possible tactic is to lure Cyndr close to the tunnel's entrance and use life stealing skills which can bypass its carapace while being protected from its attacks inside the tunnel. Your party must be positioned away from the entrance to lure effectively.
For more details on how to kill Cyndr, refer to this boss-like foe's page.
Once the boss is killed and the Hammer of the Great Dwarf retrieved from the Stone Pedestal, a Mountain Heart Chest will spawn which grants every player a reward. Wait for the three minutes countdown timer to expire to be returned next to King Jalis to claim the quest reward and take the next quest.
Skill recommendations[edit]
- Life stealing skills and skills that inflict bleeding, poison and/or disease ignore the damage immunity of the wurm.
- Ward Against Elements and Ward Against Harm.
- Protective Spirit to protect the runner(s), who should also have a speed boost skill.
NPCs[edit]
Allies[edit]
Boss-like foes[edit]
Dialogue[edit]
Initial dialogue[edit]
- Jalis Ironhammer
- The moment of Dwarven destiny is almost at hand. We know the location of the Great Destroyer and must now seek the power and guidance of the Great Dwarf. For that, we will need the Hammer of the Great Dwarf, an ancient and powerful relic hidden deep within the mountains themselves.
- Its exact location has remained hidden for centuries, known only to a single member of the Blackpowder clan and handed down from generation to generation. Budger Blackpowder is the last of his lineage. Only he can lead ye to it. Find him in the Heart of the Shiverpeaks. Without yer help, we Dwarves will be forced to face our destiny alone.
Intermediate dialogue[edit]
- Budger Blackpowder (Heart of the Shiverpeaks)
- Come friends, drink with the last Blackpowder before we depart. The trek through the Heart of the Shiverpeaks will be interesting. And by that, I mean "dangerous." We Blackpowders have sworn a blood oath to protect the secret until the day the Hammer was needed...and my ancestors took that oath mighty serious. So, drink up, for today we may die honorably.
Upon reaching the second Cracked Wall in Heart of the Shiverpeaks: Level 3
- Budger Blackpowder: "Another obstacle built by Blackpowder hands...an opportune time for a show. Use this powder keg and blast away."
Upon entering the final chamber
- Budger Blackpowder: "Behold! The Hammer of the Great Dwarf! Now Jalis can work the Rite of the Great Dwarf, and we can drive those Destroyers back to where the sun don't shine! Grab it and we'll be..."
- Budger Blackpowder: "By the foul breath of Balthazar! It's Cyndr the Mountain Heart! This beast won't stop us from retrieving the hammer!"
- Budger Blackpowder: "Cyndr's thick carapace protects him, but don't let up your attacks! A few blasts from my extra-special powder kegs will break him but good!"
After breaking through Cyndr's carapace (repeated each time the Carapace is broken)
- Budger Blackpowder: "Har! Not even the infamous Mountain Heart can stand up to Blackpowder's recipe. Now's our chance. Hit him with all you've got!"
After defeating Cyndr
- Budger Blackpowder: "Ye've done it! I can't wait to tell the boys at the tavern about this. Truly, an epic battle!"
The Great Dwarf plays when you go near Jalis Ironhammer.
Reward dialogue[edit]
- Jalis Ironhammer
- You defeated Cyndr the Mountain Heart? Incredible! The entire Dwarven race owes you a debt of gratitude that can never be repaid. With the Hammer of the Great Dwarf in hand, we can fulfill our destiny. The Dwarves shall be transformed, forevermore! We will become living weapons who exist solely to defeat our ancestral foe.
Notes[edit]
- Budger Blackpowder will drop an Aged Dwarven Ale when talked to in the Heart of the Shiverpeaks during this quest (only receivable once).
Trivia[edit]
- This is the only dungeon that does not have a repeatable quest associated with it (excluding Zaishen Bounty quests). The dungeon itself may be repeated.