Urgoz's Warren
| Urgoz's Warren | |
|---|---|
 Interactive Map | |
| Campaign | Factions |
| Region | Echovald Forest |
| Type | Elite |
| Party size | 12 |
| Duration | Long |
“Urgoz, the ancient, tree-like spirit of the forest, was corrupted by Shiro's death wail two hundred years ago. As Shiro's residual influence slowly transformed the tree spirit, he became more hateful and twisted, and the creatures of the Echovald fell under his sway (especially wardens and the Dredge). Now Urgoz has declared war on the Kurzicks infecting "his" forest, and as luck would have it, he has chosen one of the most productive amber mines in the Echovald as his home base. The Kurzicks do not believe the tree spirit (now more demon than spirit) can truly be defeated-if it was, it could mean the end of the forest itself-but they desperately need to open access to the amber and keep Urgoz's forces in check, or their entire economy will collapse. Only an elite group of heroes-heroes from the alliance that has the most faction with the Kurzicks-are worth sending.
— Factions Prima Guide
Mission information[edit]
Starting the Mission[edit]
Get to the staging area at Urgoz's Warren (outpost) with a Passage Scroll to Urgoz's Warren or talking to Vash, form a party of up to 12, then the party leader can enter the mission.
Objectives[edit]
- Kill Urgoz.
Rewards[edit]
| Foe | Kurzick faction |
|---|---|
| Explosive Growths Hopping Vampires Thought Stealers |
0 |
| Normal foe | 10 |
| Guardian Serpent Twisted Bark |
50 (100 in Hard Mode) |
| Both Greater Serpents | 250 (500 in Hard Mode) |
| Urgoz | 5000 (10000 in Hard Mode) |
Reward chest[edit]
Killing Urgoz spawns Urgoz's Chest, which offers each player:
- Three Amber Chunks (6 Amber Chunks in Hard mode)
- One Mystical Summoning Stone
- One Passage Scroll to Urgoz's Warren (Hard Mode only)
- One of the following (two in Hard mode):
- A rare inscribable item, including the following items exclusive to Urgoz' or Kanaxai's Chest:
- A unique item available only from this quest:
Rare skins[edit]
Urgoz's Warren is also one of only two places in which the following non-inscribable weapons can drop (either from a foe or through one of the chests):
- Ceremonial Daggers
- Dragoncrest Axe
- Exalted Aegis
- Gavel of the Nephilim
- Ironwing Flatbow
- Straw Effigy
- Wayward Wand
- Zodiac weapons
Walkthrough[edit]
Your goal is to make your way to Urgoz and defeat him. To do this, you must make your way through the Warren, a job complicated by Environmental Effects that are created by Twisted Barks; killing the tree-like creatures removes the effect, so they are often your primary targets as you traverse the area. Each room is blocked by a gate which can only open after defeating a Guardian Serpent; these are usually the least difficult challenge and can often be ignored until it is safe to move on.
Although proficient teams can complete the mission within 30 minutes, less experienced teams should allow for at least two hours.
Twisted Bark effects and conditions[edit]
Teams should be prepared to deal with the following effects and conditions created by the Twisted Barks. Any party members within range are affected. Ideally, party members should stand outside the range of the Twisted Barks while an ally pulls foes towards the group.
 Energy Drain (effect): -4 Energy degeneration.
 Life Drain: -15 Health degeneration.
 Sheer Exhaustion: Every spell cast causes Overcast.
 Weakness: You deal less damage with attacks and all of your attributes are reduced by 1.
Section 1 (Weakness)[edit]
This area has Hopping Vampire and Thought Stealer popups at the start which use Suicide Health and Suicide Energy that either kill the target or take all of the target's energy respectively. They die in the process of using the skill. The easiest way to combat this is to move entire party back out of the corridor into the large room at the start. Consider using spirits as decoys for the suicidal creatures. Killing them at long range will avoid your health or energy depleting.
Moving down the corridor you will experience your first Environment Effect (Weakness). A simple method for this room is to pull the dredge back towards the corridor you started in, out of range of the Weakness. The first group of Dredge will not pull very far into the corridor. Attempt to avoid aggroing the other four patrolling groups of Dredge while killing the first. Going too far into the room will initiate the patrols to swarm into the main area to protect the Twisted Bark. Retreat and back up the corridor to the edge of the effect and begin pulling groups of Dredge to your party. Be patient and watch the patrol patterns. Luring two groups at the same time will often result in early failure.
Once you have a clear run to the Twisted Bark, move in for the kill to remove the Environment Effect.
Continue straight on up the stairs. Be careful here, because as soon as you enter this room two patrols will move in from the left and right. Due to this, try pulling back the stationary group down the stairs. Then kill the two patrol groups. Moving to the left or right of this chamber will initiate some popups of hidden Greater Blood Drinkers.
Kill the Guardian Serpent to unlock the doors and move on to the next area.
Section 2 (Health Degeneration)[edit]
Keep your group at the entrance to this area since there is a strong -15 health degeneration Environment Effect.
Once again best technique is to pull the closest groups of foes out of the environment effect. You will be able to lure all three Dredge groups with some patience. It is highly likely that you will spawn some Greater Blood Drinkers in the process. Using the walls can block the projectiles as the lure comes around the corner towards the team. Be mindful that this may also impact your team's ability to use ranged attacks.
When the area is apparently clear, have your party rush to the Twisted Bark. You should be able to kill it before any party members die due to the degeneration.
Do not rush forward at this point. This room is infested with more Greater Blood Drinkers. Proceed slowly towards the Guardian Serpent at the southern edge of the room.
Section 3 (no environmental effect)[edit]
Once the gate opens, keep your team behind the gateway and pull the big groups of Brooding Thorns and Burning Brushes back to the gate and use a few party members to form a bottle neck trap to easily dispatch them. Beware rushing into the next room since there will be ranger traps that were laid by the Brooding Thorns.
Now you will see a bridge ahead, with a ramp at each side upto two sets of levers. Clear the room and pull both levers to open the gate to the next section. Your team could choose to shelter from the ranged attacks of the Dredge by standing beneath the bridge.
Section 4 (no environmental effect)[edit]
This section consists of a long dark bridge over a pit, with Fire Flowers along each side. If someone runs onto the bridge, the Fire Flowers act like turrets and will spit fire at them. There are points along the bridge where groups of Thorn Wolves appear - these can easily kill your lure.
After killing the first group of wolves along the bridge, setup a spirit decoy at the entrance to the bridge (if you have no spirits, you can later just kill the suicidal creatures at range before they reach your party). Proceed to the next wolf spawn, and kill them. Moving further along the bridge will spawn a third group of Wolves, kill them and then kill any remaining Hopping Vampires and Thought Stealers that spawned at the start of the bridge beside your spirit decoy. Continue to the end of the bridge, where another group of Hopping Vampires and Thought Stealers will spawn.
Kill the Guardian Serpent to continue to room 5.
Section 5 (Exhaustion)[edit]
This section has quite a big room with 3 exits, but you only need the exit to the west. Have your lure pull the Thorn Wolves that pop up by strafing around the room. The four hidden groups of wolves patrol underground. Lure them back to your party at the gate (where there is no exhaustion effect) and finish the wolves off.
When all four groups are defeated, head across the room through the vine gate on the left and onto the bridge - your party will now be under the Environmental Effect. It is much easier to just ignore the Twisted Bark in this room and move on to the next room.
When you reach the end of the bridge there will be a small group of wolves that spawn in the next room. Across the bridge there is another chamber to the right which you should head to after. There is an area beside the vine gate in that next room where there is no exhaustion effect, consider letting your party's exhaustion levels lower before continuing.
Again there is an exhaustion effect at the far side of the room, pull all the groups of wolves to your party (who should be standing in the area without the exhaustion effect).
Once the area is clear, proceed to the next gate.
Section 6 (no effect)[edit]
You will see two Brooding Thorns in this next room, and there will be another two hidden groups of wolves but no exhaustion in this chamber. After killing them head west towards the valley with giant mushrooms at the sides.
The usual Thorn Wolf groups will appear out of the ground as your party makes its way to the north east towards the bridge. Deal with the wolves and continue across.
The next room contains a few more wolf patrols. Lure them out. In this room you will need to head south east to the vine gate, making a 270° turn on the map as you follow the walls of the path. This means enter the room and keep as much to the right hand side as possible. Head down the ramp towards the crystallised walls and follow the path which will take you under the bridge you were just on. There are no pops in the bright room but on your way to the next bridge you will encounter two underground wolf patrols so do not rush.
Pause when you see the Guardian Serpent, do not step onto the bridge in front of it until you have read the next section.

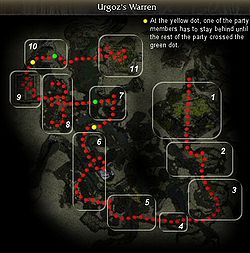
One player must stay behind at this point - if all the party members are in the room at the same time, 138 additional foes will spawn, which can be difficult in addition to the -4 energy degeneration Environment Effect. The image to the right depicts where the player/hero should stand until the rest of the party has crossed the room and the foes in section 8 have spawned - only then is it safe for the waiting player/hero to return to the main group.
Even if your party isn't full, you still need to have one waiting before the bridge.
Section 7 (Energy Degeneration)[edit]
There are 3 bridges in this room, 1 leading into the room, 1 within the room, and 1 leading out of the room.
With one player/hero waiting before the bridge leading to the first Guardian Serpent, the rest of the group can kill this Serpent and proceed across the internal bridge to the Twisted Bark. Killing it will remove the Environment Effect. (If you do not kill the Twisted Bark, there will be -4 energy degeneration in the final Urgoz battle on the southern side of the room.)
The incomplete party can now move to the second Guardian Serpent, kill it and continue across the bridge until the Wardens and Plants spawn in the next section.
Only then can the waiting player/hero return to the main group.
If all party members are in this room at the same time, 42 suicidal creatures and 96 wardens will spawn. The four Warden groups closest to the entrance can be pulled out of the effect, whereupon the group can then kill the Twisted Bark. There will be the first batch of suicidal creatures beyond the second Guardian Serpent, a large group of Wardens on the bridge, followed by a second batch of suicidal creatures at the far end of the bridge and another large groups of Wardens after the bridge.
Section 8 (Exhaustion, Weakness)[edit]
This is quite a difficult area where you are under two Environment Effects; Exhaustion to the south and Weakness to the north. It is best to kill the southern Twisted Bark first to get rid of the Exhaustion.
Lure out the first Plant group towards the entrance to kill them safely away from the Environmental Effects. There are three other groups of plants - one at each of the two Twisted Barks, and a third at the Guardian Serpent blocking the gate. The third group can be lured when it is safe to do so, take care of the Warden's traps though. Do not rush in and attempt to kill the Guardian Serpent you see directly in front of you until later.
There are also four groups of Wardens, two on each side, patrolling up and down. Lure each group outside the room one group at a time. It is advised to focus on the Maddened Earth Wardens (Earth Magic Elementalist nukers) before the Maddened Song Wardens (healers).
Once the 4 groups of Wardens are disposed of, proceed to the left hill and take out the Plants and the Twisted Bark that caused the Exhaustion. It is possible to pull the Plants while standing at the bottom of the cliff into range of the Exhaustion-free safespot at the entry gate.
Once the exhaustion effect is gone proceed over to the opposite hill and eliminate the group on top of it. Take out the Twisted Bark to get rid of the Weakness effect.
Go back to the middle of the room and kill the Guardian Serpent and the last Plant group to enter the next section.
Section 9 (no effect)[edit]
This room is filled with Wardens and stationary Plants (the plants can be ignored entirely). Lure the first group of Wardens to the top of the entry stairs (this will likely ball them up as they turn the corner). Again focus on the Maddened Earth Wardens first. This door will provide you with an excellent location to launch your attacks on the next set of groups, because the Wardens can be corner-blocked here.
Kill any Plants as needed, they are guarding their spot and shouldn't move around too much. With the exception of the wardens in the north west corner, all Warden groups can be pulled to the stairway.
Be careful of the traps the Burning Brushes leave behind and kill the last group of Wardens in the middle of the room (there is a big tree which your casters can hide behind).
Kill the Guardian Serpent to move on to the next section.
One player/hero must remain outside the next room beyond the linking corridor, this will avoid the door closing and the party being trapped inside with many spawns.
Section 10 (no effect)[edit]
Pull all the visible groups of Thorn Wolves and Greater Blood Drinkers towards the gate, one group at a time. Killing one group of foes will enable another to spawn within the room at a random location, also bear in mind the underground patrols move around, so don't go too far into the room. NOTE: If your party advances too far into the room before the patrols and random spawns arrive, the entry doors will close behind you, cutting off any escape.
You will know when the room is clear because the exit gate will open to the next section when clear. Continue to be wary as there are often a few more popups even after the gate opens.
Once you have exited the room, continue down the path and you'll see a Twisted Bark causing the degeneration in this room, you can kill it easily as there are no hidden foes here. Ignore the first two Guardian Serpents on the right and left.
Cross the bridge and kill the various Plants awaiting your team. There are some hidden Brooding Thorns beside the Guardian Serpent that must be killed to open the final gate to Urgoz's chamber.
Section 11 (no effect, Urgoz)[edit]
Urgoz is in the center of this area, accompanied by two Greater Serpents. Urgoz uses Forest's Binding, which has an extremely long range, damages a foe and hexes them with Binding Chains. If characters get close enough to Urgoz, Explosive Growths will spawn. If it survives for several seconds, an Explosive Growth will die, causing an Exploding Spores effect, which will inflict 300 damage on you. Killing Explosive Growths will prevent the Exploding Spores effect. Don't stand still too long on the same spot or you will die.
Clear out the entrance to Urgoz's room to the east first and then clear and enter via the southern entrance. Just inside the southern entrance is a safe spot with a rock on the right. This is a safe place to flag your heroes, healers and your caster for Edge of Extinction--within Urgoz's attack range, but not Explosive Growth spawn range. Take a moment to run a player right up to Urgoz to ensure that Urgoz is in the area of effect for Edge of Extinction.
If you did not kill the Twisted Bark in Section 7, party members will face the added burden of -4 energy degeneration in the south half of the room.
Each Player can now run into the pop area for Explosive Growths, cast their Urgoz Skill (3 second cast time or less) and then move on and dodge Growths as needed. Keep running around the room using this technique. Once you reduce Urgoz to below 90% health it will start dying faster, but keep the pressure on with your Player characters.
If using a team of only heroes, flag the healers and Edge of Extinction caster in the safe spot mentioned above. Queue the other heroes' spike skills and flag them directly in front of Urgoz. Several Explosive Growths will spawn along their path and next to Urgoz while they are casting their skills. After a couple seconds, flag the heroes towards the column closest to the gate you did not enter from, then back to the original entrance. Repeat this triangular pattern of movement; the spike skills and dying Explosive Growths will gradually wear down Urgoz's health. The gates will remain open during the fight so you can reset if needed.
Kill Urgoz and your objective is completed. You can mop up the Greater Serpents at your leisure.
After Urgoz is defeated, an Urgoz's Chest spawns, the Explosive Growths stop spawning and a teleporter activates at the eastern end of the room. Using the teleporter removes you from the party and returns you to the Urgoz's Warren outpost.
Party considerations[edit]
There is no so called "standard build" for Urgoz's Warren, but there are key roles that are frequently used.
- Lure/Guide (player): A person with a long range bow who knows where foes appear, where to go, and what to do.
- Linebacker/Tank (2-players or heroes): A good linebacker/tank team can keep the most dangerous foes from reaching the midline.
- Runner (player or hero): There are no resurrection shrines so if the entire party dies, it is all over, and you are teleported back to the Warren's entry point. Nominate a human player as a runner: a ranged attacker with Rebirth who can hold back and still contribute but runs away at the first sign of trouble. A speed boost might also be advantageous for this character.
- Minion master (player or hero): A good minion master is useful. Include no fewer than 3 minion summons and Rotting Flesh. The monsters have no way of removing conditions, nor of passing disease back to your party, so this skill is exceptionally useful.
- Nukers (players or heroes): The bulk of the party will need to be able to dish out plenty of attacks using AoE damage. There are huge mobs of monsters in the warren, and you must destroy multiple targets at once if you are going to succeed.
- Healers (players or heroes): Usually only two healers are used for a run through Urgoz's Warren using players (bring more healers if using heroes). This can be a combination of Protection, Spike Healing, Party Heals, etc., depending on your party mix. If your healers are predominantly heroes, make sure you spread them around the players.
- Edge of Extinction (player or flagged hero): This party member creates an Edge of Extinction spirit. This is very useful with a lot of AoE, because it damages anyone of the same type under 90% health when something is killed. Some also kill Urgoz with this spirit, by attacking Urgoz until he is under 90% health and then letting the pop ups around him blow themselves up, eventually killing Urgoz. Be wary of your team exploding too.
Other useful party considerations.
- The more players the better. This can be done with a single player and seven Heroes but more players can speed up the run and makes Urgoz's room easier.
- When making a party, be aware of skill synergy - for example a paragon with "They're on Fire!" might be extremely useful when you have many elementalists with fire magic in your party. Or a Ritualist with Splinter Weapon with Barrage-rangers.
- Do not take too many healers as it will reduce your AoE offensive capability. Two should be sufficient for a Normal Mode run.
- Taking a minion master or spirit spammer helps occupy a mob while AoE damage destroys it.
- Check if everyone has a minimum of 2 hours of time. A group has a higher chance of failing if they rush and aggro as much as possible to speed up the mission. Instances of one player running in (towards a chest for example) will endanger the whole mission. Make this clear to the group before starting.
Skill considerations[edit]
- Rangers: Barrage and Edge of Extinction (place the spirit behind doors or walls so it is not easily destroyed by foes).
- Elementalists: Meteor Shower, Mark of Rodgort, or Searing Flames.
- Ebon Battle Standard of Honor will help improve everyone's damage.
- Mesmers: Energy Surge, Ineptitude (useful vs wolves), Panic, and Mistrust.
- Necromancers: Spiteful Spirit combination with minions, Blood is Power Blood Magic build.
- Heal Party, Divine Healing, Protective Was Kaolai, and Aegis are effective. Ritualist spirits and Paragon shouts that affect the party are also beneficial.
- Energy management: your party must be able to counter the energy loss effects in various rooms. Consider a battery.
- Protection spells: Protective Spirit or Shelter will prevent Thorn Wolves from killing your party members in one hit.
- Resurrection Spells: Remember to bring a resurrection spell. Spells used for in combat resurrection spells should resurrect at full health such as Resurrection Chant, and for long range resurrection spells in case party is required to retreat consider using spells like Rebirth. Unyielding Aura on a monk serves both these goals as well as boosting the healing of Divine Healing or Heal Party.
- Hex removal skills are useful, as Thorn Wolves use Shroud of Silence which can quickly render your monks useless.
General tips[edit]
- Environment effects: Try to lure enemy groups outside of the Environment Effects. Only enter the area of the Environment Effect when you are sure you can eliminate the Twisted Bark that is causing the effect.
- Luring: Let your Lure take their time and watch the patrols to lure only one group at a time. The Lure should be able to strafe: shoot and run backwards, running side to side as you retreat. This ensures groups stay aggroed and follow. Also, strafing in rooms should allow easier aggro of hidden underground (Thorn Wolves) and ceiling (Greater Blood Drinker) creatures.
- Patience: Listen to your Guide and be patient. Also wait for your minion master to raise as many Minions as possible after each combat and then regenerate Energy for next combat. Allow relevant characters to raise Pets post-combat also.
- Ensure Edge of Extinction, wards, shouts, and healing spirits are up at all times. Control your Heroes manually if needed.
- Pets: Bring as many pets as you can. The party size of 12 means that a pet shield can be incredibly useful, especially since pets do not accrue Death Penalty.
- Consumables: Bring some items that remove DP or give party bonuses to health and attributes. This is a long mission, and even with a good team, dying is an occupational hazard. A morale boost at critical points can potentially make or break an Urgoz run.
- Chests and Treasure: Don’t forget to bring keys and lockpicks to open chests. Although these are expensive, the rewards from this area are worth it. Zodiac items can only be gained from Urgoz’s Warren and The Deep, and they are very valuable, popular skins. Do not rush forward to chests without telling the party your intentions - especially in uncleared areas.
NPCs[edit]
Allies[edit]
 10 (20) Kurzick Architect
Foes[edit]
 28 (30) Maddened Dredge
 28 (30) Maddened Dredge Savage
 24 (26) Dredge Gardener
 24 (26) Dredge Gutter
 28 (30) Maddened Dredge Seer
 28 (30) Greater Blood Drinker
- 10 (24) Explosive Growth
- 28 (30) Brooding Thorns
- 28 (30) Uprooted Malice
- 30 (32) Twisted Bark
 24 (26) Burning Brush
- 28 (30) Thorn Wolf
- 10 (24) Hopping Vampire
- 10 (24) Thought Stealer
- 28 (30) Maddened Forests Warden
- 28 (30) Maddened Wind Warden
- 28 (30) Maddened Song Warden
 28 (30) Maddened Mind Warden
- 28 (30) Maddened Earth Warden
- 28 (30) Maddened Thorn Warden
- 28 (30) Maddened Spirit Warden
- 28 (30) Guardian Serpent
- 30 (32) Greater Serpent
Boss-like foes[edit]
- 30 (32) Urgoz
Objects[edit]
- Stoneroot Chest
- Urgoz's Chest spawns after killing Urgoz.
Dialogue[edit]
Approaching Urgoz:
- Urgoz: So, you have come at last. I have forseen your arrival...just as I have forseen your doom!
- Urgoz: The blood drinkers will feast on your corpses!
- Urgoz: It is your fate to die in this place.
- Urgoz: You will never escape!
- Urgoz: Which path shall you follow? They all lead to your demise!
- Urgoz: Let the wardens put an end to your misery, human.
- Urgoz: Breathe deeply the corruption of the forest...share its agony!
- Urgoz: The Kurzicks who lived here long ago knew they could not escape their destinies. You will learn the folly of fighting the inevitable.
- Urgoz: It is as I have forseen. You WILL die here!
- Urgoz: I knew you would make it this far...but soon you shall be no more. It is your destiny.
Notes[edit]
- As with any underground area, exploration of this map does not count towards the Cartographer title track.
- Killing Urgoz for the first time raises your account's Kurzick faction cap by 10,000.
Trivia[edit]
- Prior to the 13th November 2008 update, this mission did not affect the faction cap.
- The December 15, 2011 update modified section 3 such that neither Consume Corpse nor Necrotic Traversal are required.