The Deep
| The Deep | |
|---|---|
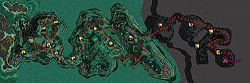 Interactive Map | |
| Campaign | Factions |
| Region | The Jade Sea |
| Type | Elite |
| Party size | 12 |
| Duration | Long |

“Deep beneath the surface of the Jade Sea, a demon of nightmares was trapped when Shiro's death wail struck. A remote Luxon tribe discovered the demon's resting place while mining the sea for jade and other resources and became corrupted—thereafter they were known as Luxon Outcasts. The Luxons ask their boldest heroes (who must be members of the highest rated alliance on the Luxon side) to seek out the source of the Luxon Outcasts, which may also be related to the reappearance of the wicked Oni in Cantha.
— Factions Prima Guide
Mission information[edit]
Objectives[edit]
Rewards[edit]
Faction for killing foes[edit]
| Foe | Luxon faction |
|---|---|
| Reborn Irukandji Foes spawned by knocking down Kanaxai |
0 |
| Normal foes | 10 |
| Aspects of Kanaxai | 50 (100 in Hard Mode) |
| The Leviathan | 250 (500 in Hard Mode) |
| Kanaxai | 5000 (10000 in Hard Mode) |
Reward chest[edit]
Killing Kanaxai spawns Kanaxai's Chest, which will reward:
- Three Jadeite Shards (6 Jadeite Shards in Hard mode)
- One Passage Scroll to the Deep (Hard Mode only)
- One of the following (two in Hard mode):
- A rare inscribable item, which may be one of the following items that are only available from this chest or Urgoz's Chest:
- A unique item unique to this chest:
Rare skins[edit]
The Deep is also one of only two places in which the following non-inscribable weapons can drop (either from a foe or through one of the chests):
- Ceremonial Daggers
- Dragoncrest Axe
- Exalted Aegis
- Gavel of the Nephilim
- Ironwing Flatbow
- Straw Effigy
- Wayward Wand
- Zodiac weapons
Walkthrough[edit]
Overview[edit]
The entire mission area is divided into fifteen sections, each with its own environment effect. The environment effect for each section persists until the Aspect of Kanaxai in that section is defeated. While killing the Aspect quickly will help in some rooms, it is not necessary to kill the Aspects to continue through the mission to the next section. The effects in the initial and final sections are permanent.
Bear in mind that this mission can take around 1 to 2 hours, depending on how experienced the team is. If you have not been there before, it is wise to proceed slowly and carefully, due to Oni pops and Aspect effects. It is a bad idea to try to rush through this mission without knowing the spawns.
In The Deep, a tank and wall method is often used. One tank pulls foes into a wall made of either other tank, spirits and/or minions who bodyblock. The skill level of your tank/s often define how effective your team will be. Before attempting The Deep, its highly suggested to find an experienced tank or someone who knows the Deep reasonably well. Stance warriors are recommended for the tanking role, as enchant removal and area effects can get through skills such as Shadow Form and Spell Breaker.
Enchantment removals or interrupts are required to stop Kanaxai's Nightmare Refuge (Revealed Enchantment is particularly good since it recharges instantly vs Monster enchantments, and can also be used on other Oni and Aspects). Knock down skills are a must to kill Kanaxai and his aspects. "You Move Like a Dwarf!" is a good shout for this, as it is available to all classes and activates instantly, making it an efficient interrupt as well.
Room 0 (overcast)[edit]
- Aspect of Exhaustion
- While under this aspect, you suffer from overcast every 30 seconds.
This is the arrival room. The party must split into four groups of three. Each group needs to enter through one of four different portals, which will activate from the far right to the far left one at a time. Ideally each group of 3 should possess a knockdown. The team should have decided upon the group split prior to entering the mission - do not linger in this section, characters will quickly be overcast. When organizing groups ensure to assign characters equally e.g.: two damage dealers and one monk. As long as one of the four teams breaks out into the 5th section and kills the Aspect of Pain, they can then rescue the whole team through the now open gates. It is not necessary to kill any of the first four Aspects as killing the fish in each room will open the gates regardless of the status of the Aspects.
Heroway tip:
It is possible to have 10 heroes in a single room. With two players, one flags their first three heroes to gate one (far right) and flag the rest of the heroes back at the wooden gate. Once all two/three players are inside Room Two, unflagging the heroes will cause them all to rejoin the players after a short delay.
Room 1[edit]
The Aspects of Kanaxai are fast moving and attacking melee foes. At 75%, 50%, and 25% health, they will stop taking damage until knocked down. It is not necessary to kill them, as the gates open once mobs are killed.
- Room 1A (far left)
-
- Aspect of Exposure
- While under this aspect, you cannot "block" attacks.
- Take advantage of kiting and anti-melee skills. (Such as the cripple inflicted by "You Move Like a Dwarf!")
- Room 1B (left)
-
- Aspect of Surrender
- When under this aspect, whenever you are struck by an attack, you are knocked down.
- Considered the toughest of the first four rooms, take advantage of anti-melee skills (e.g. Spiteful Spirit) - which deal damage even if team members are knocked down, and spirits - to bodyblock and absorb the hits.
- Room 1C (right)
-
- Aspect of Death
- While under this aspect, you receive 20% less benefit from healing.
- Considered the easiest of the first four rooms. Any balanced team should make it through.
- Room 1D (far right)
-
- Aspect of Soothing
- While under this aspect, it takes you twice as long to gain adrenaline.
- Take advantage of casters damage and anti-melee.
Room 2 (health degeneration)[edit]
- Aspect of Pain
- While under this aspect, you suffer -2 Health degeneration and suffer from the effects of Deep Wound.
This Section is heavily patrolled by three large groups of Ripper Carps, Scourge Mantas, Blessed Mantas and Darkened Irukandjis. A bad pull will result in over-aggro, so watch patiently and pull them back inside either of the previous rooms to avoid aggroing more while in combat. The only difficulty here is the Irukandji's Restoration spirit, which resurrects every other foe that was killed in its area. Killing the spirit or stealing it with Signet of Binding will prompt the Irukandjis to cast a new one, but you can use Swap to move it away from corpses.
Killing all enemies except the Kanaxai Aspect of Pain will unlock all the gates, including the ones leading from the first four sections.
Room 3 (slowed movement)[edit]
- Aspect of Lethargy
- While under this aspect, you move 50% slower.
This room contains Leviathan Arms, Leviathan Minds and Leviathan Heads. Avoid rushing in to the middle as foes will close in from both sides. Instead, choose one side and clear to the other. Casters should be wary of Choking Gas from the Leviathan Heads. There is a Fire Flower nearby which throws fire projectiles that cause burning, touch once only to deactivate it. (A second touch will re-activate it.) The Aspect of Lethargy will be standing alone at the back of the room. When the Aspect is dead, kill the foes immediately behind the gate. In order to open the next gate, the team will have to temporarily sacrifice some of the players. It is important that crucial players do not stand on the pad (i.e. healers).
In the room that you have just cleared, there are a series of five wooden pads (square in shape with a round turtle shell in the center) which are activated when five players or heroes stands on them at once, one body per switch. If any of the five volunteers step off the pads, the gate will close after a short delay. While the five are standing on the pads, the other seven should cross through the temporarily open gate. The five volunteers should then move touch range to the now shut gate. Players with Recall, Shadow Meld or Dwarven Stability combined with Dash can manage to shadow step/rush through the gate before it closes (allowing them to avoid committing suicide).
Normal mode only note: Sapping Nightmares will not cast Chaos Storm in normal mode on allies wielding martial weapons (i.e. no staves or scepters), regardless of profession. They will and do however use it in hard mode!
In the seventh section, three groups of Outcast stand in an inverted U pattern. You will be able to see a small rock on the ground - anybody approaching nearby range of this stone will trigger a large spawn of Sappings and Freezing Nightmares behind the gate that head towards the five trapped in the sixth room.
Room 4 (energy loss)[edit]
- Aspect of Depletion
- While under this aspect, every 30 seconds, you lose 10 Energy and take 8 points of damage for every point of Energy lost this way.
The gate at the entrance to the room will re-open after defeating all of the Outcasts and the Aspect of Depletion.
With a longbow, lure and kill the Aspect who patrols between the Outcast groups to remove the environmental effect. It is possible to pull the aspect without aggroing any of the Outcasts.
If you choose to kill the Aspect before finishing off all of the Outcasts, then you can kill the Nightmares through the gate without them running amok (do bear in mind the potency of Chaos Storm). You won't be able to re-group your allies yet though. First, take out each group of Outcasts seperately. Watch out for Outcast Spellstorms casting Gust and Maelstrom, and Outcast Deathhands using Putrid Explosion. Once all foes are cleared, the back gates will re-open allowing you to resurrect and reunite the entire team again.
Room 5 (no spells)[edit]
- Aspect of Failure
- While under this aspect, all of your spells fail.
Casters are rendered useless here. To clear this section more easily, pull the patrolling Outcasts into the entrance. Teams can place tanks, spirits, minions across the gate to set up a body-blocking wall. Once the patrols are killed, only Outcast Raiders and the Aspect of Failure will remain in room at an elevated level.
Players can ignore these foes and move to the next section by keeping close to the wall opposite the Outcast Raiders. The platform just before section 9 does not have the environmental effect. If the party wishes to clear the top level, e.g. for a chest, a good strategy would be to first move to the exit of room 8, setup another wall near the steps, and then pull the Aspect down from the elevated level. With the removal of the environmental effect, the party should have no trouble clearing out the remaining Outcasts.
Room 6 (no enchantments)[edit]
- Aspect of Shadows
- While under this aspect, you cannot use enchantments or be targeted by enchantments.
This wide area has numerous Oni pop-ups and a massive wurm, The Leviathan at the center. It is apparently trapped in jade but it breaks free and attacks if the party walks too close. Ignore both the Leviathan and the Reborn Irukandjis (with Disenchantment) as they respawn indefinitely. It is recommended to pull the first few Oni groups out of the room into the gate into section 8 to reduce the number of oni faced at once. Following the left wall will lead to the Aspect, and beyond that, the exit.
The Aspect of Shadows stands at the opposite end of the room to the entrance, kill it to use enchantments again. There are a few more oni popups before the gate into the 10th section.
Room 7 (teleport and knockdown)[edit]
- Scorpion Aspect
- While under this aspect, every 30 seconds, you are teleported to the nearest foe and knocked down.
This section is considered by many the most difficult area in the Deep. A safe method is to have the full team wait atop the stairs (next to the Irukandji that keeps respawning) and have a player enter the 10th section and lure Oni patrols. Use the stairs to ball and nuke them with ease. Once several groups are killed, there may appear to be no more threats, but the room is not clear yet. Once the lure walks near to the Fire Flower, the Aspect of Scorpions will start to talk. At this point more Oni patrols will spawn (one to three groups), employ the same tactic of pulling them out of the room. Beware of further Oni popups.
The remaining enemies are Outcast patrols which will have to be fought under the environmental effect. Since the environment effect is bugged, it is recommended to remove it by exiting into the ninth section to reset the frequency of teleports and knockdowns. The battle ahead will be very confusing as party members are ripped off into enemy mobs away from the team. Ensure to regroup as soon as possible. Players can time the effect to place themselves closer to the groups ahead and manipulate the effect to their advantage.
Room 8 (damage while moving)[edit]
- Aspect of Fear
- While under this aspect, you move 10% faster. You take 25 damage each second you are moving.
A snaking corridor awaits ahead, turning the first corner will trigger the charge of seven waves of Oni & Nightmares that spawn on the path behind. (Occasionally a chest will spawn with the foes.) The party will also be under fire from flowers that can be deactivated by touching them just like in the 6th section. There are two distinct methods to deal with the waves of foes:
Fast but risky: The whole team rushes to the Aspect of Fear, quickly killing Oni popups that appear in the way, then turn around and defeat the incoming groups.
Slow but safer: Stand your ground at the stairs before the first wooden bridge. Create a wall of spirits or party members, and have everybody else attack from behind. Await here for the incoming waves. A team composed mostly of heroes can use this place to take a break (afk) of five minutes as the AI can usually handle these small groups. After the waves have been defeated, make your way to the Aspect and dispose of any Oni popups.
Note: It is possible to dodge the flowers' projectiles.
Room 9 (energy depletion damage)[edit]
- Aspect of Depletion
- While under this aspect, whenever your Energy hits 0, you take 50 damage.
Normal mode only note: Sapping Nightmares will not cast Chaos Storm in normal mode on allies wielding martial weapons (i.e. no staves or scepters), regardless of profession. They will and do however use it in hard mode!
From this point onwards, the scenery will change from the depths of the Jade Sea to the caverns deep beneath the sea itself.
The twelth precinct is round in shape, appearing to be empty at first, but contains many counter-clockwise Nightmare patrols. Chaos Storm is their most dangerous skill, and will deplete any energy very quickly. Create another bottle neck by creating a wall and sending the lure in to pull some foes. Depending on the tank's skill and the party's overall firepower, one single luring process can be more than enough to clear all foes at once.
The Aspect of Depletion stands at the center of this area and does not assist the Nightmares. You can choose to avoid it by hugging one of the walls.
In normal mode, consider keeping caster weapons unequipped for the rest of the mission.
Room 10 (conditional health degeneration)[edit]
- Aspect of Decay
- While under this aspect, if you are Poisoned or Bleeding, you suffer an additional -4 Health degeneration.
Another circular cavern, this time with a backpath circling up to the central mound where the Aspect of Decay stands atop.
Here the team can choose to either follow the left path or the right path. They both lead to the final section, so the choice makes little difference. Both paths have seven Blood Flowers in the outer ring, and four Venom Flowers on the inner ring. Like the Fire Flowers and the Thorn Flowers, these can also be turned off by touching them. There are two Oni spawn spots at the fork, one Outcast group and two other Oni pop-ups behind. If you happen to walk to the mound, the Onis from the other path will close in. Assign one or two players to turn off all the flowers to ease the healers' job.
Room 11 (damage unless skill used)[edit]
- Aspect of Torment
- While under this aspect, you take 50 damage every 3 seconds if you don't use a skill.
The hidden foes that spawn will vary depending on which side you entered from; the south has Oni and the north has Nightmares. Finally, the Aspect of Torment stands with a group of Outcasts - you can pull the Aspect away from the Outcasts since they are not part of the same team.
Room 12 (heavy health degeneration)[edit]
- Nightmare Aspect
- While under this aspect, you suffer -8 Health degeneration.
This is the final chamber where Kanaxai resides, seemingly alone, at the back. The constant -8 health degeneration makes the use of party-wide healing (e.g. Heal Party) imperative. Note that this environmental effect does not go away even after Kanaxai has been defeated.
Kanaxai is a difficult foe, as he hits very hard and very fast. Each successful hit also knocks his target down. He uses an enchantment called Nightmare Refuge (1-second cast time, 10-second recharge), which makes all spells fail 50% of the time, and gives him a 50% chance to block attacks. In addition, that enchantment also heals him for 1,000 health if it is not removed within the 10 seconds it lasts. And finally, like all of the Aspects of Kanaxai, he stops taking damage at 80%, 60%, 40%, and 20% of his maximum health. To resume normal damage, a knockdown is necessary (although life stealing skills continue to function). The difference between Kanaxai and his aspects are that each of Kanaxai's knockdowns will spawn a mob of eight creatures:
- Sapping Nightmares (above 80% of maximum health)
- Freezing Nightmares (between 60% and 80% of maximum health)
- Oni of the Deep (between 40% and 60% of maximum health)
- Random mixture of the above (below 40% of maximum health)
The maximum number of Nightmare creatures that can be present at any one time is 24.
The typical procedure to defeat him is as follows:
- Keep the team at the entrance, out of the degenerative environmental effect. Healer heroes must be flagged too or they will follow to heal.
- Send one character that has two knock downs, or two characters with one knock down skill each to lure Kanaxai to one side of the cavern. Avoid maintaining bonds on these characters since the Sapping Nightmares that spawn will remove their enchantments.
- Once Kanaxai gets close to a wall, knock him down 2 times in succession to create the maximum amount of spawned creatures. Wait until Kanaxai stands up again before applying the second knock-down. Recall or Shadow Meld allow these characters to quickly escape from the spawned mob and rejoin the main team. (Either by dismissing the enchantment or the Nightmares removing it with Feedback.)
- After these creatures have spawned, the whole party can run to the opposite side of the room and await Kanaxai. Since the boss has an extended aggro range, he will immediately run to the party, and his spawned Nightmares will stay where they appeared.
- The whole party can now use everything they've got to take him down.
Do not forget that killing any of the spawned foes will cause more creatures to re-spawn (if Kanaxai is alive).
After defeating Kanaxai, Kanaxai's Chest will spawn in the center of the room. The game will ping its location on the compass with the red ping typical of players. Ensure that your team does not misjudge the ping as a sign to rush in, as sometimes the spawned Nightmare creatures may be wandering in range of the chest. Remember that the environmental effect will still persist even when Kanaxai has been defeated, if members of your party wish to backtrack through the mission for loot, then move out of the final room as soon as possible.
NPCs[edit]
Foes[edit]
 28 (30) Kanaxai Aspect of Death
- 28 (30) Kanaxai Aspect of Decay
- 28 (30) Kanaxai Aspect of Depletion
- 28 (30) Kanaxai Aspect of Exposure
- 28 (30) Kanaxai Aspect of Failure
- 28 (30) Kanaxai Aspect of Fear
- 28 (30) Kanaxai Aspect of Lethargy
- 28 (30) Kanaxai Aspect of Pain
- 28 (30) Kanaxai Aspect of Scorpions
- 28 (30) Kanaxai Aspect of Shadows
- 28 (30) Kanaxai Aspect of Soothing
- 28 (30) Kanaxai Aspect of Surrender
- 28 (30) Kanaxai Aspect of Torment
 24 (26) Oni of the Deep
 24 (26) Blessed Manta
- 24 (26) Scourge Manta
- 28 (30) Ripper Carp
 28 (30) Darkened Irukandji
- 24 (26) Reborn Irukandji
 28 Leviathan Arm
 28 Leviathan Head
- 28 (30) The Leviathan
 28 Leviathan Mind
- 24 (26) Sapping Nightmare
- 24 (26) Freezing Nightmare
- 28 (30) Outcast Reaver
- 28 (30) Outcast Raider
 28 (30) Outcast Deathhand
 28 (30) Outcast Spellstorm
- 28 (30) Outcast Assassin
- 28 (30) Outcast Ritualist
Boss-like foes[edit]
- 30 (32) Kanaxai
Objects[edit]
Dialogue[edit]
While approaching Kanaxai.
- Kanaxai Aspect of Pain: "Fear not the darkness. It is already within you."
- Kanaxai Aspect of Lethargy: "Is it comforting to know the source of your fears? Or do you fear more now that you see them in front of you?"
- Kanaxai Aspect of Failure: "Even if you banish me from your sight, I will remain in your mind."
- Kanaxai Aspect of Scorpions: "You mortals may be here to defeat me, but acknowledging my presence only makes the nightmare grow stronger."
- Kanaxai Aspect of Depletion: "So, you have passed through the depths of the Jade Sea, and into the nightmare realm. It is too bad that I must send you back from whence you came."
- Kanaxai Aspect of Decay: "I am Kanaxai, creator of nightmares. Let me make yours into reality."
- Kanaxai Aspect of Torment: "I will fill your hearts with visions of horror and despair that will haunt you for all of your days."
- Kanaxai: "What gives you the right to enter my lair? I shall kill you for your audacity, after I destroy your mind with my horrifying visions, of course."
Environmental Effects[edit]
Each section in the Deep has an Aspect that causes an Environment effect, similar to player-usable skills (most of which are Assassin or Mesmer skills).
Skill recommendations[edit]
- Due to large mobs, skills that do area damage are very useful and essential to bring (Searing Flames, Meteor Shower, Spiteful Spirit, traps, etc.). Similarly, party-wide healing and protection spells like Aegis, wards, Heal Party, and Light of Deliverance are extremely useful, since they can affect twelve party members at once.
- The Necromancer energy regeneration of Blood Ritual and Blood is Power is very valuable to monks, since it lets them use Heal Party more often.
- "You Move Like a Dwarf!" is a very useful skill, as it can be spammed to knock down and more easily kill Kanaxai and his aspects. It can be used to prevent Kanaxai from successfully casting Nightmare Refuge, since both skills have a 10 second recharge.
- Touch skills (but not touch spells) like Enfeebling Touch bypass all of Kanaxai's and his aspects' defenses. Snares like "You Move Like a Dwarf!" prevent them from kiting.
- Inspired Enchantment or Revealed Enchantment is useful to remove Kanaxai's enchantments, since they have no recharge time when used on monster skills.
- Spinal Shivers or Shivers of Dread with icy weapons or cold damage dealing skills (e.g. Snow Storm) can be used to interrupt Kanaxai's enchantments.
Notes[edit]
- There are no henchmen available for this mission. Heroes are allowed, and are subject to the usual restriction of 7 heroes per player.
- Skills that trigger health stealing (such as Insidious Parasite) bypass the requirement to knock down the aspects, so long as they are not receiving damage (such as as being attacked by a wand).
- As with any underground area, exploration of this map does not count towards the Cartographer title track.
- Killing Kanaxai for the first time raises your account's Luxon faction cap by 10,000.
Trivia[edit]
| The Guild Wars 2 Wiki has an article on The Deep. |
- Prior to the 13th November 2008 update, this mission did not affect the faction cap.