Nolani Academy
| Nolani Academy | |
|---|---|

| |
| Campaign | Prophecies |
| Region | Ascalon |
| Type | Cooperative |
| Party size | 4 |
| Duration | Medium |
| Preceded by | Ruins of Surmia |
| Followed by | The Way is Blocked |
Sneak out of Nolani Academy and destroy the besieging Charr. Help Rurik push to Rin and sound the horn Stormcaller.
Mission information[edit]
Requirements[edit]
Any character can simply walk into the outpost from Diessa Lowlands and start the mission. Completing Ruins of Surmia also brings the party here.
Objectives[edit]
Return Prince Rurik south of the Wall to safety.
- Sneak out and ambush the Charr forces besieging the academy.
- Return to the Nolani Academy to rendezvous with the prince.
- Defend Prince Rurik on the way back to the capital city of Rin.
- *BONUS* Return the Tome of the Fallen.
- ADDED: Take Stormcaller to Horn Hill.
- ADDED: Save Rin.
Rewards[edit]
| Normal mode | Rewards | ||
|---|---|---|---|
| Mission | 1,000 XP | 1 | |
| Bonus | 1,000 XP | ||
| Hard mode | Rewards | ||
| Mission | 2,000 XP | 500 |
1 |
| Bonus | 2,000 XP | 500 |
1 |
- Non-Prophecies characters will not receive any reward for completing this mission on normal mode.
Walkthrough[edit]
The goal of this mission is to return south of the Wall, back to the safety of Rin, beyond the Charr horde waiting both in the passage in front of Nolani Academy and behind the Wall. Prince Rurik will remain behind the gate in the starting area while players sneak out through the back door and ambush the Charr forces from behind. To perform this task, players will head south to the Wall and then loop back to Nolani Academy again. (Technically the lever could be used to open the gate, but that would give access to Nolani Academy to the Charr army and it's not recommended. High-level teams, however, can save a substantial amount of time.)
There is a lone Flaming Scepter Mage at the start of the mission, talk to him and he will follow and help you out. On your way to the Wall, you will also encounter allies (with Dual Shot), Warmaster Casana with an Ascalonian Ranger plus another three Lost Soldiers on the opposite side of the passage, near the Charr forces.
Clear the passage of Charr forces and Rurik will open the gate of Nolani and proceed to the Wall. Once there, a cinematic will trigger.
On the other side, Rin is found under attack. The only way to save the city now is by reaching Horn Hill and make use of the recently acquired Stormcaller. A second cinematic will trigger once there. Immediately afterwards, Rurik will rush forward in a desperate attempt to rescue Rin from several Charr invaders. Remember the Prince's death will cause mission failure. If you manage to save the Ascalon Prisoners, talk to them and they will follow you. The elementalist Charr boss Bonfaaz Burntfur will be standing at the very back of the ruins, kill him to complete the mission.
A high-level player with a hybrid running/fighting build can whizz through the mission in about 12-15 minutes. Simply bring a speed boost or two and a high-damage combo (preferably AoE) - the only necessary killing is the group immediately outside the Academy (pull the lever) and Bonfaaz Burntfur. Note that you have to go out the sneaky back exit for the bonus because Rurik is on a pre-programmed route and will not wait up - he will go to the Wall and activate the cinematic, then to Rin and activate Stormcaller.
Alternate strategy[edit]
The final battle against the Charr forces often results in Rurik's death (especially in Hard mode), mainly due to the large number of foes and the prince's suicidal tendencies. To avoid such a fate at the very end of the mission, players can use an alternative path that is completely clear of Charr and leads straight towards the last Charr boss Bonfaaz Burntfur, whose death grants mission completion.
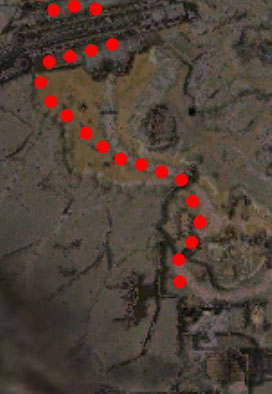
The strategy consists of reaching the final boss before Rurik triggers Stormcaller's cinematic. After the first cinematic, instead of following him, turn west (right) and run south along the clear path (see wiki-map).
Avoid aggroing the mobs within the ruins of Rin and rescue the two Ascalon Prisoners under attack (just past the archway). Climb up the stairway and kill Bonfaaz Burntfur as fast as possible to complete the mission.
Bonus[edit]
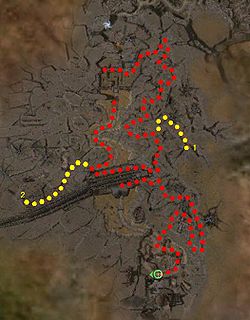
The bonus consists of returning the Tome of the Fallen (point 1 on the wiki-map) back to its pedestal at the graveyard (point 2 on the wiki-map), and can be performed before freeing the way for Rurik. Slightly close to the Wall, you will spot Watchman Pramas on your radar, who will then ask that you take the tome back to where it belongs.
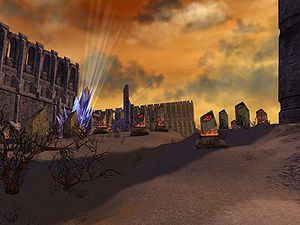
Proceed to the Wall but instead of heading north towards Nolani Academy, head westwards and across the broken steps to find the graveyard filled with hostile Spirits of the Fallen. Do not engage too many at once since there are hidden devourer pop-ups on the cliff above. At the furthest west side of the graveyard, place the tome on the tome pedestal. An Old Ascalon Spirit will then appear; talk to him and do not leave his compass range until the bonus is marked as complete.
Skill recommendations[edit]
The party size is only four:
- Bond skills e.g. Life Bond to ensure Rurik's survival.
- Punish skills e.g. Empathy.
- Helps to bring minions and/or binding rituals.
- Watch for Charr Blade Storms who can remove your stances with Wild Blow.
- Consider having everyone in the party bring resurrection skills.
- Players with access to the EoTN expansion can use both the Rebel Yell title effect and Ebon Vanguard skills to their advantage.
Hard mode[edit]
- Pulling the lever at the start will almost certainly cause your party to die due to Meteor Shower and the AoE from Cyclone Axe, Hundred Blades and Ignite Arrows. Use the back route.
- Watch out for Skull Crack from the Spirits of the Fallen in the bonus graveyard area.
- Some of the bosses are separate to the groups of enemies nearby, and can be aggro'd separately.
Interactive objects[edit]
- Charr Firestand
- Lever (Academy gate)
- Tome Pedestal
NPCs[edit]
Allies[edit]
 5 (20) Ascalon Guard
 10 (20) Prince Rurik
 5 (20) Ascalonian Ranger
 7 (20) Lost Soldier
 7 (20) Warmaster Casana
 7 (20) Ascalon Prisoner
 7 (20) Flaming Scepter Mage
 7 (20) Ascalon Watchman
 5 (20) Watchman Pramas
 11 (20) Old Ascalon Spirit
Foes[edit]
 8 (23) Charr Axe Fiend
 8 (23) Charr Blade Storm
 8 (23) Charr Hunter
 6 (23) Charr Stalker
 7 (23) Charr Shaman
 8 (23) Charr Ashen Claw
 8 (23) Charr Chaot
 8 (23) Charr Flame Wielder
 8 (23) Carrion Devourer
 7 (23) Whiptail Devourer
 8 (23) Plague Devourer
 7 (23) Boulder Elemental
 8 (22) Shatter Gargoyle
 7 (22) Flash Gargoyle
 10 (24) Spirit of the Fallen
Bosses[edit]
 10 (27) Brand the Brawler
 10 (27) Felinam the Whip
 10 (27) Blaze Bloodbane
 10 (27) Red Eye the Unholy
 10 (27) Ghast Ashpyre
 10 (27) Jaw Smokeskin
 10 (27) Bonfaaz Burntfur
 11 (27) Stank Reekfoul
 9 (27) Crush Kill
 9 (27) Rock Fist
Dialogue[edit]
Initial dialogue[edit]
- Prince Rurik: "The Charr archers have us pinned down."
- Prince Rurik: "You'll need to sneak out the path to the east and ambush those Rangers."
- Prince Rurik: "I'll stay here to help the mages hold the defenses."
- Prince Rurik: "You must hurry. We can't hold out here for long."
- Flaming Scepter Mage: "As long as I control this OBELISK, it will strike any foes who venture near."
Intermediate dialogue 1[edit]
- Warmaster Casana: "I got separated from my party on a scouting mission beyond the Wall."
- Warmaster Casana: "I didn't think I'd make it back alive by myself."
Receiving bonus objective:
- Watchman Pramas: "I took the Tome of the Fallen from the graveyard. The captain ordered me. But I didn't know it was cursed!"
- Watchman Pramas: "Now the spirits of those who lost their lives on the Wall are roaming free! Please. Take it back to the graveyard for me."
Bonus completion:
- Old Ascalon Spirit: "These spirits are at peace because of you. They gave their lives protecting the Wall."
- Old Ascalon Spirit: "The story of our destruction was foretold long ago. Our names might as well have been written in the Flameseeker's Prophecies."
- Old Ascalon Spirit: "Heed the words of the prophet. The sons of Ascalon must not die in vain."
After freeing the Academy:
- Prince Rurik: "We push on, to Rin!"
- Prince Rurik: "Bring the mages. Their homecoming is overdue."
Intermediate cinematic 21[edit]
- Ascalon Watchman: "Prince Rurik! What are you doing out here?"
- Prince Rurik: "Open this door! You will let us through!"
- Ascalon Watchman: "But sir, the king swore death if the door was opened."
- Prince Rurik: "And I swear death if you don't stand aside this instant!"
- Ascalon Watchman: "Yes, my prince."
- Prince Rurik: "I defend Ascalon against another Charr invasion, and my father trifles with doors."
- Ascalon Watchman:"You'll speak to the king, won't you? You'll tell him I had no choice?"
- Prince Rurik: "By Balthazar's beard! Rin burns! I told the king the Charr would not be held for long."
- Prince Rurik: "We must go to Horn Hill! Only Stormcaller can save the city now."
Intermediate cinematic 2[edit]
- Prince Rurik: "Praise be to Dwayna if this works."
Intermediate dialogue 2[edit]
- Prince Rurik: "I declare Charr pelt season officially open."
- Prince Rurik: "One day, the city of Rin may fall."
- Prince Rurik: "But not today."
- Prince Rurik: "I would suffer a thousand deaths before I see these beasts defile the jewel of Ascalon."
End cinematic[edit]
- Prince Rurik: "Trumpets! The king must be near. The fall of Rin will have darkened his heart. Hail King Adelbern!"
- King Adelbern: "Rise, my son. you have done well. The discovery of Stormcaller is surely a sign of victory."
- Prince Rurik: "It is a powerful weapon, but I fear not powerful enough. The Charr have amassed an army of many thousands."
- King Adelbern: "You overestimate these beasts, Rurik. Do not be afraid."
- Prince Rurik: "I am not afraid, father. I have seen them in battle. Rin has been destroyed! It would be wise to escape while we can. We should make for Kryta and rebuild our strength. Not wait here for death."
- King Adelbern: "I will never allow Ascalons to live in the shadow of the Krytans! It is Rin that will be rebuilt. And you will learn your place."
- Prince Rurik: "You have grown proud, Adelbern of Ascalon...proud and foolish!"
- King Adelbern: "You would dare call your king a fool? I will hear no more. I banish you from Ascalon! You are no longer my prince, and you are no longer my son!"
- Prince Rurik: "People of Rin! Your king will lead you to death. If you wish to see better days, if you wish to live, then leave the beasts behind and follow me over the Shiverpeaks. We make for Kryta and a new life, free of the Charr."
Notes[edit]
- If your party is powerful enough, you can pull the lever to open the front gate and fight the Charr that swarm in; however, this is only recommended for characters with high levels.
- Complete exploration of this mission contributes approximately 1.0% to the Tyrian Cartographer title. Take Rurik all the way to Bonfaaz Burntfur, where Rurik will stop running, giving you the time needed to explore.
- After completing this mission, your party will be taken to Yak's Bend.
- Completion of this mission will fill in page #5 of the Young Heroes of Tyria storybook.
- The nearby Charr will vanish or
- Some groups of Charr will attempt to invade the academy from the back.
- Prince Rurik will freeze, forcing you to restart the mission (i.e. if you open the gate before he finishes speaking).
Trivia[edit]
- In a crater in front of the main gate of the academy, there is a burning statue of a Titan, the beings worshiped as gods by the Flame Legion Charr.

