Genius Operated Living Enchanted Manifestation
| Genius Operated Living Enchanted Manifestation | |
|---|---|

| |
| Section | Primary Asura Quests |
| Campaign | Eye of the North |
| Given by | Mamp in Rata Sum (Tarnished Coast) |
| Part of | The Knowledgeable Asura |
| Preceded by | A Little Help |
| Type | Primary quest |
| Map(s) | |
 (Click to enlarge) | |
Use the prototype golems to destroy the Destroyer Hive threatening Rata Sum.
Quest information[edit]
Requirements[edit]
- All party members must have received the reward for A Little Help.
- It is possible to enter the mission with just one person meeting the requirement, but anyone else will not receive any credit for mission completion.
Objectives[edit]
- Mamp in Rata Sum will brief you on the defenses.
- Protect each golem kiln as it heats up.
- Learn how to deploy golems into battle.
- Raze the Destroyer hive.
- Drop an Asuran beacon obtained from Sokka to summon golem reinforcements.
- Defeat the Bringers of Destruction protecting the hive.
Reward[edit]
- Asura reputation points
- First time: 1,000 (1,500 in hard mode)
- On repeat: 100 (150 in hard mode)
- 2,500 Experience
Walkthrough[edit]
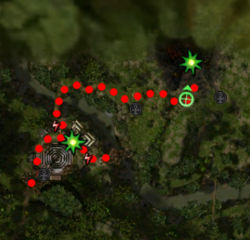
The mission is divided into three main parts: (1) defend a set of golem-producing kilns while Sokka makes them fully operational; (2) fight your way to the Destroyer spawning grounds (a burnt out area near the top of the map); and (3) defeat the Bringers of Destruction.
If you only have heroes and henchmen, the second and third techniques below are more reliable.
Standard route[edit]
Oola and Gadd will each help support one kiln; you must decide whether to split up your group or run back and forth between the kilns.
- Split: stay behind the bridge to take full advantage of the NPCs. The Destroyers stop attacking after a kiln is heated; you can regroup then. Using heroes and henchmen, flag the henchmen to the eastern kiln and the heroes at the northern one. You can run between them as required by the situation. As long as you include a healer in each group, you should not have much trouble in normal mode; this will work in hard mode, albeit more slowly. Recommended henchmen are: Devona, Lo Sha, Mhenlo, and Talon.
- Back and forth: Ignore Oola and Gadd, who will respawn when no other enemies are in their range. Run between the kilns, defending whichever is most vulnerable.
After both kilns are ready, talk with Sokka so that he will follow you and offer you Asuran Beacons, which produce a pair of G.O.L.E.M. 1.0s. These golems will follow you, so you can start moving right away. Talk to a golem to switch it between wait- and follow-modes; drop a beacon to replace your golems.
Fight your way to the spawning grounds and defeat the Bringer of Destruction pair; defeating them completes the mission (you do not have to kill the other Destroyers in that area).
Skipping the kilns[edit]
At start, you need to avoid Sokka; turn left, staying in the grass. Cross the tree-trunk bridge by the left kiln and clear the Destroyers occupying the hill including the group waiting to go down to the Eastern kiln. Once you have cleared the green area, you can leave your party just below the last tree on the green side of the hilltop at the edge of the burnt-out spawning grounds. One player must return to Sokka to trigger the kilns, then return to the party to confront the Destroyer spawns that occur within the spawning grounds. Finally, two Bringers of Destruction will appear with assorted other Destroyers. The party should move away and lose aggro at this time; the Destroyers will stay near their spawn point and not chase the party. Defeating the Bringers of Destruction at this point can trigger bugs that make the mission impossible to complete. You can then go talk with Sokka so that he will follow you and offer you Asuran Beacons, which produce a pair of G.O.L.E.M. 1.0s. These golems will follow you, so you can start moving right away. Talk to a golem to switch it between wait- and follow-modes; drop a beacon to replace your golems.
Go back to the spawning grounds and defeat the Bringers; defeating them completes the mission (you do not have to kill the other Destroyers in that area).
Clear first, kilns second[edit]
If you have trouble with either of the above techniques, then return to the kilns with the entire party after clearing the area between the NPCs and the spawning groups ("Skipping the kilns" method.) The waves of Destroyers that come in afterwards should be easy to dispatch: the mobs are smaller and arrive less frequently. Spark up the Golems and bring them with you to tackle the spawning grounds.
Speed run[edit]
You can finish the mission in about seven minutes using this technique. At least one player must equip Recall.
Start the countdown timer by flagging heroes and henchmen between the two sets of stairs. Circle backwards and around to the left, but remaining out of compass range of the eastern kiln. Continue along this path and stop near the chasm, with the northern kiln on the edge of your compass; this allows you to trigger just that one kiln, so that you do not have to defend the other.
While you are circling around and as soon as the mission text starts appearing, flag all but one of your party just across from the left-hand side bridge. Send the remaining hero across from your eventual position across the chasm; when that hero is close enough, cast Recall on them and then flag them back with the rest of the party (you might need to micromanage their pathing; they can get stuck on corners). Once the hero is with everyone else, cancel Recall so that you can teleport to the northern kiln (without having triggered the eastern one).
While the kiln heats up, take the party to clear the route to the blackened area as usual. Wait until the kiln is ready before crossing the crest of the hill. Kill the Bringers to complete the mission.
AFK time saver[edit]
Alternatively, if your party has enough anti physical (weakness, Ineptitude, Wandering Eye, etc.), a minion master and a spirit spammer (bring Shadowsong), you can flag your heroes on top of the hill, run for the kilns and go AFK until all spawns are dead and the kilns are ready. Go back to your party and finish the mission.
NPCs[edit]
Allies[edit]
 20 (20) Eastern Golem Kiln
 20 (20) G.O.L.E.M. 1.0
 20 (20) Northern Golem Kiln
Foes[edit]
 16 (28) Destroyer Spawn
 24 (?), 28 (30) Destroyer of Bones
 28 (30) Destroyer of Earth
 24 (?), 28 (30) Destroyer of Flesh
 24 (?), 28 (30) Destroyer of Sinew
 24 (26) Destroyer of Hordes
 ? (26) Destroyer of Deeds
 24 (?), 28 (30) Destroyer of Hope
 24 (26), 28 (30) Destroyer of Thoughts
 28 (30) Destroyer of Lives
Bosses[edit]
Destroyer
 28 (30) Bringer of Destruction → Skull Crack
Dialogue[edit]
Initial dialogue[edit]
(Rata Sum):
- These golems don't just make themselves, you know...although that's not a bad idea. But for now, this process takes some time. I'm sure our enemies don't want us to finish. Make yourself useful and defend this G.O.L.E.M. foundry from the attacking Destroyers.
Intermediate dialogue[edit]
Rata Sum[edit]
Mamp
- The G.O.L.E.M. production site is almost ready. With any luck our defenses will be set up before the next Destroyer assault. Are you ready to go there?
 Ready, willing, and able! (sent to Before the Battle)
 I'll check back later.
G.O.L.E.M.[edit]
- Gadd: "Destroyer swarms are headed this way. Here is what we need to do: protect the golem kilns while they heat up. Once they get to the correct temperature, Vekk's human friend here can summon the magical brutes to battle."
- Oola: "Brutes? The Destroyers don't stand a chance against my magnificent golems!"
- Gadd: "Your golems? These things would be worthless junk without my power source."
- Vekk: "Hrumph! Gadd never lets anything like reality get in the way when it comes to claiming all the credit." (If Vekk is in your party.)
- Sokka: "Enough arguing. Here they come!"
- Oola: "It takes some time for the kilns to produce a golem squad, but once they are ready you'll be able to summon them to the front lines."
- Gadd "It's quite ingenious; we've miniaturized the magic of an Asura Gate into handy, portable beacons. Young Sokka, here, will accompany you with a pack full of beacons."
- Gadd "Obtain a beacon from him whenever a golem is ready to deploy. Drop it anywhere on the battlefield and a golem will gate into your position."
- Oola: "Fight your way to the hive and destroy it. The golems will overwhelm the hive, if our hypotheses are correct."
- Gadd "Of course they will. I'm never wrong!"
- Sokka: "A golem is ready to be deployed!"
- Sokka: "Oh, my! What is that thing?"
End cinematic[edit]
- See Price of Victory.
Notes[edit]
- The relevant quest may be obtained directly from Mamp (who will also take you into the mission). Alternatively, after completing it once, it may also be obtained from the Scrying Pool in the Hall of Monuments (like any quest from the Hero's Handbook).
- Those wishing to scrape the area can do so easily: follow the alternative walkthrough and postpone the activation of the kilns; the area will be free of foes.
- This mission presents a good opportunity to farm Destroyers.
- Destroyers are immune to burning, resistant to fire damage, and vulnerable to cold damage. A common approach is to combine Winter with any elemental damage.
- Completion of this mission will fill in page #13 in the Hero's Handbook storybook.
| Eye of the North primary repeatable quests and missions |
|---|
| Asura arc: Finding the Bloodstone and The Elusive Golemancer » Genius Operated Living Enchanted Manifestation |
| Ebon Vanguard arc: Against the Charr » Warband of Brothers » Assault on the Stronghold |
| Norn arc: Curse of the Nornbear » A Gate Too Far and Blood Washes Blood |
| Deldrimor arc: Destruction's Depths » A Time for Heroes |
| Challenge: Glint's Challenge |