Warband of Brothers
| Warband of Brothers | |
|---|---|
| |
| Section | Primary Ebon Vanguard Quests |
| Campaign | Eye of the North |
| Given by | Gron Fierceclaw in Doomlore Shrine (Charr Homelands) |
| Part of | The Missing Vanguard |
| Preceded by | The Dawn of Rebellion |
| Followed by | What Must Be Done |
| Type | Primary quest |
| Map(s) | |
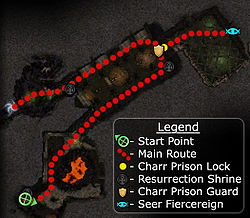 Level 1 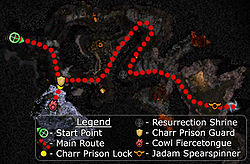 Level 2 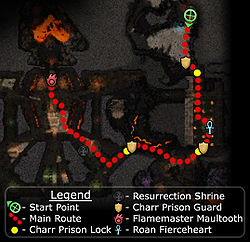 Level 3 (Click to enlarge) | |
Quest information[edit]
Requirements[edit]
- All party members must have received the reward for The Dawn of Rebellion.
- It is possible to enter the mission with just one person meeting the requirement, but anyone else will not receive any credit for mission completion.
Objectives[edit]
- Rescue each member of Pyre Fierceshot's warband from the Cathedral of Flames.
- Rescue Seer Fiercereign.
- Rescue Cowl Fiercetongue.
- Rescue Roan Fierceheart.
- Slay Flamemaster Maultooth.
- Your party has [0...1] key[s].
Reward[edit]
- Ebon Vanguard reputation points
- First time: 1,500 (2,250 in hard mode)
- On repeat: 200 (300 in hard mode)
- 2,500 Experience
- Pyre Fierceshot joins your party
Walkthrough[edit]
Most of this dungeon will be fairly simple and straightforward to progress through. Watch out for Charr Flameshielders and their area of effect spells, especially if your party is composed of heroes and henchmen. Also be warned that Charr warriors carry Resurrection Signets and Charr Dominators have Resurrection Chant.
Head along the hallway until you come to what looks like a dining room with several small groups of Charr. Take them out and look for the Charr Prison Guard or Charr Prison Lock. The Charr Prison Guard holds the key that you need to unlock the door. While trying to kill it, the Charr Prison Guard may attempt to run to other groups of Charr counter-clockwise, so progressing clockwise in the room to meet him is advised. Crippling skills or body blocking will speed things up. Once you have the key, unlock the gate to find the first of Pyre's warband brothers, Seer Fiercereign. Head to the other door on this level and down into the next level.
The second level has only slightly larger groups of Charr. Follow in the general direction of the quest marker and you'll soon see a lone Charr Prison Guard but behind a large group of Charr. Use a bow to draw out the Charr in small groups making it easier to attack them rather than a rush that almost certainly will end in death. He will attempt to run away. Just kill it and grab the key. Follow the path around and towards the next prison. Unlock it to find Cowl Fiercetongue inside, an elementalist. The quest marker will update and point to the exit to the next level. Head towards it. When you start seeing Bloodweavers, be careful. There are several hidden groups of spiders in the chamber with the exit which drop down. A group of spiders will approach when you are close to the exit portal.
On the final level, it is more or less the same. The third Charr Prison Guard is easy to spot. Take it out and grab the third key to free the monk Roan Fierceheart. One more Charr Prison Guard holds the key to the inner temple where Flamemaster Maultooth is located.
When you reach the central chamber of the inner temple, it is wise to kill off the 5 paired groups of warriors that surround the chamber, as they will run to join the fighting later. Maultooth will activate a pair of Charr Effigies. They are dangerous elementalists and lethal against unprepared parties, it is easier to kill them with Pain Inverter. Try to pull them from the side so that the two of them won't activate their highly damaging skills at the same time. Once pulled one at a time, the party can focus on one of the two sides of Charr, and then finally go for the center. Be aware that two Charr Flameshielders and two Charr Axemasters may also join the fray. Maultooth's group of two other Charr can be kept out of the fight with careful pulling. Take them on only after killing the Charr Effigies' group. Focus on Maultooth and interrupt his skills and he will go down quickly.
Try to move inside Cowl Fiercetongue's Ward Against Harm every time you are attacked by Charr Effigies or Maultooth.
If your party wipes multiple times and you rack up Death Penalty, try approaching from the right and pulling the Effigies aside. Then when you die, go around the left side, killing Charr and not aggroing the Effigies, and take out Maultooth.
If you'd like the final battle to be more on the easy and manageable side, just bring a longbow and equip it in your alternate weapon set. The Charr Flameshielders, each Effigy, and the Axemasters are all separate pulls. Park your party about 2.5 Danger Zone ranges away and pull separate creatures in nice, bite-sized chunks. Interrupts help against the Effigies. Daze also works to good effect.
Alternative: There is a very easy way to deal with the final battle. Flag your heroes and henchmen just in front of the stairs, and quickly run with them, continuing up the stairs until you can't go any further. Then turn around, equip your bow, and using Ignite Arrows, fire shot upon shot at Maultooth. He won't attack you, even if your entire party has died, making him totally vulnerable to your attacks.
You could rush up the stairs taking the Effigy with you. They will stay at the top of the stairs even if you die. Then just come down the stairs and finish Maultooth off.
Alternative 2: If you have a strong party that can deal a good amount of damage, rush to Maultooth and focus all damage on him. The mission ends when he is killed and the Effigies take a few seconds to activate and aggro to you, so if you are quick in dispatching Maultooth you can end this quest quickly.
Skills recommendations[edit]
- Consider bringing a snare for the Prison Guards; otherwise, they will run around calling the mobs that you just evaded.
- A minion master will prove extremely useful in this quest. If carefully combined with Pain Inverter, a group of minions can cause the Charr Effigies to die in seconds.
- Consider bringing skills that protect against elemental damage since 10 of the 22 types of foes during this quest have skills that cause elemental damage.
- Consider bringing Mantra of Flame, since 8 of the 22 types of foes during this quest have skills that cause fire damage.
- The Ascalon Aegis will grant +23 armor against most forms of damage here.
- Cowl Fiercetongue uses Ward Against Harm, so it is not necessary for a party member to bring it.
- Avoid bringing Bloodsong, since Seer Fiercereign uses it.
NPCs[edit]
Allies[edit]
 20 Pyre Fierceshot (all levels)
 20 Roan Fierceheart (level 3)
 20 Cowl Fiercetongue (levels 2 and 3)
 20 Seer Fiercereign (all levels)
Foes[edit]
Arachnids (level 2)
 20 (24) Needling Lavastrider
 14 (24) Spider
 24 (26) Venomweaver
 24 (26) Bloodweaver
Charr (all levels unless other wise specified)

 20 (26) Charr Axemaster
 20 (26) Charr Blademaster
 20 (26) Charr Bladestorm (level 3 only)
 20 (26) Charr Seeker
 20 (26) Charr Sentry (levels 1 and 3 only)
 20 (26) Charr Mender (level 1 only)
 20 (26) Charr Prophet
 20 (26) Charr Hexreaper
 20 (26) Charr Dominator
 20 (26) Charr Flameshielder
 20 (26) Charr Wardkeeper (level 1 and 3 only)
 20 (26) Charr Avenger (levels 1 and 3 only)
 28 (30) Charr Hunter Beast (levels 1 and 3)
 24 (28) Magma Blister (level 3)
Unknown
 28 (30) Charr Effigy (level 3)
Bosses[edit]
 28 (30) Jadam Spearspinner → Stunning Strike (Jadam's Spear) (level 2)
 24 (30) Charr Prison Guard → Eviscerate (one on level 1, one on level 2, three on level 3)
 28 (30) Flamemaster Maultooth → Mind Blast (level 3)
Dialogue[edit]
Initial dialogue[edit]
- Break into the Cathedral of Flames and free the captive members of Pyre's warband.
Intermediate dialogue[edit]
- Gron Fierceclaw
- Are you ready to rescue my comrades?
At start:
- Pyre Fierceshot: "This is the Cathedral of Flames, a power base for the Shaman caste and their witless followers. The captive members of my warband should be inside."
First encounter:
- Charr Prison Guard (or one of the other Charr in his group): Guards! Stop these intruders!
Freeing Seer Fiercereign:
- Seer Fiercereign: "Did you bring these human slaves to carry your pack, Pyre? Or are they lunch?"
- Pyre Fierceshot: "Times have changed, Seer. These humans help us of their own free will." [if Gwen is not in party]
- Gwen: "Slaves? You brutal animal! all you can do is bite the hand that rescues you!." [if Gwen is in party]
- Seer Fiercereign: So it seems we fight together. Cowl and Roan are held further below. Let's not waste anymore time.
Reaching the second level:
- Pyre Fierceshot: "Judging by these tracks, one of my warband is being held to the south. Head that way, human. Quietly!"
Freeing Cowl Fiercetongue:
- Pyre Fierceshot: "Cowl Fiercetongue, you mangy mess! I thought for sure the Shaman would have killed you by now!"
- Cowl Fiercetongue: "They wanted to make a grand spectacle of my execution, otherwise I would have been slaughtered days ago."
- Pyre Fierceshot: "It's lucky you're still wearing your pelt. Now let's find Roan and get out of here."
Freeing Roan Fierceheart:
- Pyre Fierceshot: "Roan! And here I looked forward to selling the armor off your corpse."
- Roan Fierceheart: "Another day, Pyre. Flamemaster Maultooth, the hierophant's torturer, is nearby. Maultooth's doorguard possesses keys to the inner temple."
- Pyre Fierceshot: "Good. They'll soon learn their gods are false when they reach the afterlife." [if Gwen is not in party]
- Gwen: "What are we waiting for? I want to bury my sword into the heart of Maultooth." [if Gwen is in party]
Approaching Flamemaster Maultooth:
- Pyre Fierceshot: "You should have killed us when you had the chance. We won't make the same mistake."
- Flamemaster Maultooth: "What a pathetic excuse for a rescue party. You should have sent an army. Prepare for you demise, worms! Release the effigies."
- Pyre Fierceshot: "Your Shaman tricks don't scare us, Maultooth. Let's finish this!"
Notes[edit]
- Interactive objects
- A Charr Prison Guard will drop a Prison Key every time it is killed even if it is resurrected. When you pick up the multiple keys, the notification box and quest log will register the extras, but using a key will use all of them (even though the log will still show you as having some).
- There are Charr corpses on the third level that can be exploited.
- Exterminate nearby enemies to avoid being mobbed before you fight Maultooth.
- This mission-like quest takes place in an alternative version of Cathedral of Flames that is located in the Charr Homelands.
- You will be sent to Questions and Answers 20 seconds after completing this quest.
- This quest (and all primary repeatable Eye of the North quests) may also be obtained from the Scrying Pool in the Hall of Monuments after completing it once.
- You have 15 seconds to capture Maultooth's elite skill, since his death triggers the end-quest cinematic.
- There are places in the map where your melee party can get stuck inbetween multiple enemies. This will cause them to run in circles and not attacking anything.
- Completion of this mission will fill in page #4 of the Hero's Handbook storybook.
Trivia[edit]
- Band of Brothers is the name of an HBO miniseries, which itself takes its name from a speech in William Shakespeare's play, Henry V.
| Eye of the North primary repeatable quests and missions |
|---|
| Asura arc: Finding the Bloodstone and The Elusive Golemancer » Genius Operated Living Enchanted Manifestation |
| Ebon Vanguard arc: Against the Charr » Warband of Brothers » Assault on the Stronghold |
| Norn arc: Curse of the Nornbear » A Gate Too Far and Blood Washes Blood |
| Deldrimor arc: Destruction's Depths » A Time for Heroes |
| Challenge: Glint's Challenge |
