Darkrime Delves
| Darkrime Delves | |
|---|---|
| |
| Campaign | Eye of the North |
| Region | Depths of Tyria |
| Type | Dungeon |
| Levels | 3 |
| Reward chest | Havok's Chest |
| Required quest | The Misanthropic Jotun Principle |
| Party size | 8 |
| Exit(s) | Bjora Marches |
| Images | |
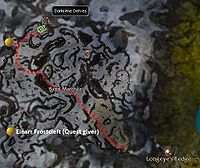 Getting there from Longeye's Ledge | |
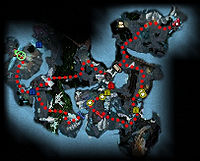 Level one | |
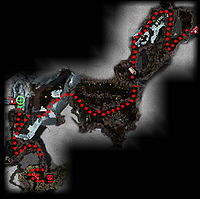 Level two | |
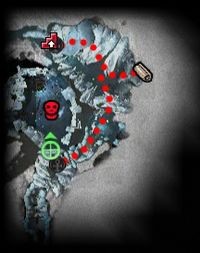 Level three | |
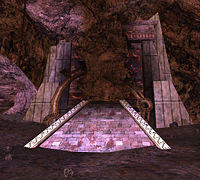 Broken Asura portal on level 2 | |
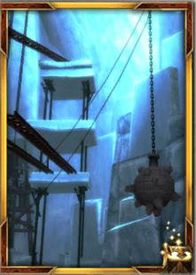
“A vast series of caves, called the Darkrime Delves by the local Norn, leads into the depths of the northern mountains in Bjora Marches. Home to snow jotun, the caves provide natural defenses for the ferocious (yet not terribly clever) beasts. We came upon two hunters, Kolgrim and Einarr, in the middle of an argument over which of them had the right to enter the Delves and kill the new jotun leader. The matter was a point of both honor and glory, as the defeat of such a powerful beast would certainly immortalize the victor. There seemed no end in sight to their bitter discussion, so on a lark, they allowed us to enter the caves first. The hunt was long and arduous, but in the end, the incredulous Norn were amazed by our success. Our impressive victory greatly increased our reputation.
NPCs[edit]
Allies[edit]
 20 Dobb (Collects Jotun Pelts near entrance on first level.)
Norn (during The Misanthropic Jotun Principle)
Hidden objects[edit]
Hidden objects are revealed using Light of Deldrimor.
 24 Dwarven Ghost ally
- Level 1: Near the Area Map
- Level 2: South of broken Asura Gate
- Level 3: In secret area (eastern door, previously closed)
- Hidden Treasure
- Level 1: Over the upper bridge, near the Beacon of Droknar (2x)
- Level 1: North of the upper Dungeon Gate (3x)
- Level 1: A bit south from the upper Dungeon Gate, near the Nightmares
- Level 1: At the west end of the middle bridge
- Level 1: Near the portal to level 2 (3x)
- Level 2: West of Area Map
- Level 2: Central area, Northern upper path, after avoiding the rolling snow ball (2x)
- Level 2: Central area, at the bottom center of the chasm in the center of the room
- Level 2: At the east end of the central area: south of the entrance and in a small alcove, midway between the Beacon of Droknar and the next location listed below (the southernmost point of the area)
- Level 2: At the very bottom point south of the central area (2x)
- Level 2: Just past the central area (3x)
- Level 3: Near northern Area Map
- Level 3: Just before boss area Beacon of Droknar room
- Level 3: South east of boss area near Beacon of Droknar
- Level 3: Near Secret Switch
- Level 3: In Secret Area (4x)
- Level 3: North part of boss area
- Level 3: Central part of boss area
- Secret Switch
- Level 3: Middle of the southern den area
Charmable animals[edit]
- 5 White Crab (all levels)
Foes[edit]
 20 (26) Chromatic Drake (levels 1 and 2)
 24 (26) Bloodtaint Dryder (levels 1 and 2)
 24 (26) Dreadgaze Dryder (level 1)
 24 (26) Soulfire Dryder (levels 1 and 2)
 24 (26) Terrorbond Dryder (level 2)
 24 (26) Stone Summit Carver (levels 1 and 2)
 24 (26) Stone Summit Crusher (level 1)
 24 (26) Stone Summit Healer (level 1)
 24 (26) Stone Summit Gnasher (level 2)
Elementals (levels 1 and 3)
 20 (26) Icy Stalagmite
 20 (26) Shattered Elemental
 20 (26) Whirling Wisp
 20 (26) Stormcloud Incubus (levels 1 and 2)
Nightmares (level 1)
 15, 20 (26) Scourge Vaettir
 20 (26) Shadow Vaettir
 15, 20 (26) Mist Vaettir
 24 (28) Jotun Skullsmasher (levels 2 and 3)
 28 (30) Jotun Skullsmasher (all levels)
 24 (28) Jotun Bloodcurdler (level 3)
 28 (30) Jotun Bloodcurdler (all levels)
 28 (30) Jotun Bladeturner (all levels)
 24 (28) Jotun Mindbreaker (levels 1 and 3)
 28 (30) Jotun Mindbreaker (all levels)
Bosses[edit]
Ogres
 26 (30) Havok-kin (two on level 1, one on level 2, one on level 3) → Skull Crack
 28 (30) Grelk Icelash (level 2) → Skull Crack (Grelk's Hammer)
Boss-like foes[edit]
Ogre
 29 (32) Havok Soulwail (level 3)
Objects[edit]
Notes[edit]
- 1,500 Norn reputation points are awarded for completing this dungeon for the first time in normal mode, and 750 points are awarded for subsequent completions. 2,250 Norn reputation points are awarded for completing this dungeon in hard mode for the first time, and 1,125 points are awarded for subsequent completions.
- The first gate on level 1 will not open without the required quest.
- Picking up the Dungeon Key on the first level will disable the Ice Dart traps.
- Pull the small groups around the end boss, until there is only Havok Soulwail and a few other Jotun.
- After killing the end boss, Havok's Chest spawns.
- The Stone Summit listed in the dungeon are no threat as they are being constantly wiped out by the Jotun every time they are encountered.
- The location of the Area Map in level 3 may not be correct. It may be just inside and to the left of the entry at the end of the dead end trail shown.
- The southern end of level 3 contains a switch that opens a secret door on the east side of the map. Inside are four Hidden Treasures and a Dwarven Ghost.
- Completion of this dungeon will fill in page #5 of the Master Dungeon Guide storybook.
Trivia[edit]
| The Guild Wars 2 Wiki has an article on Darkrime Delves. |
- On level 2, there is an overlook that show some mine equipment; scaffolding, board-bottom walkways, and what appears to be other "leftover building materials" (including a series of archways which contain a large demonic face motif) and similar "junk". This spot is where the first turn is made on the map for level 2 above. Just above this pile of materials, an orange firefly-looking thing flies around occasionally. A much better view can be afforded by walking as far as possible towards the corner with the lowest elevation. Just as one nears that point, the previously-dark "mist" that hangs over much of the bottom "lifts" or becomes much more transparent, likely due to a proximity/elevation trigger in one's character's current coordinates in the environment.
| One-level | Ooze Pit • Fronis Irontoe's Lair • Secret Lair of the Snowmen |
|---|---|
| Two-level | Arachni's Haunt • Bogroot Growths • Sepulchre of Dragrimmar |
| Three-level | Bloodstone Caves • Catacombs of Kathandrax • Cathedral of Flames • Darkrime Delves • Heart of the Shiverpeaks • Oola's Lab • Raven's Point • Rragar's Menagerie • Shards of Orr • Vloxen Excavations |
| Five-level | Frostmaw's Burrows • Slavers' Exile |