Fort Ranik
| Fort Ranik | |
|---|---|

| |
| Campaign | Prophecies |
| Region | Ascalon |
| Type | Cooperative |
| Party size | 4 |
| Duration | Medium |
| Preceded by | The Great Northern Wall |
| Followed by | Ruins of Surmia |
Your party must push the invading Charr army back to the Northern Wall, using any means at your disposal, including 2 trebuchets you find en route.
Mission information[edit]
Requirements[edit]
Any character can simply walk into the outpost from Regent Valley and start the mission. Completing The Great Northern Wall also brings the party here.
Objectives[edit]
Retake the Great Northern Wall.
- Push back the invading Charr army.
- ADDED: Locate the RESTRAINING BOLT [sic] and return it to Siegemaster Lormar.
- ADDED: Locate the ARMING CRANK [sic] and return it to Siegemaster Lormar.
- ADDED: Locate the RELEASE LEVER [sic] and return it to Siegemaster Lormar.
- *BONUS* Rescue Deeter Saberlin from his Charr imprisonment.
Rewards[edit]
| Normal mode | Rewards | ||
|---|---|---|---|
| Mission | 1,000 XP | 1 | |
| Bonus | 1,000 XP | ||
| Hard mode | Rewards | ||
| Mission | 2,000 XP | 500 |
1 |
| Bonus | 2,000 XP | 500 |
1 |
- Non-Prophecies characters will not receive any reward for completing this mission on normal mode.
Walkthrough[edit]
Your party must help the guards to retake the Great Northern Wall by pushing the Charr invasion back. Proceed forward until you sight the wall. Eventually, you will meet Siegemaster Lormar who will brief you how to recover and use trebuchets.
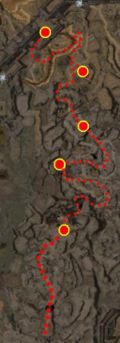
To make the siege mechanisms operable again, you need to salvage other Wrecked Catapults and use their parts to fix the one near Lormar. Each of the needed pieces are indicated in the wiki-map. Use the ALT key to search for Wrecked Catapults and click on them to obtain a usable part. Pick them up one by one and deliver them to Lormar by talking to him.
Once the trebuchet is fixed, use the lever once to charge it first and a second time to fire it. Repairing the trebuchet is not required to complete the mission, so high level players can skip this step and charge in.
Continue ahead and you will find another trebuchet - this one doesn't need repairing and aims towards a large crater, which Charr patrol out of. Players may find no use for this tool until foes get closer. (If the player is quick enough, they can quickly activate the trebuchet and kill the final Charr boss to complete the mission, before the Charr run away). Shortly after the player approaches the trebuchet, all enemies will scatter from the blast point.
Charr that survive the impact can be left alone as long as they don't interfere with the path leading to the boss and its group. Killing them completes the mission.
Bonus[edit]
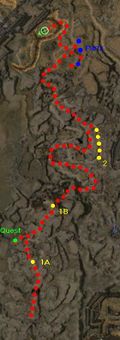
To gain the bonus, your task is to find Trooper Deeter Saberlin, who can be seen while proceeding with the mission's main objectives and only takes a minor detour (point 2).
Master Armin Saberlin is the NPC that provides this task, he joins your party early in the mission (point 1A) and will follow you up to the large ruined wall (point 1B). After clearing the mob with the boss, you can talk to him to activate the bonus if he is still alive; however, it actually does not matter if he survives or not - performing the task is enough to complete the bonus.
Hard mode[edit]
Only the first half presents difficulty, after the bonus it becomes much easier. The most problematic group is immediately when you start - the weak NPCs will be under attack from several groups of Charr. There is always a visible stationary group, but two other patrol groups far behind them. Those who naively engage the standing group will soon be overwhelmed by the additional forces. To avoid this, send a lure character as bait and finish the stationary group far from its spawn point. Then move slowly to face the patrols which are scripted to push forward with the invasion. The ascalonian allies, all six of them, may survive the fights but wait until their healthbar fully regenerate to continue ahead or you will lose valuable support. When facing the Charr Stalkers, use walls to obstruct projectiles - minimizing damage against your party from Ignite Arrows, and spread out if attacked in open areas.
At the second half while repairing the trebuchets, there will be groups with two Charr Fire Callers. Once again use a lure so they cast Meteor Shower away from your backliners and only then engage.
Skill recommendations[edit]
The party size is only 4 so:
- Party healing such as Heal Party or Protective Was Kaolai might be advisable to counter the degeneration from Lingering Curse and Faintheartedness (if your team cannot bring hex removal).
- The canyon walls will block your line of sight; Do not take projectile skills. Since you encounter small groups of foes, area of effect skills are not particularly effective.
- Consider bringing an enchantment removal skill to remove Shield of Judgment from the Charr Martyrs and Overseers if your team depends on martial professions.
- Display the Agent title.
Interactive objects[edit]
- Firing lever
- Wrecked Catapult
NPCs[edit]
Allies[edit]
 5 (20) Ascalonian Warrior
 4 (20) Captive Soldier
 5 (20) Gurn Blanston
 5 (20) Master Armin Saberlin
 4 (20) Trooper Deeter Saberlin
 5 (20) Ascalon Militia
 5 (20) Ascalonian Ranger
 4 (20) Ascalon Engineer
 4 (20) Siegemaster Lormar
Charmable animals[edit]
 3 Moa Bird
Foes[edit]
 6 (23) Charr Axe Warrior
 6 (23) Charr Blade Warrior
 6 (23) Charr Warrior
 6 (23) Charr Stalker
 5 (23) Charr Martyr
 6 (23) Charr Overseer
 6 (23) Charr Ash Walker
 8 (23) Charr Ashen Claw
 6 (23) Charr Mind Spark
 6 (23) Charr Fire Caller
 4 (22) Carrion Devourer
 3 (22) Plague Devourer
Bosses[edit]
 8 (26) Spar the Ravager
 8 (26) Klaww FeatherStorm
 8 (26) Rrrack Whitefire
 8 (26) Roarst One Eye
 8 (26) Craze the Unforgiving
 8 (26) Torch Spitfur
Dialogue[edit]
Initial dialogue[edit]
- Ascalon Militia: "The Charr have pushed past the cathedral."
- Ascalon Militia: "If we don't stop them, thousands of our countrymen will die."
Intermediate dialogue[edit]
When activating the bonus:
- Master Armin Saberlin: "My son Deeter was carried off by the Charr after the first wave. Please find him. He's all I have left."
Prior to rescuing the prisoners.
- Trooper Deeter Saberlin: "Help! The Overseers were too much for us!"
After rescuing the prisoners:
- Captured Soldier: "Our lives would have been worth less than Charr meat had we not returned. [sic] We owe you our thanks."
- Trooper Deeter Saberlin: "The Charr have slaughtered and carried off many of our friends. They must be stopped."
- Trooper Deeter Saberlin: "I will report back to my father. If you can get to the trebuchets north of here perhaps there is hope."
- Trooper Deeter Saberlin: "Thank you friend. I will support my father's group. You should go on."
By the first trebuchet:
- Ascalon Engineer: "Charr! There are Charr everywhere. This isn't good. No, not good at all."
- Ascalon Engineer: "The Charr aren't anything without their claws and teeth. If you can stay away from those, you'll be fine."
- Ascalon Engineer: "If you can get one of these trebuchets working, you might be able to smash a few of those Charr."
Intermediate cinematic[edit]
- Siegemaster Lormar: "Damn Charr snuck up on me while I was repairing this trebuchet."
- Siegemaster Lormar: "Its [sic] missing a release lever, restraining bolt, and an arming crank."
- Siegemaster Lormar: "Search the other wrecked trebuchets to find those three pieces, and bring them to me."
- Siegemaster Lormar: "If you do. We can fix this little lovely, and we'll give those Charr a taste of their own filth"
- Siegemaster Lormar: "To activate the trebuchet after it's fixed, pull the lever once to load it and once to fire it."
- Siegemaster Lormar: "Anything under its blast will get blown to bits."
- Siegemaster Lormar: "But hurry. More Charr come through the Wall every minute."
Intermediate dialogue 2[edit]
Before giving him any parts:
- Siegemaster Lormar: "I can't make it fire if you don't bring me the parts to repair it."
After giving him the Salvaged Arming Crank first:
- Siegemaster Lormar: "That's a sight for sore eyes. An arming crank. Get me a release lever and a restraining bolt. Hurry now."
After giving him the Salvaged Release Lever first:
- Siegemaster Lormar: "Ah, you found a release lever. Good work. But I still need a retraining [sic] bolt and an arming crank. Keep searching."
After giving him the Salvaged Restraining Bolt first:
- Siegemaster Lormar: "Praise Dwayna, you found a restraining bolt. I'll hook it up while you look for a release lever and an arming crank."
After giving him two out of the three parts:
- Siegemaster Lormar: "I just need [an arming crank...a release lever...a restraining bolt] to blast those Charr back over the Wall."
After collecting all the parts to the trebuchet:
- Siegemaster Lormar: "To activate the trebuchet, pull the lever once to load it and once again to fire it. Anything under its blast will get blown to bits."
End cinematic[edit]
- Prince Rurik: "The time for action has come. No more cowering behind this wall!"
- Prince Rurik: "From now on, we take the fight to our enemies"
- Ascalon Guard: "Prince Rurik!"
- Ascalon Guard: "Prince Rurik!"
- Prince Rurik: "What is it?"
- Ascalon Guard: "Prince Rurik. We are victorious, but it has cost us greatly"
- Ascalon Guard: "During their retreat the Charr took prisoners. Several of our wounded have been carried off."
- Prince Rurik: "Ascalon will live in fear of these beasts no more."
- Prince Rurik: "We march to the north, to free our brothers and take back that which has been taken from us."
Notes[edit]
- There is a quest within this mission, called "Deliver a Message to My Wife", which can be taken by talking to Gurn Blanston (green dot on the wiki-map).
- After completing this mission, your party will be taken to Frontier Gate.
- Complete exploration of this mission contributes approximately 0.8% to the Tyrian Cartographer title.
- Completion of this mission will fill in page #3 of the Young Heroes of Tyria storybook.
