Thirsty River
| Thirsty River | |
|---|---|

| |
| Campaign | Prophecies |
| Region | Crystal Desert |
| Type | Cooperative |
| Party size | 6 |
| Duration | Medium |
| Preceded by | Sands Of Souls |
| Followed by | Augury Rock*
*Dunes of Despair and Elona Reach |
Thirsty River is one of the missions required to achieve ascension in Prophecies. As part of the trials to ascend, defeat six teams of ever-increasing difficulty in a combat arena.
Mission information[edit]
Requirements[edit]
Any character can simply walk into the outpost from The Scar and start the mission.
Objectives[edit]
Annihilate the opposing enemy teams.
- Defeat Goss Aleessh's team.
- Defeat Issah Sshay's team.
- Defeat Hessper Sasso's team.
- Defeat Josso Essher's team.
- Defeat Lyssha Suss's team.[sic]
- Defeat Kesskah Shissh's team.[sic]
- *BONUS* Cleanse the area before King Khimaar's spirit is driven away.
Rewards[edit]
| Normal mode | Rewards | ||
|---|---|---|---|
| Mission | 1,000 XP | 1 | |
| Bonus | 1,000 XP | ||
| Hard mode | Rewards | ||
| Mission | 2,000 XP | 500 |
1 |
| Bonus | 2,000 XP | 500 |
1 |
Walkthrough[edit]

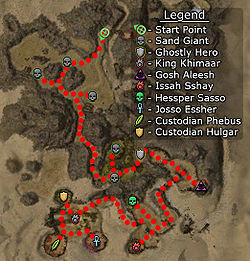
Before you fight the six teams mentioned in the objectives, there is an opportunity to gain Morale Boosts by killing the five Sand Giants which grant a 2% boost each. These Sand Giants are not mission critical.
The mission has three more sections, each with some Forgotten, a boss and a priest. A timer starts and at every two minutes mark, if the priest of a group is still alive, all defeated foes are resurrected; thus timing is highly important. Focus your firepower on the Priest first but if your party shows difficulty, pull back to prevent being instantly swarmed by the respawned foes. Defeating all foes opens the gate to the next section. Between sections, the timer stops and will reset when the next gate is opened, allowing enough time to regenerate and recharge before tackling the next area. Remember that if the Ghostly Hero dies, the mission is over. If you're unsure whether your healers can keep him alive, leave him behind the gate by talking to him once.
- Talk to the Ghostly Hero and enter the first section which has a single group led by Goss Aleessh. Be wary of the Forgotten's Chaos Storms, as it tends to confuse Hero and Henchmen AI, making them run in-and-out of the effect repeatedly.
- Section two has two groups, one headed by Issah Sshay and the other by Hessper Sasso. Finish off one group at a time. After defeating the first boss, wait until the 2 minute timer mark has passed, then continue. There is little space to fight so instead of rushing ahead, wait by the recently opened gate as both groups have patrols headed towards it. In particular, sticking to the left wall can let one avoid the groups connected to Hesper Sasso entirely, making it easier to kill the Elementalist groups undisturbed.
- The third section has three groups. Custodian Hulgar is to the right, Josso Essher to the left, and Custodian Phebus in between. In this section the right group will attack King Khimaar. Of the six groups, Josso's (Word of Healing) is the most difficult as you will be facing two monks. Only groups from Custodian Hulgar will enter the center as long as noone wanders too close to the other groups.
Bonus[edit]
The bonus requires keeping King Khimaar alive in the third (and final) area. This is complicated by three factors that can cause you to fail the bonus: first, as soon as you enter the area, Custodian Hulgar's group will start attacking him. If he survives, he is also at risk from other foes in the area, especially if you draw them away from their original locations. Finally, if you take more than ten minutes to clear the area, the king will leave (usually at least one 2 minute cycle is needed per group, leaving only two possible extra cycles).
Accordingly, immediately send your party to protect the king (e.g. by flagging heroes and henchmen) and clear the central area of all foes before going after any of the other groups. Be prepared to return to protect the king if any foes respawn and head in his direction.
Skill recommendations[edit]
- Area of effect skills as all sections are tight.
- Anti-caster skills, such as Scourge Healing, Backfire, and Broad Head Arrow.
- Technobabble can prove useful to daze both the Priest and the boss at once (if used properly).
- A minion master helps corpse control as enemies use Consume Corpse to heal themselves and dodge players attacks.
- Blind skills to use against warriors and rangers but not versus Sand Giants as they use Plague Touch.
NPCs[edit]
Allies[edit]
 20 (20) Ghostly Hero
 24 (24) King Khimaar
Charmable animals[edit]
 5 Dune Lizard (near the Devourers and Sand Giants)
Foes[edit]
 20 (26) Enchanted Sword
 20 (26) Forgotten Champion
 20 (26) Enchanted Bow
 20 (26) Forgotten Avenger
 20 (26) Rockshot Devourer
 22 (31) Sand Giant
 20 (26) Enemy Priest
 20 (26) Forgotten Cursebearer
 20 (26) Forgotten Illusionist
 20 (26) Forgotten Arcanist
Bosses[edit]
Enchanted armors
 24 (30) Custodian Hulgar → Warrior's Endurance
 24 (30) Custodian Phebus → Marksman's Wager
Forgotten
 24 (30) Josso Essher → Word of Healing
 24 (30) Hessper Sasso → Order of the Vampire
 24 (30) Goss Aleessh → Mantra of Recovery
 24 (30) Issah Sshay → Ether Renewal
Dialogue[edit]
Intermediate cinematic[edit]
- Ghostly Hero: "Before you can Ascend and enter the Rift, you must first be cleansed."
- Ghostly Hero: "Lead me safely to the Rune Circle at the end of this test, and I will cast the ritual to burn away your earthly imperfections."
- Ghostly Hero: "Your first challenge will be to defeat a single legion of Forgotten."
- Ghostly Hero: "Your opponents will be resurrected every two minutes unless you destroy the priest who tends their shrine."
- Ghostly Hero: "Once you have defeated your foes, lead me to the door, and I will usher you into the next challenge."
- Ghostly Hero: "The challenges will grow harder as you progress. If you defeat all of the foes along your path, we will claim the Rune Circle, and you will be cleansed."
- Ghostly Hero: "Prove yourselves worthy, and you will be one step closer to gaining entrance to the Rift."
Intermediate dialogue[edit]
When the Ghostly Hero opens the door to the second challenge.
- Ghostly Hero: "Quickly! Through the door. We face much harder challenges ahead."
When coming into range of King Khimaar.
- King Khimaar: "The Forgotten defile the resting place of my people. Have we not suffered enough...?"
When the Ghostly Hero opens the door to the third challenge.
- Ghostly Hero: "This last battle will test us all. May Balthazar grant us strength and courage."
Randomly during the third challenge.
- King Khimaar: "I will never fully rest until the memory of my people is no longer taunted by these filthy creatures...."
- King Khimaar: "My spirit has been weakened by such blashphemy.[sic] I must see the Forgotten removed from this place before I slip away...."
- King Khimaar: "The Forgotten defile the resting place of my people. Have we not suffered enough...?"
- King Khimaar: "In a matter of moments I shall leave this world for good, never to see my people's resting place cleansed...."
If the group fails the bonus objective.
- SECONDARY FAILED: King Khimaar has left this world without seeing the redemption of his people.
End cinematic[edit]
- Ghostly Hero: "Under the scrutiny of the gods, your souls will be pure, your bodies cleansed. You are ready for the next phase."
Notes[edit]
- The groups led by the different bosses are hostile toward each other, and it is possible to have two enemy teams engage in combat if pulled correctly.
- Lyssha Suss and Kesskah Shissh are not present in the mission. Their teams are actually headed by Custodian Phebus and Custodian Hulgar, respectively.
- Consistent with the rest of the game, respawning enemies do not yield any experience or drops. However, they do leave exploitable corpses.
- Completion of this mission will fill in page #9 of The Flameseeker Prophecies storybook.
Cartography[edit]
- Complete exploration during this mission contributes approximately 0.7% to the Tyrian Cartographer title.
Farming[edit]
- This mission can be used for levelling up your character or your heroes. A Scroll of Hunter's Insight will increase the experience gained as you will be killing bosses on a regular basis.
Trivia[edit]
- The beginning of this mission is similar to the first morale system of the Tomb of the Primeval Kings (now Heroes' Ascent). It requires you to kill Sand Giants for Morale Boosts; the first morale system of Tombs required you to kill Rift Wardens to get Morale Boosts before the beginning of the Tournament.
- This mission's objectives are based on the Annihilation game type in Heroes' Ascent. Maps within Heroes' Ascent that use this game type are: The Underworld, Burial Mounds, and Golden Gates.