Guide to tutorial areas
| Note: This article is geared towards new players. Please keep its contents to those which new players can reasonably understand and use. |
This guide is an overview for new PvE players to introduce them to the storyline and some of the most important features in Guild Wars.
The tutorial areas: Ascalon, Shing Jea Island and Istan[edit]
After character creation you will start the game in Ascalon City (Prophecies), Monastery Overlook (Factions) or on the Island of Shehkah (Nightfall). Whichever the campaign may be, the starting area is a training period that allows a new player to get used to the controls of Guild Wars and gain a few levels before progressing with the storyline.
One of the first things a player will want to do is to talk to the character with a green exclamation mark above their head indicating that they have a quest or message for the player. To stay on track you can view all your quests in the Quest Log (L button by default).
It is advised that the new player stays in the tutorial area and gets a few more levels (experience) while getting comfortable with the controls of the game and of the selected profession. This is also the chance to party with other players, acquire various skills and weapons, get more inventory space as well as a better armor.
Prophecies[edit]
In Prophecies, it is a time of war against the Charr, a race of feline creatures which are currently trying to invade the kingdom of Ascalon, stopped so far by the Ascalonian soldiers and the Great Wall between Ascalon and the northern territories controlled by the Charr. In order to fight them, the king Adelbern send his scribes to recruit new heroes accross the land. The highest level of foes is 5 outside of The Northlands (where the highest level of foes is 10) so reaching at least level 5 is advised before leaving the area.
The action is supposed to be the course of a single day, two years before the true events of the storyline begin. As a matter of consequence, the area can never be accessed again after entering Ascalon Academy and skipping the two years, so it is up to the player to spend more time in the verdant area or rush to further advance the storyline. It is possible, allbeit very long, to reach level 20 in this area, which allows for the special title of Legendary Defender of Ascalon. For these reasons, some players have characters that by intent stay in this portion of the game. This is not recommended for new players.
Factions[edit]
In Factions, the Canthan empire is threatened by a plague known as the Affliction which transforms people and animals in hostile, monstruous creatures known as the Afflicted. The Shing Jea Island is not spared by the strange disease, and its inhabitants, especially the renowned Master Togo and its students of the Shing Jea Monastery are trying to understand what is happening. Two missions take place on the island and the highest level of foes is 18 so reaching at least level 15 is advised before leaving the area.
Nightfall[edit]
In Nightfall, Istan is a small island far from the rest of Elona. Here dwell the members of an order pledged to defend the nation against all threats, whether natural, martial, mystical or supernatural: the Order of the Sunspears. Between corsairs attacks, kournan military suspicious manoeuvers, undeads attacks and dark forces at work, the Order needs true heroes in order to face old and new threats and unveil a dark conspiracy which threatens all Elona. Three missions take place on the island and the highest level of foes is 18 so reaching at least level 15 is advised before leaving the area.
Getting started[edit]
Secondary Professions & Skills[edit]
At the character selection screen, choose your campaign. Note that assassins and ritualists are exclusive to the Factions campaign, while dervishes and paragons are exclusive to the Nightfall campaign. Choose your primary profession among warrior, ranger, monk, necromancer, mesmer, elementalist, and the exclusive two others if not choosing prophecies. This is an important choice which cannot be changed without deleting the character. For additional guides on your primary profession of choice see these articles:
 Guide to playing as a warrior
 Guide to playing as a ranger
 Guide to playing as a monk
 Guide to playing as a mesmer
 Guide to playing as an elementalist
 Guide to playing as a necromancer
 Guide to playing as a ritualist
 Guide to playing as an assassin
 Guide to playing as a dervish
 Guide to playing as a paragon
Part of your primary mission in the tutorial area is to choose a secondary profession. You will be given a chance to try out any profession as a secondary before making a decision. The primary and secondary profession is listed as an abbreviation above a character for other players to view and also shows in the party window. For example, a Warrior who has selected a secondary as a monk is shown as a W/Mo. The Monk profession (Mo) and the Mesmer profession (Me) are shown with two letters so they do not get confused with each other.
About secondary professions: you will not always need your secondary profession except for a few skills. You can very well play the game using skills from your primary profession only. Also keep in mind that you will gain the ability to change your secondary profession later in the game. So if you find that you have made a choice that does not suit your playing style there is no need to restart.
If you are new to the game and trying to figure out which may be the best secondary profession for your character, first check whether your character is a physical damage dealers (ranger, paragon, dervish, assassin, warrior) or a caster (monk, mesmer, elementalist, necromancer, ritualist).
- Casters usually benefit from the elementalist line for energy (Glyph of Lesser Energy), or mesmer for energy (Inspiration Magic skills) and special skills such as Arcane Echo.
- Physical damage dealers especially benefit from the warrior line for many shouts ("For Great Justice!", "Save Yourselves!").
Some players prefer to choose secondary ranger for taming a pet or monk for a reusable resurrection skill. Experienced players may also choose different secondary profession if they need it for a dedicated build. Some physical attackers can be seen using other weapons than those of their primary profession. However, warriors and paragons and even dervishes will have trouble with energy if using a bow or daggers (which require energy as a ressource exclusively).
Primary Attribute[edit]
As an example let’s look at an elementalist who has a secondary as a necromancer (E/N). It can combine the skills and attributes of an elementalist and those of a necromancer: Energy Storage, Air Magic, Fire Magic, Earth Magic and Water Magic (from the elementalist profession), Soul Reaping, Curses, Death Magic and Blood Magic from the necromancer profession. As the character levels up, the player can put 'attribute points' in the different attributes to increase the power of the related skills. However, a character cannot put attribute points in the primary attribute of its secondary profession: in the example of a E/N, it is possible to put attribute points in Energy Storage, which is the primary attribute of Elementalists, but not in Soul Reaping, which is the primary attribute of Necromancers. On the contrary, a necromancer who has a secondary as elementalist (N/E), can put attribute points in Soul Reaping but not in Energy Storage.
The primary attribute often boosts the effectiveness of the profession's skills: for example, high energy from Energy Storage allows elementalists to use their overcast with fewer troubles than any other class, while expertise specifically reduces the cost of ranger skills.
The list of primary attributes available are:
 Strength for a Warrior, which grants armor penetration to attack skills.
 Expertise for a Ranger, which reduces the energy cost of certain skills.
 Divine Favor for a Monk, which incurs additional healing when using monk spells on allies.
 Fast Casting for a Mesmer, which reduces the activation time of spells and signets and reduces recharge time of mesmer spells in PvE.
 Energy Storage for an Elementalist, which increases maximum energy.
 Soul Reaping for a Necromancer, which grants energy each time a creature dies.
 Spawning Power for a Ritualist, which increases the health of summoned creatures and the duration of weapon spells.
 Critical Strikes for an Assassin, which grants energy on critical strikes and increases the chance to critical.
 Mysticism for a Dervish, which reduces the cost of dervish enchantment spells and increase armor rating when affected by enchantment spells.
 Leadership for a Paragon, which grants energy for each ally affected by a shout or chant.
Attribute Points[edit]
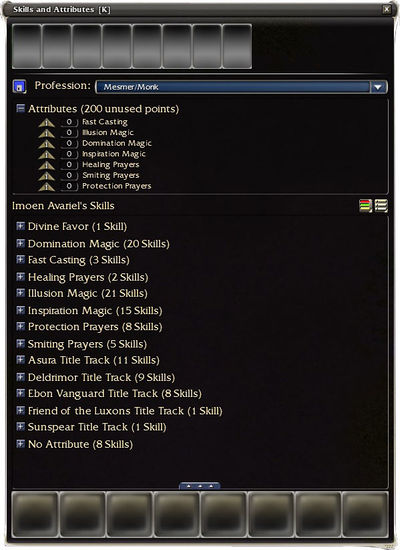
Attribute points are gained as characters level up. You can choose to put these points in whatever attributes you like, and then add skills under that attribute to your skill bar or on the opposite add skills then put the attribute points in the corresponding attributes. Bear in mind that usually the higher the attribute will be, the more powerful the skills tied to the attribute will be. As a rule of logic, it doesn't make any sense to have any points in an attribute when there are no skills tied to that attribute on your skill bar. You always need to be in an outpost to change your attribute points repartition.
At some point in the game, you will have access to two special secondary quests rewarding 15 attribute points each, allowing you to boast a total of 200 attribute points at level 20. Those quests are available soon in Nightfall and Factions, but much later in Prophecies.
Armor[edit]
Each profession has its own types of armor that grant various benefits. All professions start with 0 armor rating and 2 pips of energy regeneration. Casters (Ritualists, Elementalists, Mesmers, Necromancers and Monks) will have more energy and recover it faster but will have a lower armor rating, whereas physicals such as Warriors will have a higher armor rating and a lower energy regeneration rate. You don't start with the highest available armor rating and armor bonuses: as you progress through the game you will find armor for sale/trade that has a higher armor rating than your current armor. It is always recommended to have the highest armor possible. Increasing armor rating by 40 points results in half damage taken.
From the professions with high additional energy regeneration and low armor to those with low additional energy regeneration and high armor:
- Ritualists, Elementalists, Mesmers, Necromancers, Monks: 60 max armor rating, +2 energy regeneration, 10 extra energy.
- Assassins, Dervishes: 70 max armor rating, +2 energy regeneration, 5 extra energy. Dervishes have an extra 25 health.
- Rangers: 70 max armor rating, +1 energy regeneration, 5 extra energy, +30 armor rating (total 100) against elemental damage.
- Paragons: 80 max armor rating, 10 extra energy.
- Warriors: 80 max armor rating, +20 armor rating (total 100) against physical damage.
Runes and Insignias[edit]
As you progress through the game you will find or buy runes and insignias that you can attach to armor. Only runes belonging to a chracter's primary profession can be used. Be careful as strong attribute runes (+2 and +3 to attribute) will incur a reduction in your total health.
You can acquire runes and insignias in the following ways
- Rune Trader
- Salvage from enemy armor using at least an Expert Salvage Kit
Builds and Skills[edit]
As you progress you will unlock or learn new skills. At any one time, you can only have 8 skills on a skill bar, but these 8 can be any skills from your primary or secondary profession you have taught your character. Any time you're in a town or outpost, you can change your skills (and attribute points accordingly). Then, you can enter an explorable area or mission and test those skills. If you don't like the skills you've chosen (i.e., using fire magic isn't effective against some enemies), you can simply zone back into town and change your skills.
Some special skills are "unlinked skills", also known as No Attribute Skills. They are not listed under any attribute and their effects are not affected by the value of your other attributes (except for primary attributes). Those skills only require that you belong to the profession that can use those skills. Some skills, while being listed under a particular attribute, do not actually improve (or improve much) as the related attribute point increases and so can be treated as if it were an unlinked skill.
You can acquire more skills in the following ways:
- As a quest reward.
- A Skill Trainer
- Signet of Capture, first encountered after you reach a town named Lions Arch in Prophecies, and after leaving the islands in the other campaigns. Signet of Capture is the primary way to obtain elite skills.
Features not in Ascalon (pre-Searing)[edit]
Although Pre-Searing Ascalon gives plenty of opportunities to discover parts of Guild Wars, it doesn't include everything.
Xunlai Chests[edit]
It costs 50 gold pieces to open an account with an Xunlai agent, but once you do, you can share items across all your characters who have access to the chests. Xunlai chests are available in almost every town and outpost. If your Warrior finds a fire wand your Elementalist can use, they can give the wand to the elementalist by putting it in the Xunlai chest. Then, the Elementalist can create a Xunlai account and use it.
Henchmen/Heroes[edit]
Sometimes you can't always find a group of people to play with. You don't have to go into the 'beyond' by yourself. In most outposts or towns, there are a group of computer controlled players available to assist you. Their level changes as the game progresses and by the end of the storyline the henchmen are level 20. Henchmen are usually close to the level of foes in the region. If you don't know if you're a high enough level to fight foes in the area, the level of the local henchmen is usually a good indicator. To invite one into your party, open the party menu click on their names twice and they should add into your party roster.
Missions[edit]
Missions move the storyline along and upon completion place you in the next best place to advance your primary quests. In the Prophecies storyline, there are 25 missions, in Factions 13 and in Nightfall 20 missions. After completing certain quests or other missions, you'll end up in a mission outpost. Upon entering a mission outpost, the screen will display "Mission Name - Cooperative Mission", which means that different players can group together to complete mission objectives. Missions objectives will vary and your goals will be displayed in your quest log.
When doing a mission, you'll find that there are certain objectives given to you from the start, and other objectives added throughout the mission. If all the players in the party die, you will be sent back to the mission outpost.
In the Prophecies campaign, each mission has a bonus objective, or another task to do during the mission. The bonus can vary for each mission and will be displayed in your quest log once certain requirements are met. Completing a mission and bonus adds to the Protector title track, and gives you extra experience and a skill point.
Especially in Prophecies, experienced players who have already finished portions of the game often choose to skip parts of the storyline to advance their character fast later in the game. This is not recommended for new players as it requires that you have access to resources needed to provide for a late game character.
Other expansions and items[edit]
Once the tutorial area is over, you may begin to encounter players and items from other expansions of Guild Wars. You can later decide to purchase these expansions and gain access to more skills and items and professions and explore other parts of Tyria. Until then however you may still trade and obtain these otherwise unattainable items from players, but be wary of trading for items that you are unable to use. As an example, for a player who does not have Nightfall, you could trade another player for a Scythe which is a melee weapon for the Dervish profession in Nightfall and you would be able to equip it. But because you cannot use the attribute of Scythe Mastery (which is a dervish attribute), the weapon can be useless to you.
Interactions with other players[edit]
Unfortunately not every player is going to be your friend. Some players prey on the naivete of new players using various scams or by overcharging for items that are quite common later in the game. Let the buyer beware, before you accept any trade from another player be sure of what you are getting. This wiki is a great tool for learning where items come from and how hard they can be to obtain.
Guild Wars is best enjoyed with other players. Consider adding people you have enjoyed playing with to your friend list, and joining a Guild of players who have the same goals in mind. Getting help when doing difficult missions or quests can be very precious, as there isn't always a lot of people available in the outposts and henchmen/heroes can be rather weak, especially early in storyline.
Take it slowly, especially if you're new to the game. Early on you will find players willing to run you past difficult enemies into a later part of the game or rush you through a mission, sometimes for a small fee. While free help is always nice, unless you know what they are doing for you, it is suggested you learn what is going on. If you do not know it may spoil your game or leave you at a disadvantage later in the game.
Additional Guides[edit]
Make use of other articles found on this wiki that benefit a new player, here are some examples


