User:Ilr/sandbox
| This page is a sandbox. |
Guide to cartography nooks[edit]
Nooks or "Magic Spots" along the outer edges of all Explorable Areas, Missions, and Outposts are crucial for the title of Grand Master Cartographer. And knowing where each one is, saves a great deal of time that would otherwise be spent slowly "Scraping" the Geometry on maps that may not even reveal the section you need. ...Or in some cases, would not be revealed anyway due to heavy server latency. And in the majority of cases, the portions of the map technically revealed by these nooks are not even detectable on the standard game map, often forcing players to use Texture Modification tools just to locate and fully reveal them.
This guide will list and display the locations of most of these nooks for players who wish to quickly achieve 100% cartography without relying on those 3rd party applications.
- Additional Tips:
- Some portions between Areas will reveal only when fully explored on both sides.
- Exploring each area in a clockwise rotation makes a small difference, do so whenever possible
- Secret paths over terrain that looks solid but is actually passable (fairly rare)
Tyria[edit]
Eastern Tyria[edit]

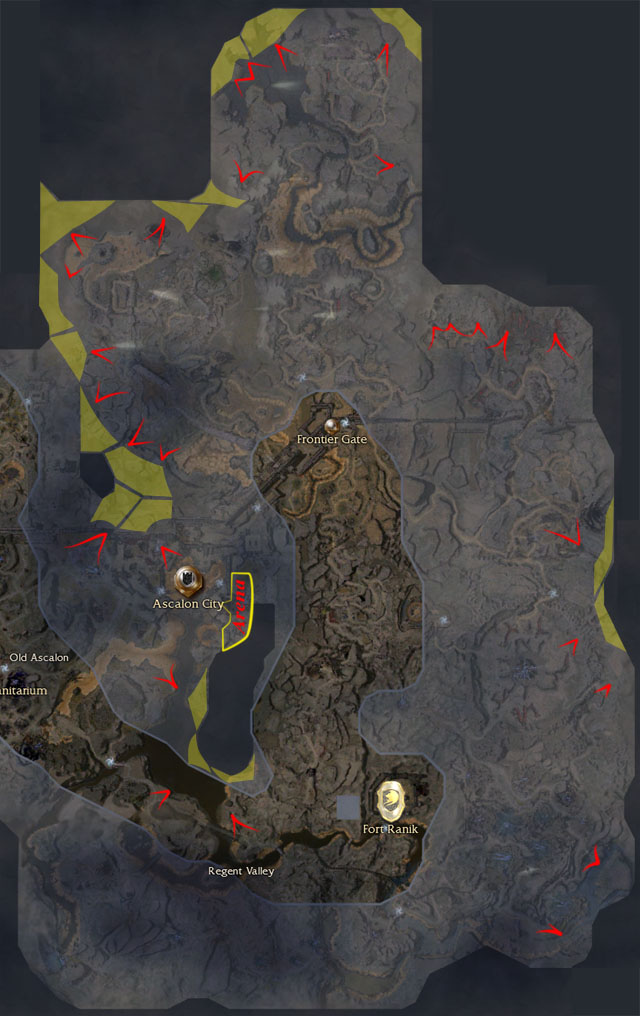
- Ascalon City: Inside a floating wall fragment & crystal wreckage, near Xunlai chests.
- Old Ascalon: North of the wrecked performer's stage
- T.G.N.W.: Its north area can't be explored until after the cinematic triggers. Due to only having 3 minutes, the whole mission will need to be restarted several times to fully expose every nook.
- After crossing the first warning bridge, there is a rock cliff line that looks solid but in fact is not.
- South of the fake cliff, is a maze of nooks that may also need to be explored.
- Take another right before the final bridge but be wary of the 2 groups of Charr (Bring along help if you can). Just past them, will be 2 ponts: 1 against a gate & 1 on pitch-black ground
- Pockmark Flats: Southeast from its north exit and 20 paces up from a stone bridge is a darker patch of slope that requires very precise scraping to find its east-facing nook.
- Ruins of Surmia
- Closed gate near Breena Stavinson ...and Flame Temple Bonus area triggered by her.
- 2 points on the west half of the Lake, and a 3rd point around the north side.
- Back corner of Cell that the flame scepter Mages are released from.

- The Breach
- Southwest tarpit, due south from a Tar Behemoth
- A culvert north of a collector on the hillside above the south tarpits
- Diessa Lowlands
- Climb partially up the wall near the 2 wooden tar pit bridges.
- 2 points: southern edge populated by Elementals. ...1 by way of a small stone bridge.
- Dead-end near the Academy, south of a large bridge and a few Storm Riders
- Dead-end with 1 Charr group along the western edge, after gargoyles, but before storm riders.
- Scraping against some crates in the back of Grendich Courthouse
- Dragon's Gullet: Lots and lots of slogging through smaller tar pits on the periphery
- Nolani Academy(mission)
- 3 points along the west cliff adjacent to, and north of the fallen spirits
- Tight space between the great wall and a glowing column near the tome pedestal.
- Corner of two tiled walls directly behind Bonfaaz Burntfur

- Traveler's Vale: West wall near where the refugees spawn (during Shiverpeak Stragglers).
- Borlis Pass
- Scraping back end of the ice cave where the bonus Drake is.
- A solid looking chunk of slope (south facing) right before the main Siege Area
- 2 points up above where you meet up with Prince Rurik
- 2 points north west of the big bridge after receiving the second torch.
- East Anvil Rock: Despite appearing to be within the mission boundaries, the outer northwest section of Borlis is actually revealed by heading north after reaching the next outpost
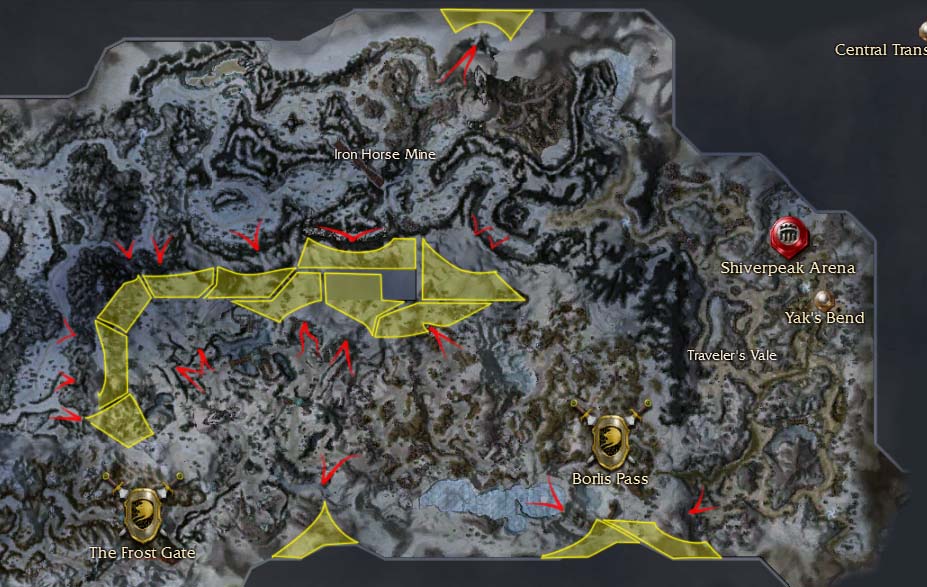
- Iron Horse Mine
- Behind a tree in the southwest area clustered with Dryders.
- Narrow channel guarded by Stone Summit & Ice Golems
- False dead-end nortwest of the mining camp where a huge cliff juts out.
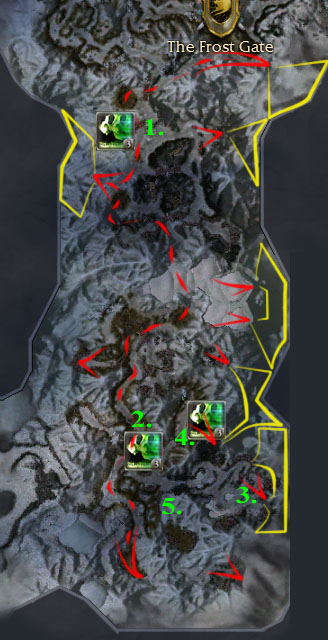
Frost Gate[edit]
Every inch of this Mission can be fully explored in 1 run by following this order:

- 1.Bring Consume Corpse, and a strong Degen solo-build or a summoned pet if you have any.
- 2.Make sure you fully explored every path prior to the bridge Prince Rurik is waiting under
- 3.Flag your party back and pull the Ice Golem on the other side onto the bridge (Point #1 on the Map)
- 4.Use consume corpse on the first Ascalon Soldier it kills, then kill the golem and go explore the road.
- Up the road, right as it turns left(North), is a corner that requires careful scraping.
- 5. Important: Do not kill any of the Engineers yet. Instead make your way to the very end of the mission.
- Scrape the west side of this road (blast-pits included) to make sure you don't miss any nooks along it.
- 6.At the very bottom of the mission is a lone Stone Summit unit standing on the road, ignore him while exploring the area just beyond him, then head back UP the road to the bridge connecting a short road to the 3 Gate winches.
- 7.Degen one or all of the units guarding this bridge and use consume corpse again.
- 8.Head east on this bridge and kill + consume the Summit behind the next gate. (point #2)
- 9.Go as far south as you can and unflag your Heroes if you have any. It may take up to 5 minutes for them to "ghost" their way to your location. Once they arrive, go east(#3), clean house, and explore
- 10.Head back to the 3 Winches and the closed gate to the north-east and wait. A pair of Ettins should start heading your way.(#4) Kill & Consume them to get to the Gear Lever & open that gate.
- 11.Use the Lever on the south winch first to open the south gate, clean house & explore.
- 12.Repeat on the north-east winch to open the other gate. But do not activate the Center winch yet. Instead head back up the road and Kill+Consume every group you come to that's behind a gate until you've fully revealed every last spot on the east half of the mission as well. You can even grab and complete the bonus while doing so.
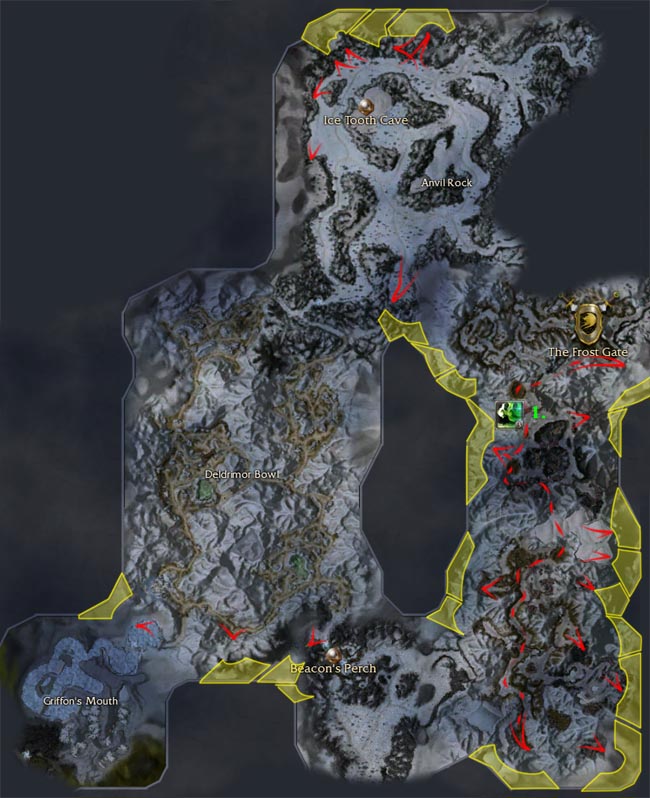
- When you're all done, activate the center Winch and be sure to let the Cinematic run to reveal the Ice Cave to the west.

- Outside of Ice Tooth Cave
- 2 points over False Rocky patches northeast of the Cave
- Scraping the minotaur-clustered bend norhtwest of the Cave
- 2 Centaur camps, 1 soutwest of the Cave, another due south of Anvil Rock
- Deldrimor Bowl
- Behind the shrine after leaving Beacon's Perch
- Scraping up against a small dwarven house on the way to Ranger Olson
- Due north of the Griffon's Mouth portal.
Central Tyria[edit]

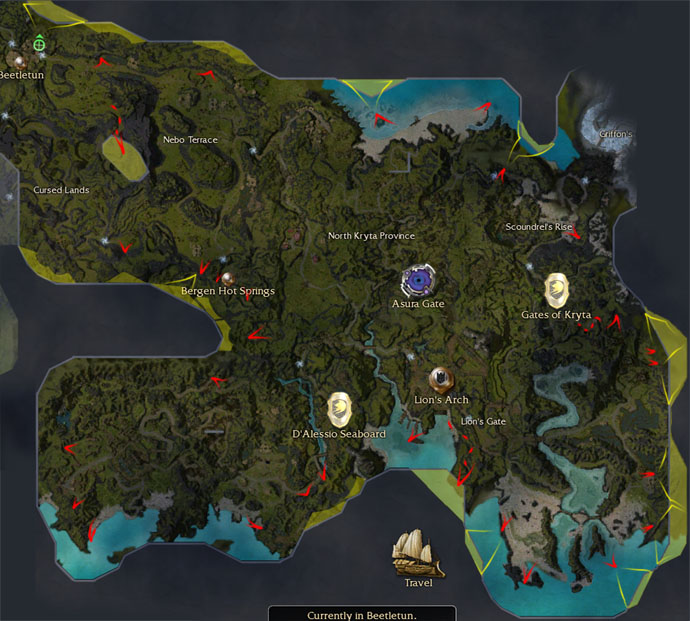
- Scoundrel's Rise
- Behind the wreckage in its southeast corner
- Up the wall next to a Fern and Palm tree at its west (North Kryta) portal.
- Gates of Kryta
- Through the tiny yard and behind the house Oinky is standing in front of
- In between two rock shelfs on the rocky western beach shore, next to some pink flowers.
- Southwest corner of the beach between 2 starfish and a water lily.
- East slope behind the stone watchtower up from the boat dock.
- Up the slope above the stone plaza east of where Justiciar Hablion is waiting.
- Two alcoves where the final Boss (random) spawns, just past the swamp.
- Lion's Arch: 2 points; Bow of the Canthan ship, and the Lighthouse south of Alton Thorne
- D'Alessio Seaboard: Scraping the pathway en route to Benji Makala's village
- North Kryta Province: In the water on the tiny island along the north beach.
- Bergen Hot Springs: South wall may require mild scraping on both ends of the pool.
- Nebo Terrace: Key points along its north & south walls (see map for key points)
- Beetletun: Scrape wall behind Elder Hezron
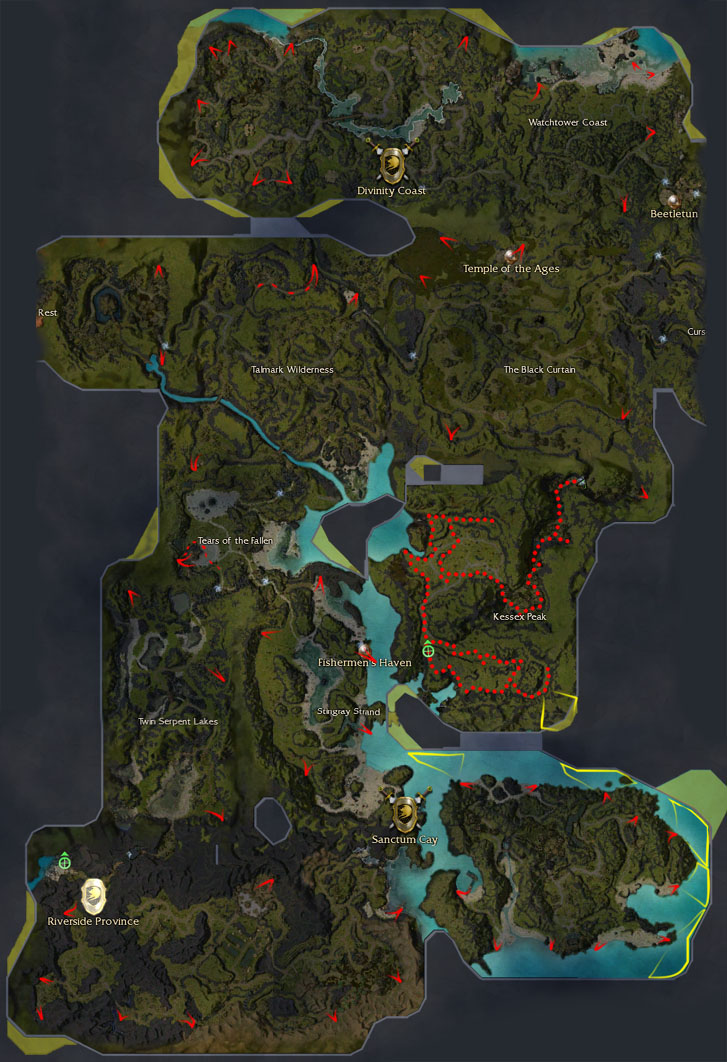
- Watchtower Coast:
- Second underwater berm, closest to the WatchTower island. (near boss-spawn)
- Bank shaded by the palm tree in N-E corner. (also near boss-spawn)
- Mossy boulder between 2 piles of volcanic rocks. (north of Beetletun)
- Divinity Coast: LOTS of wall-hugging at key points. (included in map)
- Cursed Lands: This zone has 2 western portals/exits so be sure to explore both of them
- Temple of Ages: In addition to revealing ~0.1% to its northeast, this outpost is also the best launching point for all further exploration of central Tyria beyond this point as the zones south of here can have very large spawns of level 17+ enemies.

- The Black Curtain: Its southwest loop (with Tengu patrolling) requires careful edging.
- Kessex Peak The south edge, esp. near the very tall Palm in the SE corner.
- Majesty's Rest: Near a pop-up spawn of Spiders. (not shown on map)
- Tears of the Fallen: A small gully on the road behind the lake settlement.
- Stingray Strand:
- Behind the Shrine north of Fishermen's Haven.
- Edging around bottom of the peninsula reaching towards the floating castle.
- Fishermen's Haven: The boat dock past Delves the Dodgy
- Twin Serpent Lakes: No tricky nooks, just tricky Mobs on big patrol loops.
- Riverside Province: Both in the outpost, and right at the start of the mission.
- Against a small moonlit crease, north of the west-most tower.
- Left of the fire, behind the Oxen...south of that same tower.
- Stepping onto the onyx stairs in the Mursaat Temple.
- Sanctum Cay:
- 5 different beaches that need their corners lightly scraped
- Watching the full Cut Scene after boarding the boat.

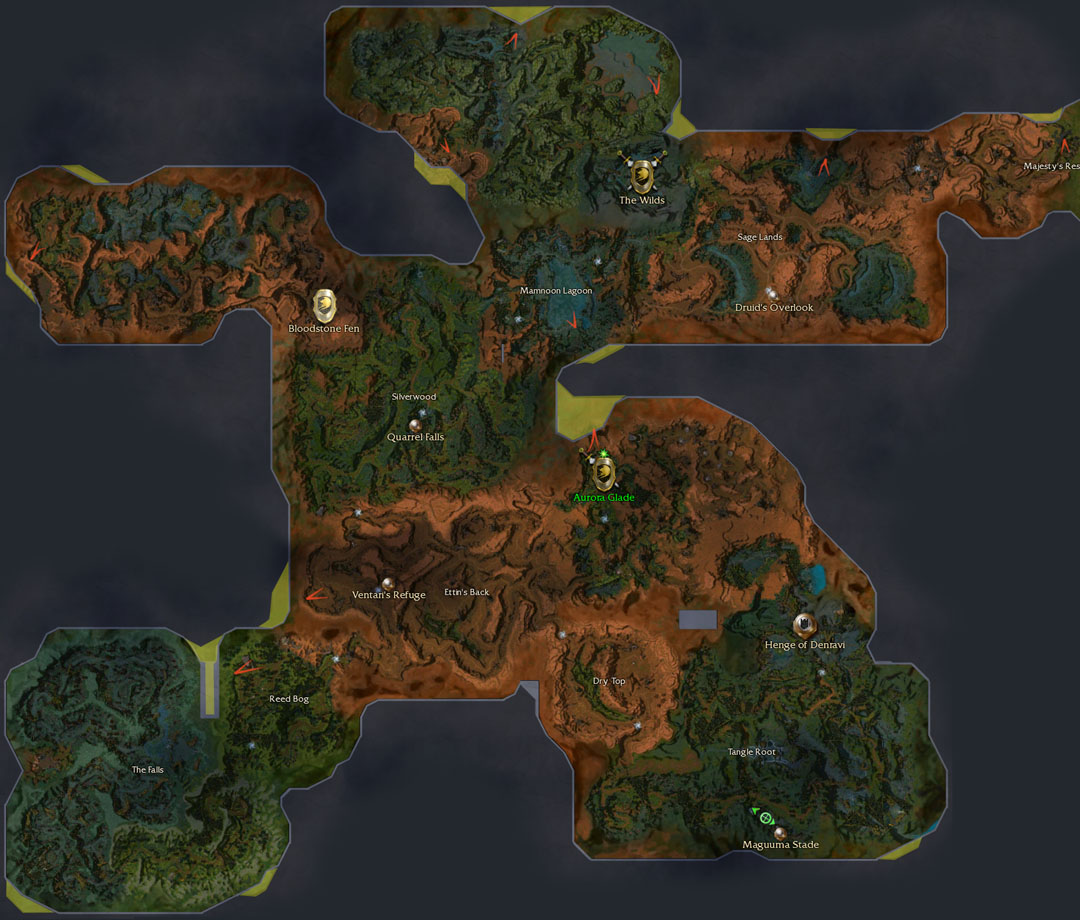
Maguuma Jungle -- Only a couple spots in this region will involve real edge scraping or nooks:
- The Wilds:
- In the bonus area is a crucial spot in the shallow eastern-most pool that connects to the larger lake. It is important to get to the other side of that pool and as far south into it as you can.
- In a previous build, you had to get up where Evenia at the end of the mission was but that no longer reveals anything you can't already reveal by walking over and up under the BROWN roots near where the first round of spiders spawn.
- Mamnoon Lagoon
- Over the southeast Bridge past the smaller pool, walk past the 3 big Ferns, and into a 2nd nook to the left of a 4th big Fern. Be sure to stand there a good 3-5 seconds for it to register.
- Reed Bog & The Falls:
- Past the first Amphitheatre near some Oaks is an edge that requires minor scraping.
- Most of the Area around the Blathazar Shrine will require Scraping (in the Falls)
- Aurora Glade (outpost)
- There is a Hidden Passage behind a tree-house in this outpost leading to a larger area that counts for atleast 0.1%.
- Aurora Glade itself has 2-3 edges to scrape along its north-east side once you defeat all of the White-Mantle and The Demagogue
Southern Tyria[edit]

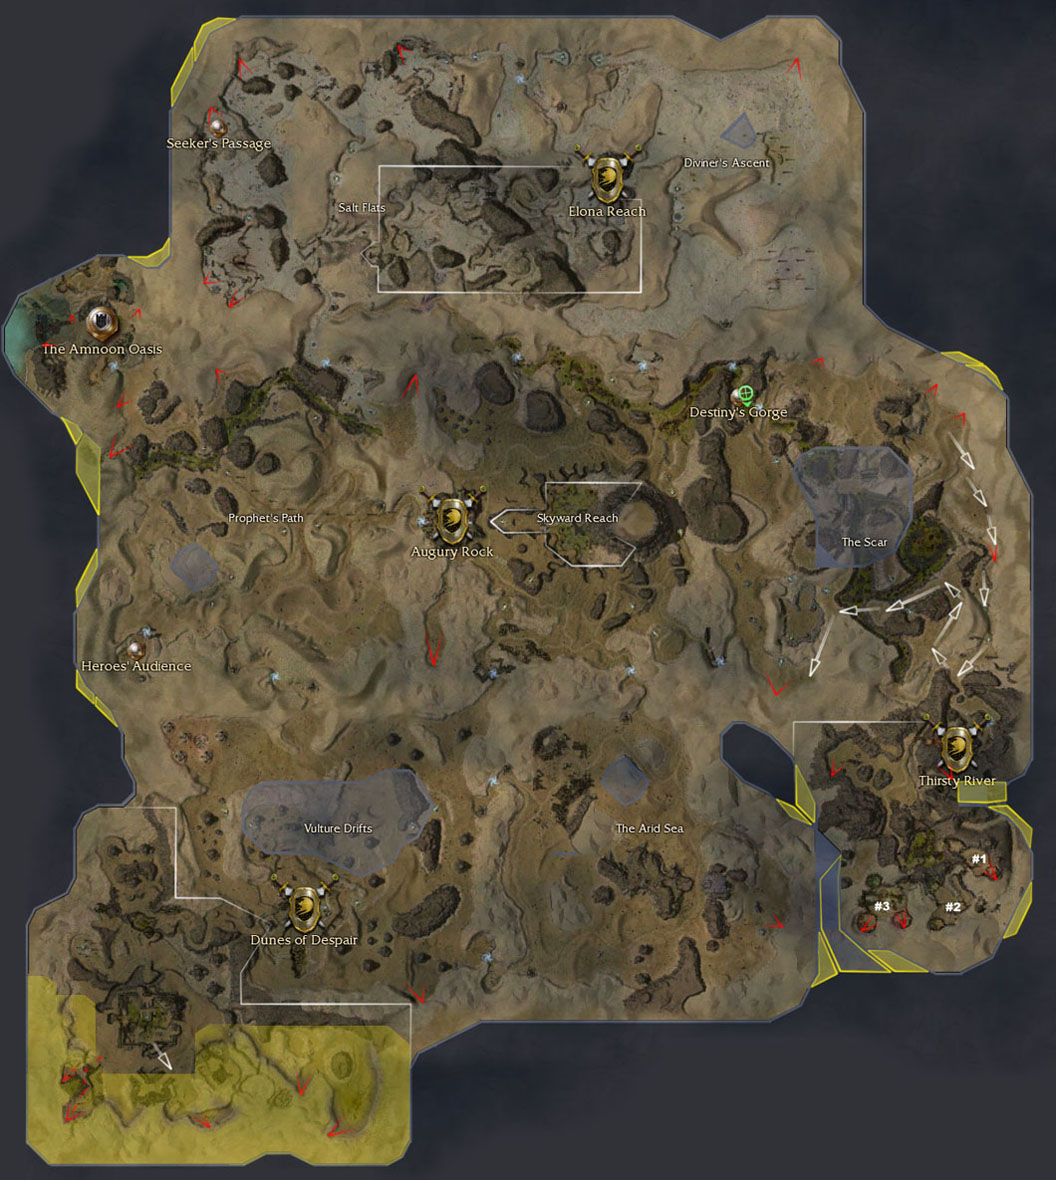
- Amnoon Oasis: Be sure to get every corner of it including the Dock & right side of the big post @ the Arena(*inside of arena now exempt) gate.
- Dunes of Despair: The best way to map this area without a clock (or dead Ghostly) stopping you halfway through, is to make him stay back at the second bridge and then sneak around the enemy Ghostly over to the edge of the currently-playable area. Oh & by the way, you'll want to go /Necromancer secondary for this trick, and equip
 Consume Corpse plus a strong degen or Pocket Sin. With luck, a Jade Scarab will pop up near the little white arrow on the map to the right and you'll kill it before it gets away. Sometimes a Boss spawns in range of this ledge, so bring a Flatbow too just in case. Once you teleport over it, walk east slowly as not to cause more than 1 scarab popup at a time. Once you get far enough away from your heroes/henchmen that they become unselectable, unflag them & they should be teleported across the gap automatically, allowing you to explore the rest of the area at a medium pace.
- In the southern most corner (west side) is a small fort that appears to have its drawbridge up, but you can walk right across it.
Thirsty River: Scrape the back end of every enemy Priest's Altar area in all 3 mini-Arenas
Shiverpeaks[edit]

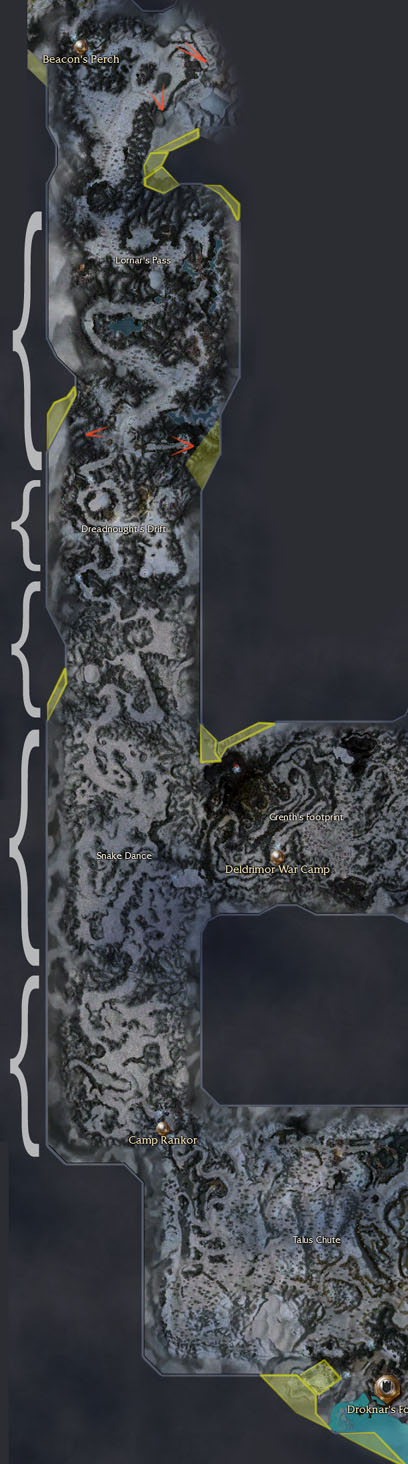
Note: It is highly recommended that any would-be Cartographers whose party will contain henchmen, always leave from Deldrimor War Camp or Camp Rankor instead of from Beacon's Perch
- Droknar's Forge:
- South-slope past the bridge, to the east of the Xunlai Agent
- The old Arena now used for the Prophecies Epilogue (requires completion of Hell's Precipice).
- Talus Chute: While there isn't exactly any tricky nooks here, the area is quite huge and some effort should be made to cover all its edges slowly. Particularly west of the Troll Cave and most of the north edge too.
- Grenth's Footprint: The area above Sorrow's Furnace requires careful scraping of the Portal leading into it without actually stepping all the way in. This may require a few attempts by going back outside.
- Snake Dance: Along its east wall; adjacent to Sorrow's Furnace, is some open pathing tiles northward that may reveal a little extra, but the whole wall section should be scraped just to be on the safe side
- Lornar's Pass:
- North of the Dreadnought's Drift Portal and around the bend; there is a small house with 2 lamposts, you must step around the left post to get into the nook blocked by the chain-fence.
- Be sure not to miss the area surrounding Grenth's Monument.
- Just north of the word "Pass" is a Summit cave with a forge in it; scrape around inside it.
- East of Beacon's Perch is 2 nooks (marked on the map).
- East Talus Chute: North of Ice Caves, around a bend brimming with ice golems, is a large boulder with a small gully to the right of it. Near the end of that gully is a Secret passage up the sunny section of its east slope which leads to a huge open hillside.

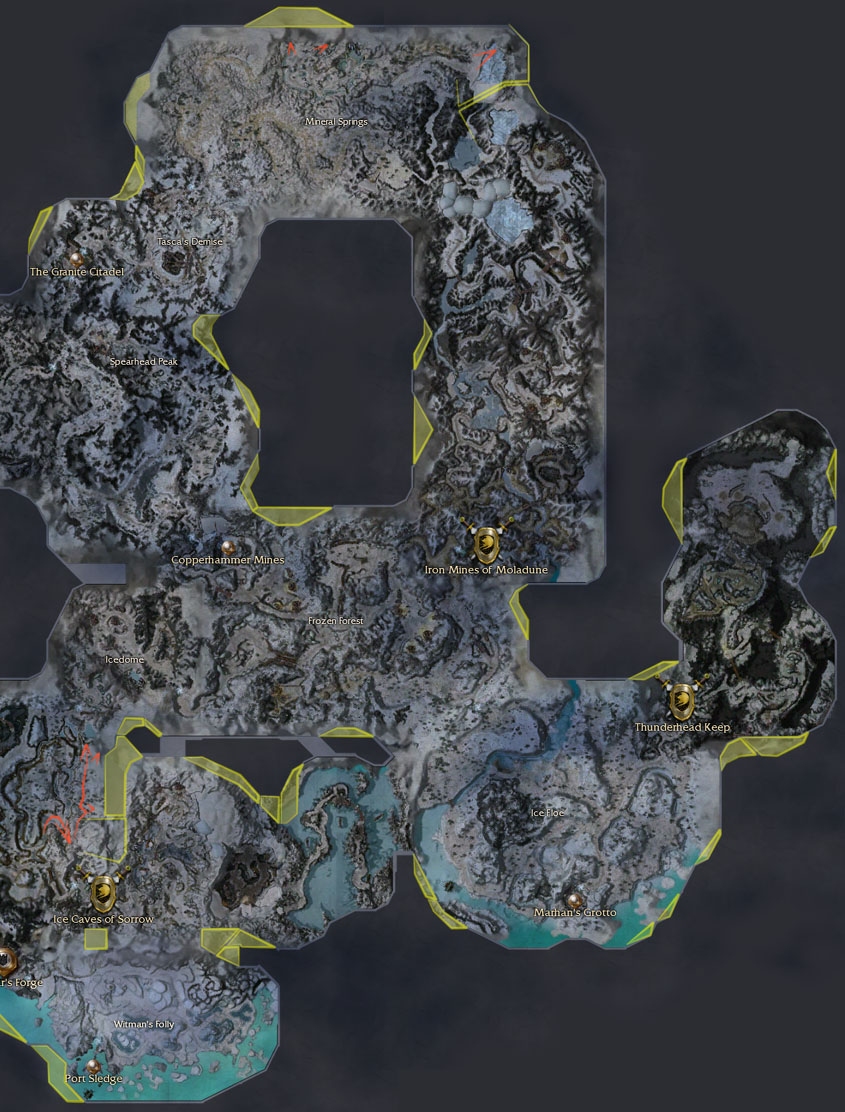
- Witman's Folly: Scraping--> the peninsula outside Droknar's, N-E corner near Vania Sewell, East wall, and portions next-to and inside of Port Sledge.
- Ice Caves of Sorrow: Scraping--> Opposite-facing corner as soon as you start the mission, all paths in the ice caves once you blow the door, the west bombard hitting the Mursaat, and even into the "water" along that last route.
- Iron Mines: Carefully scraping the left side of the wall where the 2nd large group of Stone Summit group fights some White Mantle.
- Mineral Springs: Up the frozen creek on the north edge by passing under the first bridge. Through a geometry bug on the steepest bank below the frozen waterfall around the bend just beyond. Near 2 Stalagmites, top-end of the ice imp cave.
- Ice Floe: very bit of the southern shore on either side of Marhan's pretty much has to be scraped. Just pace yourself as this is a large area with fairly difficult mobs.
- Thunderhead Keep Along the southern edge near the start of the mission; in a dead-end occupied by Griffons (and a few yaks) and continuing north east from there. West dwarf camp (allies) after all waves have ceased. Just below the east dwarf camp on the other side. And (likely), the north-most cave where the Mursaat spawn.

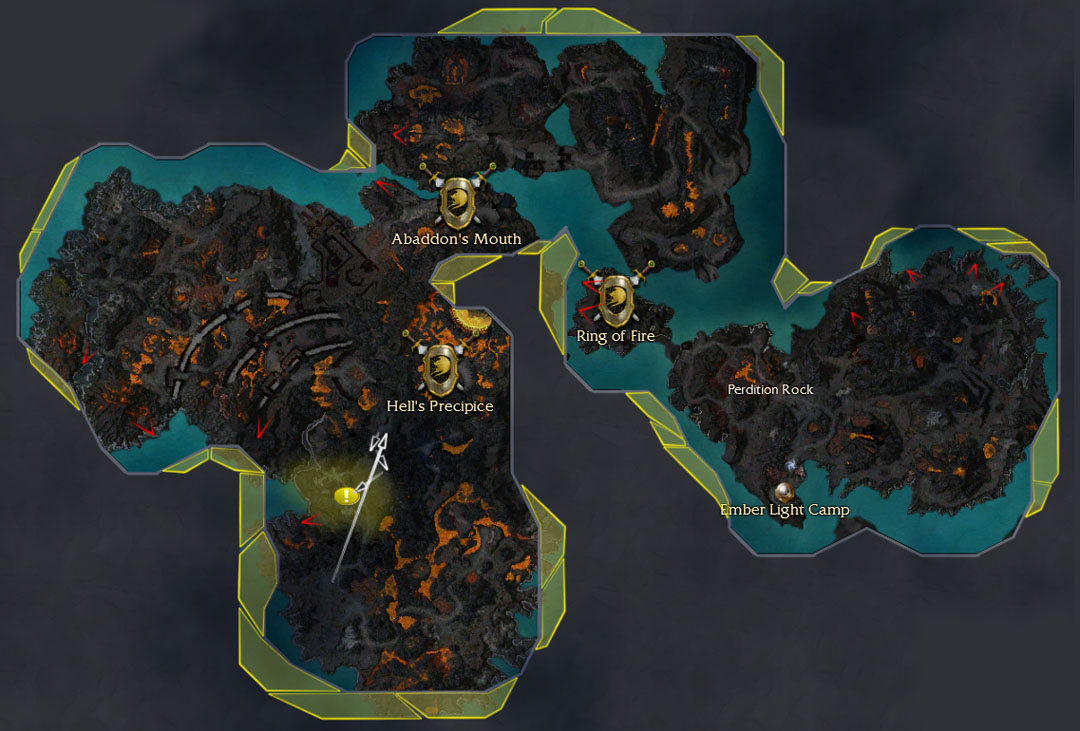
- Hell's_Precipice
- Pretty much the entire southern section of this mission must be scraped, all the way from the second bridge to the SPOILER BOSS fight
- After Defeating all Portal Wraiths, your whole party is teleported past a large area of the map meaning you must back track to cover that missed area.

Cantha[edit]

Shing Jea Island[edit]
- Linnok Courtyard: buy Viper's Defense in town and stand between the ramparts. With the right targeting, you should teleport to the bottom where you can walk back through the monastery, and to the training yard through the no-longer-solid Gate. Note: This area is normally only accessible to Factions characters immediately after creation.
- In Town: Talk to the Arena guard to visit the staging area. (doesn't require entering a battle).
- Panjiang: S.E. of the village, and east of the Naga cave shrine.
- Kinya Province and Minister Cho's Estate: All small islands and any sandy beaches, require moderate scraping.
- Jaya Bluffs: All northern edges and overlooks, especially the one north of the east Lagoon portal.
- Haiju Lagoon: All features along the beach, and the Shrine nearest Zen Daijun.
- Zen Daijun
- Directly south of the exploration entrance from Seitung Harbor.
- The eastern most boat dock where it connects to land.
Echovald Forest[edit]

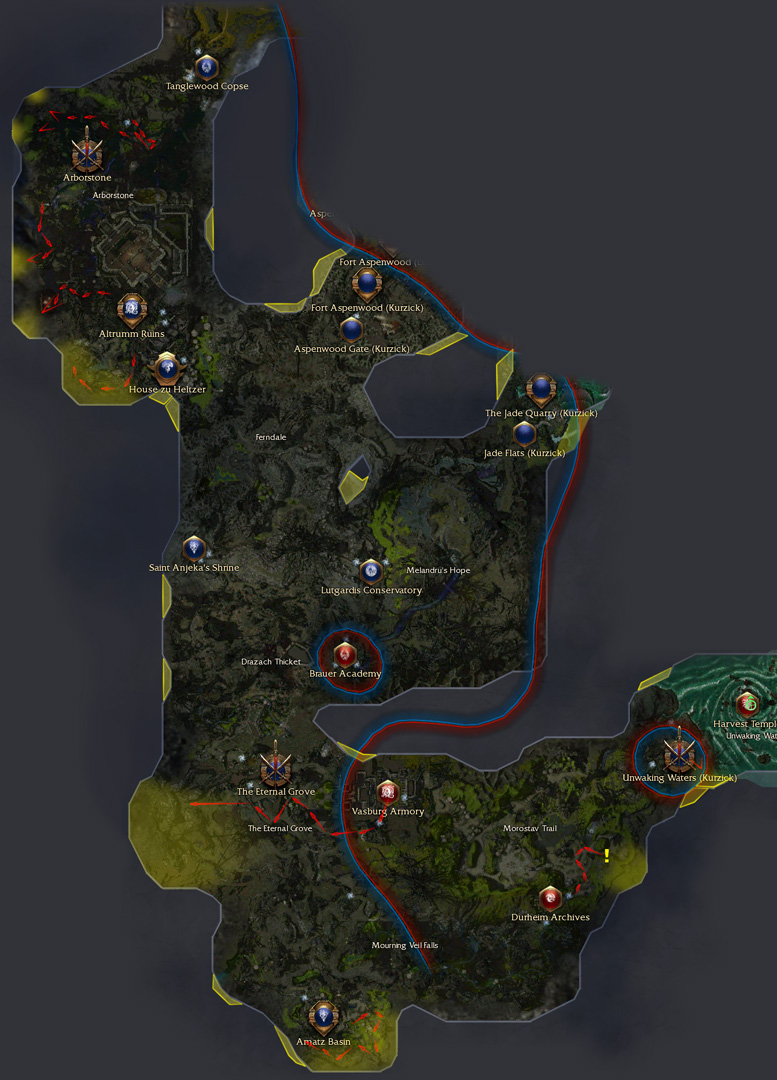
- Arborstone: The quickest way into the north end of this big ugly maze is to pack along Consume Corpse and talk to the Gate guard in the mission outpost to leave on the Gondola. Then kill a Kirin or Moss near where you spawn and teleport down into the water.
- Altrumm Ruins: Any areas within all challenge missions are also required for 100% so don't miss any of them. Altrumm is probably the hardest one to cover because you get zerged by a lot of mobs as soon as you start heading west but just keep going until you hit the west wall where a boss spawns. Turn north and you're done.
- The Eternal Grove: Don't attempt exploring it in mission mode, just find the Portal that leads back to it from Vasburg Armory.
- Morostav Trail: Just east of Durheim in a small cove is an epic clumping of mobs & popus that may require careful pulling before the area can safely be explored.
- Unwaking Waters: Both the staging area, and the exporeable itself require careful scraping along their south and north edge respectively. To cover the explorable itself, you must enter it from Harvest Temple instead of the mission.
- Aspenwood Gate: Near the portal to the Aspenwood PvP area is a wall that must be scraped.
- Note: PvP areas themselves are needed but will be covered in the next section
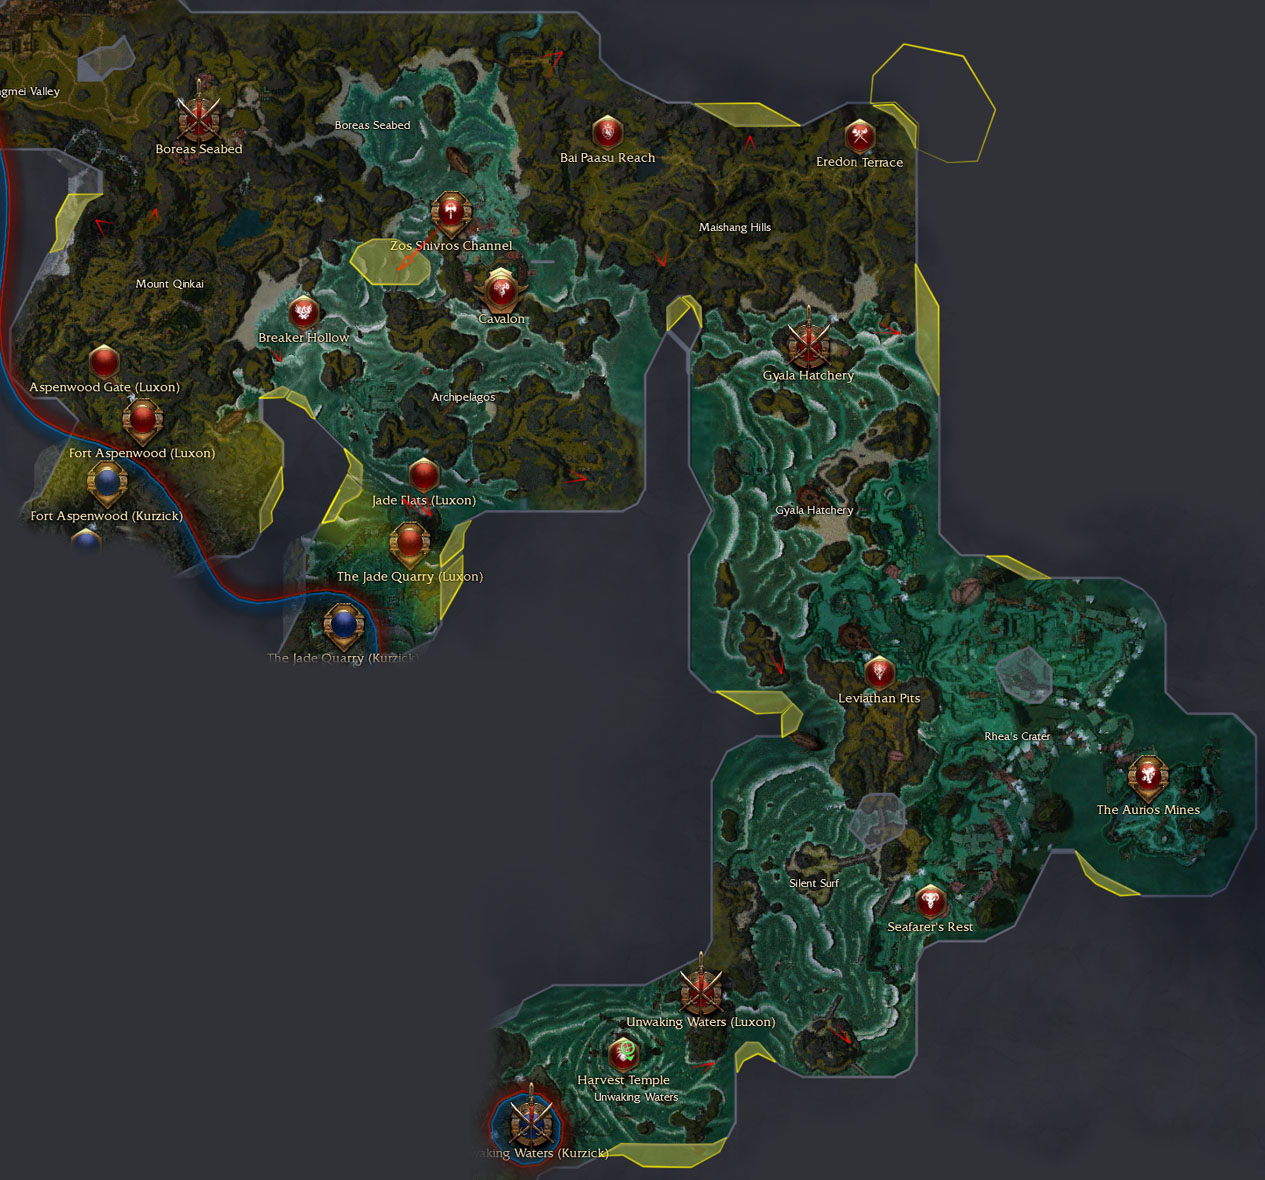
Jade Sea[edit]

- Unwaking Waters (again): A large area in the south is easily missed during the mission stage but can also be accessed in the explorable by bringing Consume Corpse and using it on one of the crabs (after killing it) that spawn in the middle channel of the wirlpool that is normally only accessible to players doing the actual mission.
- Silent Surf: has 2 tricky nooks, both in close proximity to the mission outpost. One near the first shrine, and another where some Oni spawn up on the island with large sea-walls jutting out.
- Gyala Hatchery: to the east is another island with Oni spawns and a nook that requires very dedicated south-bound scraping.
- Jade Flats and Jade Quarry outposts: ...require thorough scraping of their east and west walls, especially those accessed by bridges.
- Fort Aspenwood and Jade Quarry: Both of these areas must be explored (However you don't have to get every inch.) and could result in Dishonor if you don't observe a certain etiquette expected in PvP teams. But do not be afraid of entering them even if you are normally averse to PvP. It is simply a matter of scraping the east and west walls as quickly as you can, and then rejoining any teammates you can find with a skill bar that really improves the Luxon's chances (b/c exploring from the luxon side grants the most open & gank-free space to explore). For Aspenwood, that would be Heals and skills that penalize blocking or strip enchants. For JQ, that would be heals and interrupts.
- Mount Qinkai: The highest points of the north mountains here reveal a lot of space but the northernmost sections won't be fully revealed until you hit them from the caves on the Pongmei Valley side. The good news is Qinkai takes you straight into the...
- Boreas Seabed (explorable_area): A large area in the N-E corner dominated by huge groups of "Luxons" may require careful pulling so come prepared, and then scrape all structure walls once cleared.
- Maishang Hills: Near a spawn of Wallows is a crevice that reveals a good-sized chunk.
- Eredon Terrace (important): Visit this outpost's Talk Page to learn a key exploit that adds up to 0.65% in bonus area so you can more easily hit 100% without getting every single one of the smaller nooks shown in this guide.
- Boreas Seabed (outpost): This is arguably the largest staging area in the game so be thorough.
- Pongmei Valley: just West of the Yeti caves is a grassy ledge overlooking the caves that also requires scraping for the last little bit of this area. ...And while you're there, you might as well hit the walls to the north-west guarded by the Kaineng gangs & Kirin.
Kaineng City[edit]

The only tricky areas here are those already marked with arrows in the guide map. Namely; Shenzun, Nahpui, Xaquang, Vizunah, Tanakai, Imperial Sanctum, and Vizunah's Local outpost if you are a Foreign born character (this is b/c you can only enter it if you are teamed with a Factions-born character doing the quest "Mayhem in the Market"). But fret not if you are Foreign-born b/c the whole area can still be revealed by scraping at the 3 arrows in 3 different zones most-adjacent to the outpost. Note: One of them is inside the Vizunah mission meaning you should flag your party around Togo to keep him safe while you back-track the short distace to the gate where Local characters entered this mission..
For Imperial Sanctum, you 'will need to team with another human player in order to be banished for the last bit of scraping needed ...also be prepared for the Spirits in this banished area as they do use a Disenchanting attack. And One of the nooks to the south in the Divine Path might require you to actually beat Shiro as well to gain every last bit.