Cartographer Guide[edit]
Comparison with a 100% map[edit]
The most efficient way to know if you're missing several pieces for your title is to compare your map with the map of a player having already reached 100%.
Use of an image processing software[edit]
- See also: Player-made Modifications/Cartography Index for highly recommended community-made Cartography Made Easy texmod
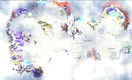
Example of using image processing software to highlight the gaps
One method of discovering unexplored locations is to take screenshots of your world map and compare it to one of the fully-explored maps on the wiki.
You can also download software that makes it easier to compare two images, e.g. Photoshop, Paint Shop Pro, or GIMP.
- Change your graphics options to maximum resolution and disable post-processing effects.
- Open up the world map (default shortcut "M") and take a screenshot (Shift+PrtScrn, to hide map markers) in either zoomed-in or zoomed-out mode.
- Open a 100% explored map with your image editing software, then insert your screenshot as a layer on top of the image.
- Set the layer to "difference" to emphasize differences between the two maps. All the explored areas will go dark, and unexplored areas (the differences) will become much brighter.
Remember to align and scale images as needed. You can also change the layer setting from "normal" to "difference" to "hidden" to determine if the bright areas are indeed unexplored areas, or if they are simply due to passing clouds.
Use of a texture-modifier software[edit]
ArenaNet does not support any third party tools, but many players use "Cartography Made Easy", a plug-in for TexMod that makes it easier to see which areas remain fogged. This drastically reduces the amount of time spent pursuing the title, since it makes it possible to uncover the map while vanquishing, during a mission, or while otherwise performing other in-game tasks. See Player-made Modifications for details.
Locations to explore[edit]
| Locations to explore in Tyria
|
- Underlines denote places that may be or become inaccessible (tutorial areas or low-level arenas).
Ascalon
- Towns and outposts: Ascalon City, Frontier Gate, Grendich Courthouse, Piken Square, Sardelac Sanitarium, Serenity Temple
- Arena / Mission Outposts: Fort Ranik, Nolani Academy, Ruins of Surmia, The Great Northern Wall, Ascalon Arena
- Arenas / Missions: Fort Ranik, Nolani Academy, Ruins of Surmia, The Great Northern Wall, Ascalon Arena
- Explorable areas: Ascalon Foothills, Diessa Lowlands, Dragon's Gullet, Eastern Frontier, Flame Temple Corridor, Old Ascalon, Pockmark Flats, Regent Valley, The Breach
Northern Shiverpeaks
- Towns and outposts: Beacon's Perch, Ice Tooth Cave, Yak's Bend
- Arena / Mission Outposts: Borlis Pass, The Frost Gate, Shiverpeak Arena
- Arenas / Missions: Borlis Pass, The Frost Gate, Shiverpeak Arena
- Explorable areas: Anvil Rock, Deldrimor Bowl, Griffon's Mouth, Iron Horse Mine, Traveler's Vale
Kryta
- Towns and outposts: Lion's Arch, Beetletun, Bergen Hot Springs, Fishermen's Haven, Temple of the Ages
- Mission Outposts: D'Alessio Seaboard, Divinity Coast, Gates of Kryta, Riverside Province, Sanctum Cay
- Missions: D'Alessio Seaboard, Divinity Coast, Gates of Kryta, Riverside Province, Sanctum Cay
- Explorable areas: Cursed Lands, D'Alessio Seaboard (after progressing in War in Kryta), Divinity Coast (after progressing in War in Kryta), Kessex Peak, Lion's Gate, Majesty's Rest, Nebo Terrace, North Kryta Province, Riverside Province (after progressing in War in Kryta), Scoundrel's Rise, Stingray Strand, Talmark Wilderness, Tears of the Fallen, The Black Curtain, Twin Serpent Lakes, Watchtower Coast
Maguuma Jungle
- Towns and outposts: Henge of Denravi, Druid's Overlook, Maguuma Stade, Quarrel Falls, Ventari's Refuge
- Mission Outposts: Aurora Glade, Bloodstone Fen, The Wilds
- Missions: Aurora Glade, Bloodstone Fen, The Wilds
- Explorable areas: Dry Top, Ettin's Back, Majesty's Rest, Mamnoon Lagoon, Reed Bog, Sage Lands, Silverwood, Tangle Root, The Falls
Crystal Desert
- Towns and outposts: The Amnoon Oasis, Augury Rock, Destiny's Gorge, Heroes' Audience, Seeker's Passage, Tomb of the Primeval Kings
- Mission Outposts: Augury Rock, Dunes of Despair, Elona Reach, Thirsty River
- Missions: Augury Rock, Dunes of Despair, Elona Reach, Thirsty River
- Explorable areas: Diviner's Ascent, Prophet's Path, Salt Flats, Skyward Reach, The Arid Sea, The Scar, Vulture Drifts
Southern Shiverpeaks
- Towns and outposts: Droknar's Forge, Camp Rankor, Copperhammer Mines, Deldrimor War Camp, Marhan's Grotto, Port Sledge, The Granite Citadel
- Mission Outposts: Ice Caves of Sorrow, Iron Mines of Moladune, Thunderhead Keep
- Missions: Ice Caves of Sorrow, Iron Mines of Moladune, Thunderhead Keep
- Explorable areas: Dreadnought's Drift, Droknar's Forge, Frozen Forest, Grenth's Footprint, Ice Floe, Icedome, Lornar's Pass, Mineral Springs, Snake Dance, Spearhead Peak, Talus Chute, Tasca's Demise, Witman's Folly
Ring of Fire Islands
|
| Locations to explore in Cantha
|
- Underlines denote places that become inaccessible (tutorial areas or low-level arenas).
Shing Jea Island
- Towns and outposts: Shing Jea Monastery (town), Ran Musu Gardens, Seitung Harbor, Tsumei Village
- Arena / Mission outposts: Minister Cho's Estate, Zen Daijun, Shing Jea Arena
- Arenas / Missions: Minister Cho's Estate, Zen Daijun, Shing Jea Arena
- Explorable areas: Haiju Lagoon, Jaya Bluffs, Kinya Province, Linnok Courtyard, Minister Cho's Estate, Monastery Overlook, Panjiang Peninsula, Saoshang Trail, Sunqua Vale, Zen Daijun
Kaineng City
- Towns and outposts: Kaineng Center (town), Maatu Keep, Senji's Corner, The Marketplace, Zin Ku Corridor
- Mission outposts: Imperial Sanctum, Nahpui Quarter, Raisu Palace, Sunjiang District, Tahnnakai Temple, Vizunah Square (Foreign Quarter), Vizunah Square (Local Quarter)
- Missions: Vizunah Square, Nahpui Quarter, Tahnnakai Temple, Sunjiang District, Imperial Sanctum, Raisu Palace
- Explorable areas: Bejunkan Pier, Bukdek Byway, Divine Path, Kaineng Docks, Nahpui Quarter (transformed at Winds of Change), Pongmei Valley, Raisu Palace, Raisu Pavilion, Shadow's Passage, Shenzun Tunnels, Sunjiang District, Tahnnakai Temple, Wajjun Bazaar, Xaquang Skyway
Echovald Forest
- Towns and outposts: House zu Heltzer (town), Aspenwood Gate (Kurzick), Brauer Academy, Durheim Archives, Jade Flats (Kurzick), Lutgardis Conservatory, Saint Anjeka's Shrine, Tanglewood Copse, Vasburg Armory
- Mission outposts: Altrumm Ruins, Amatz Basin, Arborstone, Fort Aspenwood (Kurzick), The Eternal Grove, The Jade Quarry (Kurzick), Unwaking Waters (Kurzick),
- Missions: Arborstone, The Eternal Grove, Altrumm Ruins (challenge), Amatz Basin (challenge), Fort Aspenwood (PvP),
- Explorable areas: Arborstone, Drazach Thicket, Ferndale, Melandru's Hope, Morostav Trail, Mourning Veil Falls, The Eternal Grove
The Jade Sea
- Towns and outposts: Cavalon (town), Aspenwood Gate (Luxon), Bai Paasu Reach, Breaker Hollow, Eredon Terrace, Harvest Temple, Jade Flats (Luxon), Leviathan Pits, Seafarer's Rest
- Mission outposts: Boreas Seabed, Fort Aspenwood (Luxon), Gyala Hatchery, The Aurios Mines, The Jade Quarry (Luxon), Unwaking Waters (Luxon), Zos Shivros Channel
- Missions: Boreas Seabed, Gyala Hatchery, Unwaking Waters, Zos Shivros Channel (challenge), The Aurios Mines (challenge), The Jade Quarry (PvP)
- Explorable areas: Archipelagos, Boreas Seabed, Maishang Hills, Mount Qinkai, Gyala Hatchery, Rhea's Crater, Silent Surf, Unwaking Waters
|
| Locations to explore in Elona
|
- Underlines denote places that become inaccessible (tutorial areas or low-level arenas).
Istan
- Towns and outposts: Kamadan, Jewel of Istan (town), Sunspear Great Hall, The Astralarium, Champion's Dawn, Beknur Harbor, Kodlonu Hamlet
- Arena / Mission outposts: Chahbek Village, Jokanur Diggings, Blacktide Den, Consulate Docks, Sunspear Arena
- Arenas / Missions: Chahbek Village, Jokanur Diggings, Blacktide Den, Consulate Docks, Sunspear Arena
- Explorable areas: Island of Shehkah, Sun Docks, Churrhir Fields, Plains of Jarin, Cliffs of Dohjok, Zehlon Reach; Fahranur, The First City; Lahtenda Bog, Issnur Isles, Mehtani Keys
Kourna
- Towns and outposts: Yohlon Haven, Camp Hojanu, Wehhan Terraces
- Mission outposts: Nundu Bay, Venta Cemetery, Dajkah Inlet, Pogahn Passage, Kodonur Crossroads, Rilohn Refuge
- Missions: Nundu Bay, Venta Cemetery, Pogahn Passage, Kodonur Crossroads, Rilohn Refuge
- Explorable areas: Arkjok Ward, Marga Coast, Sunward Marches, Jahai Bluffs, Turai's Procession, Dejarin Estate, Barbarous Shore, Gandara, the Moon Fortress, The Floodplain of Mahnkelon
Vabbi
- Towns and outposts: The Kodash Bazaar (town), Honur Hill, Chantry of Secrets, Yahnur Market, Mihanu Township
- Mission outposts: Tihark Orchard , Dzagonur Bastion, Grand Court of Sebelkeh, Jennur's Horde
- Missions: Tihark Orchard, Dzagonur Bastion, Grand Court of Sebelkeh, Jennur's Horde
- Explorable areas: The Mirror of Lyss, Forum Highlands, Vehjin Mines, Holdings of Chokhin, Wilderness of Bahdza, Resplendent Makuun, Yatendi Canyons, Vehtendi Valley, Garden of Seborhin
The Desolation
- Towns and outposts: Bone Palace, Lair of the Forgotten, The Mouth of Torment, Basalt Grotto
- Mission outposts: Gate of Desolation, Ruins of Morah, Remains of Sahlahja
- Missions: Gate of Desolation, Ruins of Morah, Remains of Sahlahja (challenge)
- Explorable areas: Joko's Domain, Crystal Overlook, The Sulfurous Wastes, The Shattered Ravines, The Alkali Pan, Poisoned Outcrops, The Ruptured Heart
|
Where to find "Leeway"[edit]
- GuildWiki has estimated the amount of leeway built-in to the titles as follows:
Normally inaccessible areas[edit]
- See also: Portal jump, SaO chain, Gate Glitch
Some places can be reached even though they were not designed to be visited or become inaccessible as the character progresses through the storyline. None of these areas are required for the title, but any fog exposed while exploring them will count towards its progression.
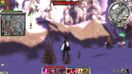
Beginning of the false cliff in Talus Chute.
- Talus Chute: along the eastern side edge of the zone (north of the Ice Caves of Sorrow), players can walk up the side of the mountain then traverse the ridge along the northeastern edge of the zone.
- The Great Northern Wall: after the timer starts, run into the Charr camp (north of the wall) to reach the edge of the map and during the way back to the wall explore a bit to the west. Because of the timer, running skills are advised but you may have to do the mission several times until you map everything.
- Sanctum Cay: Watching the end cutscene will uncover some fog, adding an additional 0,2% toward the title.
- Regent Valley: during April Fools' Day, two otherwise unreachable spots to the southeast and southwest can be exposed during Annihilator.
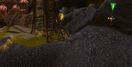
Eredon Terrace bonus area.
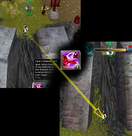
Where to stand: Linnok Courtyard bonus area.
- Eredon Terrace: the mountains northeast of the outpost can be explored by those belonging to the alliance that controls it. You can also reach this area via portal jumping. This bonus part of the map add up to 0.5% leeway to the title.
- Monastery Overlook: in Linnok Courtyard, use Viper's Defense while standing on the cliff edges on one side of the entry portal (you can use a flagged hero/henchman to set the jump direction) to shadow step down the cliff. You can then walk through the gates of the Shing Jea Monastery and explore the Monastery Overlook tutorial area. This contributes 0.5% to Canthan cartographer. This area can also be mapped during Anniversary Celebration, Canthan New Year, and the Dragon Festival, since these events open up the Shing Jea Boardwalk.
- Shing Jea Arena: during The Final Confrontation, there is an opportunity to map the area which is normally unavailable after passing level 10. This can add ~0.29% towards the title.
- Raisu Pavilion: Using a SaO chain allows for mob-free exploration of the entire Raisu Palace (explorable area) and a hidden area to the south of the Imperial Sanctum (outpost), contributing about 0.19% towards the title.
- Wajjun Bazaar: using a Portal jump from Kaineng Docks into The Marketplace will allow for mob-free exploration of the area and a tiny otherwise unexplorable part in the south section where The Undercity begins. This can add approximately 0.01% towards the title.
- Saint Anjeka's Shrine: the northwest section of the outpost can be explored from the exclusive area (belong to the alliance controlling the outpost). Alternatively, use a SaO chain to gain access to it. This can add approximately 0.02% towards the title.
- Morostav Trail and The Eternal Grove: use Strike as One with a pet to gain access to Vasburg Armory. Exiting Eternal Grove increases the uncoverable map when exiting Vasburg into Morostav Trail and running to where the shrine would have been normally. Exiting Morostav Trail removes the shrine in the north east corner of Vasburg, allowing one to run into the massive rock left of it, into a secret path behind it, uncovering the left side (no extra bits come with that one). This can add approximately 0.05% towards the title.
- Vizunah Square (Foreign Quarter): Watching the intro cutscene will uncover a part of the fog in the southeast of the area where the mission takes place. This can provide an additional 0,2% toward the title.
- Vizunah Square (Local Quarter): It is possible to enter the outpost if forming a team with a character with Mayhem in the Market active (only accessible to factions characters) and having completed Zen Daijun. The small part of fog that can only be uncovered from the outpost can also be mapped by SaO chain from Bukdek Byway to The Undercity.
- Churrhir Fields: using a gate glitch, you'll be able to explore the tutorial area, Island of Shehkah, adding up to 0.5% toward the title especially for non-Elonian characters.
- Dzagonur Bastion: ignore all the groups and run for the portal in the south, towards what would be Resplendent Makuun. You can run through the gate and reach the end of the world, adding up to 0.1–0.2% leeway towards the title. There are foes in the way and time is limited. This area can also be mapped using SaO chain.
- Marga Coast: the portal to Sunspear Sanctuary is bugged — it allows heroes to walk through it without bouncing (as they do elsewhere). Send a hero through the portal and Shadow step to them (Recall is ideal for this). If having trouble, use the U mini-map to flag the hero to the far side of the hill (left of the portal). You can reach the end of the world and add up to 0.1–0.2% leeway.
- Floodplain of Mahnkelon: use a SaO chain to gain access to Moddok Crevice outpost and the beginning of Bahdok Caverns. Exploring the outpost this way will count toward the title and can add up to 0.3%.
- Vehjin Mines: use a SaO chain to gain access to the tunnel leading to Jennur's Horde outpost. This can add up to 0.1% towards the title.
- Vehjin Mines <-> Holdings of Chokhin: use SaO chains to gain access to each entrance of the tunnel in between the two areas. These two chains can add up to 0.4% toward the title.
- Arkjok Ward: a SaO chain can get you behind the portal to Marga Coast, uncovering up to 0.1%.
- Cliffs of Dohjok: the area between CoD and Beknur Harbor can be reached by using 2 SaO chains (one for the West and another for the East side, can't be done in one run), uncovering another 0.1%.
- Kodonur Crossroads: watching the intro cutscene (exact conditions still unknown, might be random, moving using keyboard may also be required) will uncover a small 0.1% right above Camp Hojanu.
- Pogahn Passage: watching the end cutscene (as above). This will uncover 0.2% around the southeast of the mission.
- Pogahn Passage or Gandara, the Moon Fortress: using a gate glitch, one can explore behind the closed gate at the far west of the map and uncover another ~0.2%. If exploring during the Pogahn Passage mission, there will be no enemies to fight on the route to the gate.
Eye of the North[edit]
Note: any of the areas requiring a special quest can still be reached with SaO chains if the relevant quests are unavailable.
Mob-free exploration[edit]
Areas that can be explored without any foe[edit]
Areas that can be mapped with very few foes[edit]
- Gyala Hatchery: Most of the explorable area can be mapped during the mission if the player avoid triggering the turtles. However, two small areas to the east and west will still be closed unless using a gate glitch.
- Eternal Grove: Most of the explorable area can be mapped during the mission if going quickly enough or leaving at least one luxon (for example a ranger) of the last wave alive. However, some areas will not be reachable unless doing a gate glitch.
- Nahpui Quarter: The area accessible during the mission can be mapped from the explorable area. Rest of the map is filled with foes.
- Tahnakai Temple: Same as above
- Issnur Isles: during Assault on Beknur Harbor, ignoring the skale waves and running through the gate into the otherwise empty area. The portal to Kodlonu Hamlet causes the party to return to Beknur Harbor.
Exact area details[edit]
| Tyria - 9512987px (101.497%)
|
- Hide the tables to save your scrolling finger.
| Region |
Location |
Pixels |
%
|
| Ascalon |
Ascalon Arena |
5439.5 |
0.058%
|
| Ascalon |
Ascalon City |
13721 |
0.146%
|
| Ascalon |
Ascalon Foothills |
43515 |
0.464%
|
| Ascalon |
Diessa Lowlands |
175297 |
1.870%
|
| Ascalon |
Dragon's Gullet |
142012 |
1.515%
|
| Ascalon |
Eastern Frontier |
127427.5 |
1.360%
|
| Ascalon |
Flame Temple Corridor |
37753.5 |
0.403%
|
| Ascalon |
Fort Ranik (mission) |
76875.5 |
0.820%
|
| Ascalon |
Fort Ranik (outpost) |
9923 |
0.106%
|
| Ascalon |
Frontier Gate |
2067.5 |
0.022%
|
| Ascalon |
Grendich Courthouse |
4856.5 |
0.052%
|
| Ascalon |
Nolani Academy (mission) |
105387.5 |
1.124%
|
| Ascalon |
Nolani Academy (outpost) |
7515 |
0.080%
|
| Ascalon |
Old Ascalon |
163794.5 |
1.748%
|
| Ascalon |
Piken Square |
3549 |
0.038%
|
| Ascalon |
Pockmark Flats |
145110.5 |
1.548%
|
| Ascalon |
Regent Valley |
156312 |
1.668%
|
| Ascalon |
Ruins of Surmia (mission) |
118780.5 |
1.267%
|
| Ascalon |
Ruins of Surmia (outpost) |
1399.5 |
0.015%
|
| Ascalon |
Sardelac Sanitarium |
1953 |
0.021%
|
| Ascalon |
Serenity Temple |
7674 |
0.082%
|
| Ascalon |
The Breach |
108061.5 |
1.153%
|
| Ascalon |
The Great Northern Wall (mission) |
114201.5 |
1.218%
|
| Ascalon |
The Great Northern Wall (outpost) |
1601 |
0.017%
|
| Crystal Desert |
Augury Rock (mission) |
10430 |
0.111%
|
| Crystal Desert |
Augury Rock (outpost) |
3227.5 |
0.034%
|
| Crystal Desert |
Destiny's Gorge |
3381 |
0.036%
|
| Crystal Desert |
Diviner's Ascent |
134664 |
1.437%
|
| Crystal Desert |
Dunes of Despair (mission) |
130849.5 |
1.396%
|
| Crystal Desert |
Dunes of Despair (outpost) |
1318 |
0.014%
|
| Crystal Desert |
Elona Reach (mission) |
46996 |
0.501%
|
| Crystal Desert |
Elona Reach (outpost) |
1204.5 |
0.013%
|
| Crystal Desert |
Heroes' Audience |
8095.5 |
0.086%
|
| Crystal Desert |
Prophet's Path |
161103.5 |
1.719%
|
| Crystal Desert |
Salt Flats |
136366.5 |
1.455%
|
| Crystal Desert |
Seeker's Passage |
4436.5 |
0.047%
|
| Crystal Desert |
Skyward Reach |
124967.5 |
1.333%
|
| Crystal Desert |
The Amnoon Oasis |
25646.5 |
0.274%
|
| Crystal Desert |
The Arid Sea |
142464.5 |
1.520%
|
| Crystal Desert |
The Scar |
168934 |
1.802%
|
| Crystal Desert |
Thirsty River (mission) |
67396.5 |
0.719%
|
| Crystal Desert |
Thirsty River (outpost) |
7228.5 |
0.077%
|
| Crystal Desert |
Tomb of the Primeval Kings |
30558 |
0.326%
|
| Crystal Desert |
Vulture Drifts |
151785 |
1.619%
|
| Kryta |
Beetletun |
6551.5 |
0.070%
|
| Kryta |
Bergen Hot Springs |
6577.5 |
0.070%
|
| Kryta |
Cursed Lands |
34882.5 |
0.372%
|
| Kryta |
D'Alessio Seaboard (mission) |
137869 |
1.471%
|
| Kryta |
D'Alessio Seaboard (outpost) |
8594 |
0.092%
|
| Kryta |
Divinity Coast (mission) |
137030.5 |
1.462%
|
| Kryta |
Divinity Coast (outpost) |
6719 |
0.072%
|
| Kryta |
Fishermen's Haven |
2807.5 |
0.030%
|
| Kryta |
Gates of Kryta (mission) |
151099.5 |
1.612%
|
| Kryta |
Gates of Kryta (outpost) |
2948 |
0.031%
|
| Kryta |
Kessex Peak |
108018.5 |
1.152%
|
| Kryta |
Lion's Arch |
30169 |
0.322%
|
| Kryta |
Lion's Arch Keep |
6893.5 |
0.074%
|
| Kryta |
Lion's Gate |
4984 |
0.053%
|
| Kryta |
Majesty's Rest |
88796.5 |
0.947%
|
| Kryta |
Nebo Terrace |
109456.5 |
1.168%
|
| Kryta |
North Kryta Province |
159344.5 |
1.700%
|
| Kryta |
Riverside Province (mission) |
173536.5 |
1.852%
|
| Kryta |
Riverside Province (outpost) |
15854 |
0.169%
|
| Kryta |
Sanctum Cay (mission) |
135001.5 |
1.440%
|
| Kryta |
Sanctum Cay (outpost) |
4915 |
0.052%
|
| Kryta |
Scoundrel's Rise |
31787 |
0.339%
|
| Kryta |
Stingray Strand |
88117 |
0.940%
|
| Kryta |
Talmark Wilderness |
133723.5 |
1.427%
|
| Kryta |
Tears of the Fallen |
40259.5 |
0.430%
|
| Kryta |
Temple of the Ages |
3511 |
0.037%
|
| Kryta |
The Black Curtain |
150830 |
1.609%
|
| Kryta |
Twin Serpent Lakes |
92607.5 |
0.988%
|
| Kryta |
Watchtower Coast |
90668.5 |
0.967%
|
| Maguuma Jungle |
Aurora Glade (mission) |
100779.5 |
1.075%
|
| Maguuma Jungle |
Aurora Glade (outpost) |
21975.5 |
0.234%
|
| Maguuma Jungle |
Bloodstone Fen (mission) |
127126 |
1.356%
|
| Maguuma Jungle |
Bloodstone Fen (outpost) |
8682 |
0.093%
|
| Maguuma Jungle |
Druid's Overlook |
1444 |
0.015%
|
| Maguuma Jungle |
Dry Top |
43486 |
0.464%
|
| Maguuma Jungle |
Ettin's Back |
135112 |
1.442%
|
| Maguuma Jungle |
Henge of Denravi |
30387 |
0.324%
|
| Maguuma Jungle |
Maguuma Stade |
4732.5 |
0.050%
|
| Maguuma Jungle |
Mamnoon Lagoon |
41240.5 |
0.440%
|
| Maguuma Jungle |
Quarrel Falls |
1721 |
0.018%
|
| Maguuma Jungle |
Reed Bog |
53563 |
0.571%
|
| Maguuma Jungle |
Sage Lands |
167471 |
1.787%
|
| Maguuma Jungle |
Silverwood |
157386.5 |
1.679%
|
| Maguuma Jungle |
Tangle Root |
160200 |
1.709%
|
| Maguuma Jungle |
The Falls |
168903 |
1.802%
|
| Maguuma Jungle |
The Wilds (mission) |
151124.5 |
1.612%
|
| Maguuma Jungle |
The Wilds (outpost) |
10436 |
0.111%
|
| Maguuma Jungle |
Ventari's Refuge |
1408 |
0.015%
|
| Northern Shiverpeaks |
Anvil Rock |
166269 |
1.774%
|
| Northern Shiverpeaks |
Beacon's Perch |
3408 |
0.036%
|
| Northern Shiverpeaks |
Borlis Pass (mission) |
129698 |
1.384%
|
| Northern Shiverpeaks |
Borlis Pass (outpost) |
2265.5 |
0.024%
|
| Northern Shiverpeaks |
Deldrimor Bowl |
167557.5 |
1.788%
|
| Northern Shiverpeaks |
Griffon's Mouth |
45725 |
0.488%
|
| Northern Shiverpeaks |
Ice Tooth Cave |
1937 |
0.021%
|
| Northern Shiverpeaks |
Iron Horse Mine |
132292.5 |
1.411%
|
| Northern Shiverpeaks |
Shiverpeak Arena |
5184.5 |
0.055%
|
| Northern Shiverpeaks |
The Frost Gate (mission) |
145294 |
1.550%
|
| Northern Shiverpeaks |
The Frost Gate (outpost) |
2828.5 |
0.030%
|
| Northern Shiverpeaks |
Traveler's Vale |
77011.5 |
0.822%
|
| Northern Shiverpeaks |
Yak's Bend |
4022.5 |
0.043%
|
| Ring of Fire Islands |
Abaddon's Mouth (mission) |
117980 |
1.259%
|
| Ring of Fire Islands |
Abaddon's Mouth (outpost) |
6558.5 |
0.070%
|
| Ring of Fire Islands |
Ember Light Camp |
8929 |
0.095%
|
| Ring of Fire Islands |
Hell's Precipice (mission) |
99472.5 |
1.061%
|
| Ring of Fire Islands |
Hell's Precipice (outpost) |
11471 |
0.122%
|
| Ring of Fire Islands |
Perdition Rock |
109981 |
1.173%
|
| Ring of Fire Islands |
Ring of Fire (mission) |
102840 |
1.097%
|
| Ring of Fire Islands |
Ring of Fire (outpost) |
15890 |
0.170%
|
| Southern Shiverpeaks |
Camp Rankor |
2176.5 |
0.023%
|
| Southern Shiverpeaks |
Copperhammer Mines |
9409.5 |
0.100%
|
| Southern Shiverpeaks |
Deldrimor War Camp |
1366 |
0.015%
|
| Southern Shiverpeaks |
Dreadnought's Drift |
38670.5 |
0.413%
|
| Southern Shiverpeaks |
Droknar's Forge |
16032 |
0.171%
|
| Southern Shiverpeaks |
Droknar's Forge (explorable) |
9976 |
0.106%
|
| Southern Shiverpeaks |
Frozen Forest |
153586.5 |
1.639%
|
| Southern Shiverpeaks |
Grenth's Footprint |
99781 |
1.065%
|
| Southern Shiverpeaks |
Ice Caves of Sorrow (mission) |
105879.5 |
1.130%
|
| Southern Shiverpeaks |
Ice Caves of Sorrow (outpost) |
11833 |
0.126%
|
| Southern Shiverpeaks |
Ice Floe |
152919.5 |
1.632%
|
| Southern Shiverpeaks |
Icedome |
41485 |
0.443%
|
| Southern Shiverpeaks |
Iron Mines of Moladune (mission) |
174448 |
1.861%
|
| Southern Shiverpeaks |
Iron Mines of Moladune (outpost) |
3616 |
0.039%
|
| Southern Shiverpeaks |
Lornar's Pass |
169611.5 |
1.810%
|
| Southern Shiverpeaks |
Marhan's Grotto |
3920 |
0.042%
|
| Southern Shiverpeaks |
Mineral Springs |
146635.5 |
1.565%
|
| Southern Shiverpeaks |
Port Sledge |
7999.5 |
0.085%
|
| Southern Shiverpeaks |
Snake Dance |
186095.5 |
1.986%
|
| Southern Shiverpeaks |
Spearhead Peak |
110378.5 |
1.178%
|
| Southern Shiverpeaks |
Talus Chute |
187892 |
2.005%
|
| Southern Shiverpeaks |
Tasca's Demise |
45948.5 |
0.490%
|
| Southern Shiverpeaks |
The Granite Citadel |
5939.5 |
0.063%
|
| Southern Shiverpeaks |
Thunderhead Keep (mission) |
102711 |
1.096%
|
| Southern Shiverpeaks |
Thunderhead Keep (outpost) |
9662 |
0.103%
|
| Southern Shiverpeaks |
Witman's Folly |
72388 |
0.772%
|
| Tyria |
100% |
9372653 |
100.000%
|
| Tyria |
Complete |
9512987 |
101.497%
|
Largest area: Talus Chute, 2.005%
Smallest outpost: Elona Reach, 0.013%
Average size of explorable areas: 1.193%
Average size of outposts: 0.084%
|
| Eye of the North - 2931937px (100.000%)
|
- Hide the tables to save your scrolling finger.
| Region |
Location |
Pixels |
%
|
| Charr Homelands |
Dalada Uplands |
182424 |
6.222%
|
| Charr Homelands |
Doomlore Shrine |
12575.5 |
0.429%
|
| Charr Homelands |
Grothmar Wardowns |
181443 |
6.189%
|
| Charr Homelands |
Sacnoth Valley |
181495.5 |
6.190%
|
| Far Shiverpeaks |
Bjora Marches |
198983 |
6.787%
|
| Far Shiverpeaks |
Boreal Station |
12443.5 |
0.424%
|
| Far Shiverpeaks |
Drakkar Lake |
201900 |
6.886%
|
| Far Shiverpeaks |
Eye of the North |
2078 |
0.071%
|
| Far Shiverpeaks |
Gunnar's Hold |
19143 |
0.653%
|
| Far Shiverpeaks |
Hall of Monuments |
3377 |
0.115%
|
| Far Shiverpeaks |
Ice Cliff Chasms |
137331.5 |
4.684%
|
| Far Shiverpeaks |
Jaga Moraine |
201612.5 |
6.876%
|
| Far Shiverpeaks |
Longeye's Ledge |
11923 |
0.407%
|
| Far Shiverpeaks |
Norrhart Domains |
191410 |
6.528%
|
| Far Shiverpeaks |
Olafstead |
2618 |
0.089%
|
| Far Shiverpeaks |
Sifhalla |
12757 |
0.435%
|
| Far Shiverpeaks |
Varajar Fells |
192480.5 |
6.565%
|
| Tarnished Coast |
Alcazia Tangle |
187534.5 |
6.396%
|
| Tarnished Coast |
Arbor Bay |
188281.5 |
6.422%
|
| Tarnished Coast |
Gadd's Encampment |
9277 |
0.316%
|
| Tarnished Coast |
Magus Stones |
184012 |
6.276%
|
| Tarnished Coast |
Rata Sum |
14546.5 |
0.496%
|
| Tarnished Coast |
Riven Earth |
178599 |
6.092%
|
| Tarnished Coast |
Sparkfly Swamp |
190723 |
6.505%
|
| Tarnished Coast |
Tarnished Haven |
15014.5 |
0.512%
|
| Tarnished Coast |
Umbral Grotto |
11715.5 |
0.400%
|
| Tarnished Coast |
Verdant Cascades |
191184.5 |
6.521%
|
| Tarnished Coast |
Vlox's Falls |
15174 |
0.518%
|
| EotN |
Total |
2931937 |
100.000%
|
Largest area: Drakkar Lake, 6.884%
Smallest area: Eye of the North, 0.071%
Average size of explorable areas: 6.343% (excluding Hall of Monuments)
Average size of outposts: 0.394%
|
| Elona - 5698959px (100.775%)
|
- Hide the tables to save your scrolling finger.
| Region |
Location |
Pixels |
%
|
| Istan |
Beknur Harbor |
13580.5 |
0.240%
|
| Istan |
Blacktide Den (outpost) |
14170.5 |
0.251%
|
| Istan |
Chahbek Village (outpost) |
2561 |
0.045%
|
| Istan |
Champion's Dawn |
8505 |
0.150%
|
| Istan |
Churrhir Fields |
36623.5 |
0.648%
|
| Istan |
Cliffs of Dohjok |
148010.5 |
2.617%
|
| Istan |
Consulate |
396.5 |
0.007%
|
| Istan |
Consulate Docks (outpost) |
1897 |
0.034%
|
| Istan |
Fahranur, the First City |
157532.5 |
2.786%
|
| Istan |
Island of Shehkah |
33011 |
0.584%
|
| Istan |
Issnur Isles |
148144.5 |
2.620%
|
| Istan |
Jokanur Diggings (outpost) |
9852 |
0.174%
|
| Istan |
Kamadan, Jewel of Istan |
11669 |
0.206%
|
| Istan |
Kodlonu Hamlet |
14103 |
0.249%
|
| Istan |
Lahtenda Bog |
147890.5 |
2.615%
|
| Istan |
Mehtani Keys |
135948 |
2.404%
|
| Istan |
Plains of Jarin |
139246 |
2.462%
|
| Istan |
Sun Docks |
2036.5 |
0.036%
|
| Istan |
Sunspear Arena |
7570.5 |
0.134%
|
| Istan |
Sunspear Great Hall |
1961 |
0.035%
|
| Istan |
The Astralarium |
9799 |
0.173%
|
| Istan |
Zehlon Reach |
184764 |
3.267%
|
| Kourna |
Arkjok Ward |
176040.5 |
3.113%
|
| Kourna |
Barbarous Shore |
146845.5 |
2.597%
|
| Kourna |
Camp Hojanu |
7552 |
0.134%
|
| Kourna |
Dajkah Inlet (outpost) |
15570.5 |
0.275%
|
| Kourna |
Dejarin Estate |
177675 |
3.142%
|
| Kourna |
Gandara, the Moon Fortress |
164244.5 |
2.904%
|
| Kourna |
Jahai Bluffs |
180831 |
3.198%
|
| Kourna |
Kodonur Crossroads (outpost) |
13252.5 |
0.234%
|
| Kourna |
Marga Coast |
166271.5 |
2.940%
|
| Kourna |
Nundu Bay (outpost) |
13925.5 |
0.246%
|
| Kourna |
Pogahn Passage (outpost) |
10757 |
0.190%
|
| Kourna |
Rilohn Refuge (outpost) |
6528 |
0.115%
|
| Kourna |
Sunward Marches |
179883.5 |
3.181%
|
| Kourna |
The Floodplain of Mahnkelon |
156099.5 |
2.760%
|
| Kourna |
Turai's Procession |
196929.5 |
3.482%
|
| Kourna |
Venta Cemetery (outpost) |
2921.5 |
0.052%
|
| Kourna |
Yohlon Haven |
18939 |
0.335%
|
| The Desolation |
Bone Palace |
2358.5 |
0.042%
|
| The Desolation |
Crystal Overlook |
159998 |
2.829%
|
| The Desolation |
Dynastic Tombs |
105702 |
1.869%
|
| The Desolation |
Gate of Desolation (outpost) |
18866 |
0.334%
|
| The Desolation |
Joko's Domain |
162273.5 |
2.869%
|
| The Desolation |
Lair of the Forgotten |
10988 |
0.194%
|
| The Desolation |
Poisoned Outcrops |
128853 |
2.279%
|
| The Desolation |
Remains of Sahlahja (outpost) |
12415 |
0.220%
|
| The Desolation |
Ruins of Morah (outpost) |
6396 |
0.113%
|
| The Desolation |
The Alkali Pan |
170670.5 |
3.018%
|
| The Desolation |
The Mouth of Torment |
4061 |
0.072%
|
| The Desolation |
The Ruptured Heart |
157167 |
2.779%
|
| The Desolation |
The Shattered Ravines |
152799.5 |
2.702%
|
| The Desolation |
The Sulfurous Wastes |
180836 |
3.198%
|
| Vabbi |
Basalt Grotto |
12233 |
0.216%
|
| Vabbi |
Bokka Amphitheatre |
1832.5 |
0.032%
|
| Vabbi |
Chantry of Secrets |
18998 |
0.336%
|
| Vabbi |
Dzagonur Bastion (outpost) |
10945.5 |
0.194%
|
| Vabbi |
Forum Highlands |
172455.5 |
3.050%
|
| Vabbi |
Garden of Seborhin |
178497 |
3.156%
|
| Vabbi |
Grand Court of Sebelkeh (outpost) |
463 |
0.008%
|
| Vabbi |
Holdings of Chokhin |
151508 |
2.679%
|
| Vabbi |
Honur Hill |
6462.5 |
0.114%
|
| Vabbi |
Jennur's Horde (outpost) |
16560 |
0.293%
|
| Vabbi |
Mihanu Township |
12927.5 |
0.229%
|
| Vabbi |
Resplendent Makuun |
168437.5 |
2.978%
|
| Vabbi |
The Kodash Bazaar |
14563.5 |
0.258%
|
| Vabbi |
The Mirror of Lyss |
179958 |
3.182%
|
| Vabbi |
Tihark Orchard (outpost) |
885 |
0.016%
|
| Vabbi |
Vehjin Mines |
131006 |
2.317%
|
| Vabbi |
Vehtendi Valley |
154925.5 |
2.740%
|
| Vabbi |
Wehhan Terraces |
16019 |
0.283%
|
| Vabbi |
Wilderness of Bahdza |
167088.5 |
2.955%
|
| Vabbi |
Yahnur Market |
13178.5 |
0.233%
|
| Vabbi |
Yatendi Canyons |
133092.5 |
2.353%
|
| Elona |
100% |
5655127 |
100.000%
|
| Elona |
Total |
5698959 |
100.775%
|
Largest area: Turai's Procession, 3.482%
Smallest area: Consulate, 0.007%
Average size of explorable areas: 2.483%
Average size of outposts: 0.179%
|
| Cantha - 4212653px (101.058%)
|
- Hide the tables to save your scrolling finger.
| Region |
Location |
Pixels |
%
|
| Echovald Forest |
Altrumm Ruins (mission) |
18023 |
0.432%
|
| Echovald Forest |
Altrumm Ruins (outpost) |
1649 |
0.040%
|
| Echovald Forest |
Amatz Basin (mission) |
17829 |
0.428%
|
| Echovald Forest |
Amatz Basin (outpost) |
8209.5 |
0.197%
|
| Echovald Forest |
Arborstone (explorable) |
146030 |
3.503%
|
| Echovald Forest |
Arborstone (outpost) |
1103.5 |
0.026%
|
| Echovald Forest |
Aspenwood Gate (Kurzick) |
6388.5 |
0.153%
|
| Echovald Forest |
Brauer Academy |
3564.5 |
0.086%
|
| Echovald Forest |
Drazach Thicket |
100707.5 |
2.416%
|
| Echovald Forest |
Durheim Archives |
4637 |
0.111%
|
| Echovald Forest |
Ferndale |
143810 |
3.450%
|
| Echovald Forest |
Fort Aspenwood (Kurzick) |
6477 |
0.155%
|
| Echovald Forest |
Fort Aspenwood (mission) |
39684 |
0.952%
|
| Echovald Forest |
House zu Heltzer |
9551 |
0.229%
|
| Echovald Forest |
Jade Flats (Kurzick) |
9046.5 |
0.217%
|
| Echovald Forest |
Lutgardis Conservatory |
4231 |
0.101%
|
| Echovald Forest |
Melandru's Hope |
135375 |
3.248%
|
| Echovald Forest |
Morostav Trail |
108995.5 |
2.615%
|
| Echovald Forest |
Mourning Veil Falls |
118187 |
2.835%
|
| Echovald Forest |
Saint Anjeka's Shrine |
4600 |
0.110%
|
| Echovald Forest |
Tanglewood Copse |
3610.5 |
0.087%
|
| Echovald Forest |
The Eternal Grove (explorable) |
94055 |
2.256%
|
| Echovald Forest |
The Eternal Grove (outpost) |
5330.5 |
0.128%
|
| Echovald Forest |
The Jade Quarry (Kurzick) |
2751.5 |
0.066%
|
| Echovald Forest |
Unwaking Waters (Kurzick) |
10292 |
0.247%
|
| Echovald Forest |
Vasburg Armory |
14657 |
0.352%
|
| Kaineng City |
Bejunkan Pier |
12240.5 |
0.294%
|
| Kaineng City |
Bukdek Byway |
111487 |
2.674%
|
| Kaineng City |
Imperial Sanctum (mission) |
30665.5 |
0.736%
|
| Kaineng City |
Imperial Sanctum (outpost) |
3745.5 |
0.090%
|
| Kaineng City |
Kaineng Center |
24095.5 |
0.578%
|
| Kaineng City |
Kaineng Docks |
7941 |
0.190%
|
| Kaineng City |
Maatu Keep |
4345.5 |
0.104%
|
| Kaineng City |
Nahpui Quarter (explorable) |
114936.5 |
2.757%
|
| Kaineng City |
Nahpui Quarter (outpost) |
13666 |
0.328%
|
| Kaineng City |
Pongmei Valley |
107416 |
2.577%
|
| Kaineng City |
Raisu Palace (explorable) |
116415 |
2.793%
|
| Kaineng City |
Raisu Palace (outpost) |
2064 |
0.050%
|
| Kaineng City |
Raisu Pavilion |
1592 |
0.038%
|
| Kaineng City |
Senji's Corner |
5218.5 |
0.125%
|
| Kaineng City |
Shadow's Passage |
20885 |
0.501%
|
| Kaineng City |
Shenzun Tunnels |
138111.5 |
3.313%
|
| Kaineng City |
Sunjiang District (explorable) |
85239 |
2.045%
|
| Kaineng City |
Sunjiang District (outpost) |
6493 |
0.156%
|
| Kaineng City |
Tahnnakai Temple (explorable) |
90283 |
2.166%
|
| Kaineng City |
Tahnnakai Temple (outpost) |
9585.5 |
0.230%
|
| Kaineng City |
The Marketplace |
5959.5 |
0.143%
|
| Kaineng City |
Vizunah Square (Foreign Quarter) |
8091.5 |
0.194%
|
| Kaineng City |
Vizunah Square (Local Quarter) |
11286.5 |
0.271%
|
| Kaineng City |
Vizunah Square (mission) |
75114 |
1.802%
|
| Kaineng City |
Wajjun Bazaar |
128637.5 |
3.086%
|
| Kaineng City |
Xaquang Skyway |
93081.5 |
2.233%
|
| Kaineng City |
Zin Ku Corridor |
14287 |
0.343%
|
| Shing Jea Island |
Haiju Lagoon |
131941 |
3.165%
|
| Shing Jea Island |
Jaya Bluffs |
87319 |
2.095%
|
| Shing Jea Island |
Kinya Province |
123378.5 |
2.960%
|
| Shing Jea Island |
Linnok Courtyard |
2120.5 |
0.051%
|
| Shing Jea Island |
Minister Cho's Estate (explorable) |
106162.5 |
2.547%
|
| Shing Jea Island |
Minister Cho's Estate (outpost) |
1786 |
0.043%
|
| Shing Jea Island |
Monastery Overlook |
26729 |
0.641%
|
| Shing Jea Island |
Panjiang Peninsula |
149294 |
3.581%
|
| Shing Jea Island |
Ran Musu Gardens |
2555 |
0.061%
|
| Shing Jea Island |
Saoshang Trail |
12098 |
0.290%
|
| Shing Jea Island |
Seitung Harbor |
14441.5 |
0.346%
|
| Shing Jea Island |
Shing Jea Arena |
11956 |
0.287%
|
| Shing Jea Island |
Shing Jea Monastery |
17732 |
0.425%
|
| Shing Jea Island |
Sunqua Vale |
130430 |
3.129%
|
| Shing Jea Island |
Tsumei Village |
6065 |
0.145%
|
| Shing Jea Island |
Zen Daijun (explorable) |
114602.5 |
2.749%
|
| Shing Jea Island |
Zen Daijun (outpost) |
2084.5 |
0.050%
|
| The Jade Sea |
Archipelagos |
95862 |
2.300%
|
| The Jade Sea |
Aspenwood Gate (Luxon) |
4424 |
0.106%
|
| The Jade Sea |
Bai Paasu Reach |
4690 |
0.113%
|
| The Jade Sea |
Boreas Seabed (explorable) |
110978.5 |
2.662%
|
| The Jade Sea |
Boreas Seabed (outpost) |
13964 |
0.335%
|
| The Jade Sea |
Breaker Hollow |
2446.5 |
0.059%
|
| The Jade Sea |
Cavalon |
10932.5 |
0.262%
|
| The Jade Sea |
Eredon Terrace |
6988 |
0.168%
|
| The Jade Sea |
Fort Aspenwood (Luxon) |
3149 |
0.076%
|
| The Jade Sea |
Gyala Hatchery (explorable) |
133929.5 |
3.213%
|
| The Jade Sea |
Gyala Hatchery (outpost) |
5765.5 |
0.138%
|
| The Jade Sea |
Harvest Temple |
677.5 |
0.016%
|
| The Jade Sea |
Jade Flats (Luxon) |
3456 |
0.083%
|
| The Jade Sea |
Leviathan Pits |
4915.5 |
0.118%
|
| The Jade Sea |
Maishang Hills |
120002.5 |
2.879%
|
| The Jade Sea |
Mount Qinkai |
91468 |
2.194%
|
| The Jade Sea |
Rhea's Crater |
111067.5 |
2.664%
|
| The Jade Sea |
Seafarer's Rest |
4945.5 |
0.119%
|
| The Jade Sea |
Silent Surf |
110786.5 |
2.658%
|
| The Jade Sea |
The Aurios Mines (mission) |
40711.5 |
0.977%
|
| The Jade Sea |
The Aurios Mines (outpost) |
4865.5 |
0.117%
|
| The Jade Sea |
The Jade Quarry (Luxon) |
4457 |
0.107%
|
| The Jade Sea |
The Jade Quarry (mission) |
34020.5 |
0.816%
|
| The Jade Sea |
Unwaking Waters (explorable) |
56141.5 |
1.347%
|
| The Jade Sea |
Unwaking Waters (Luxon) |
5821 |
0.140%
|
| The Jade Sea |
Zos Shivros Channel (mission) |
22329 |
0.536%
|
| The Jade Sea |
Zos Shivros Channel (outpost) |
1485.5 |
0.036%
|
| Cantha |
100% |
4168562 |
100.000%
|
| Cantha |
Total |
4212653 |
101.058%
|
Largest area: Pangjiang Peninsula, 3.581%
Smallest area: Harvest Temple, 0.016%
Average size of explorable areas: 2.017%
Average size of outposts: 0.162%
|
External links[edit]


